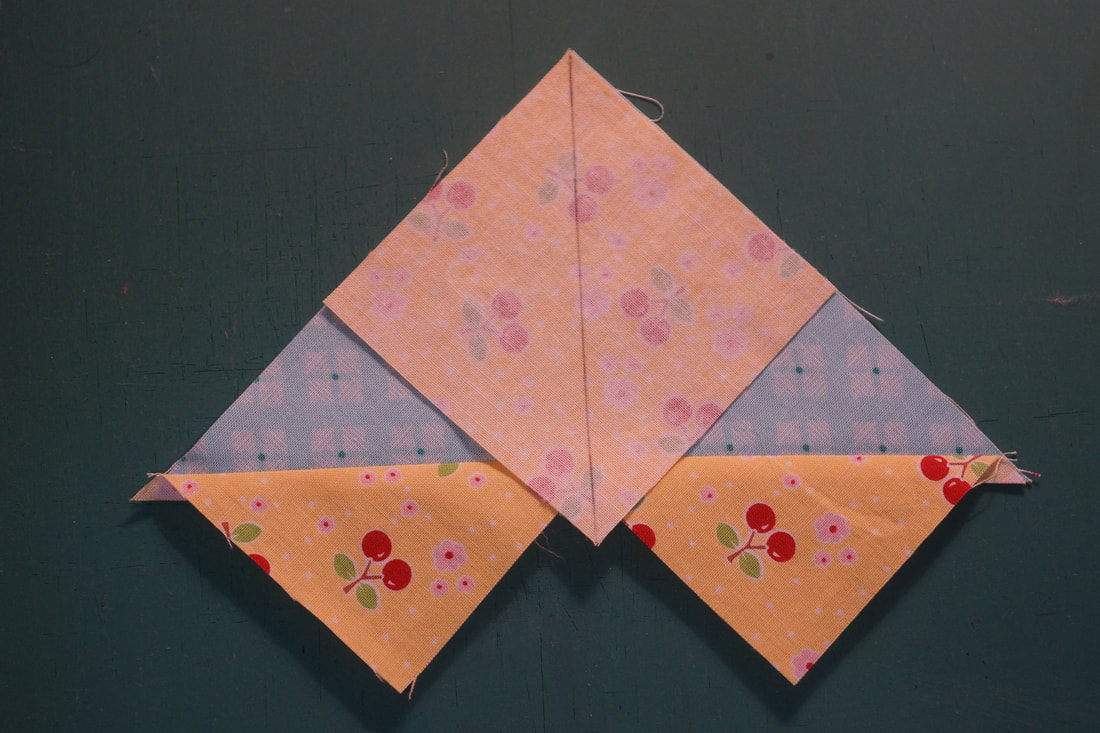
Block 2-Raspberry Cheesecake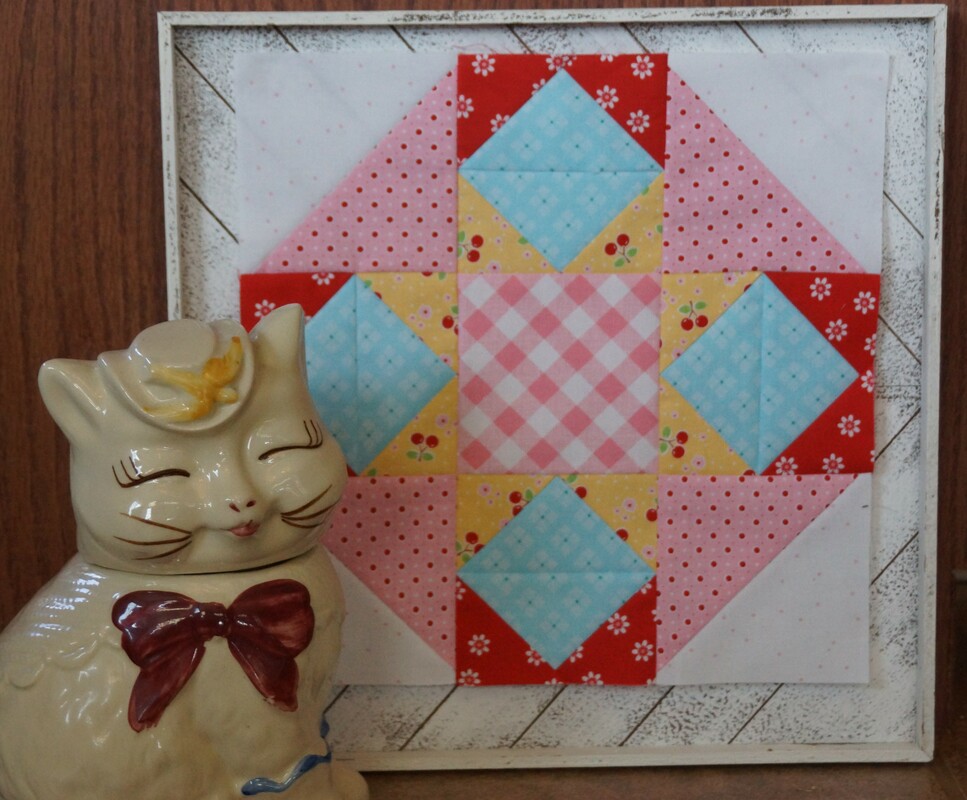 This month's block goes together pretty quickly with some easy piecing techniques. I love the No-waste method for making Flying Geese, though the name is a misnomer as I do end up with some waste since I tend to make my pieces oversize and then trim them. The true wonder of this technique is that you get four Flying Geese out of it so it really saves time. To begin, I lay two of the smaller squares on the large one and draw a diagonal line down the middle. Whenever I need to mark lines on my fabric I place it on a clipboard that has a piece of very fine sandpaper attached to it; this keeps the fabric from slipping as I mark it. 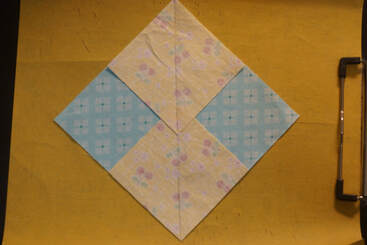 With my fabric marked, I sew 1/4 inch from each side of my drawn line. I like to use a stitch length of 2.4, just slightly shorter than my machine's normal setting. As I sew these I keep the top square pointed away from my needle, by doing so the fabric does not bunch up as I sew it. 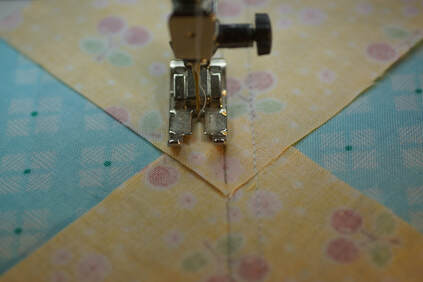 Once sewn, I cut apart on the drawn line and press towards the smaller triangles. I always press with a dry iron, I have found that my iron lasts longer if I just don't put any water in it. Remember that you want to press your pieces, not iron them. When you iron you move the iron back and forth over the item, when you press you set the iron in place, lifting and setting it so that you do not distort your seams with a back and forth motion.
Now I place the remaining small squares on top as shown and have drawn my diagonal line down the middle. Once again I sew 1/4 inch from each side of the drawn line.
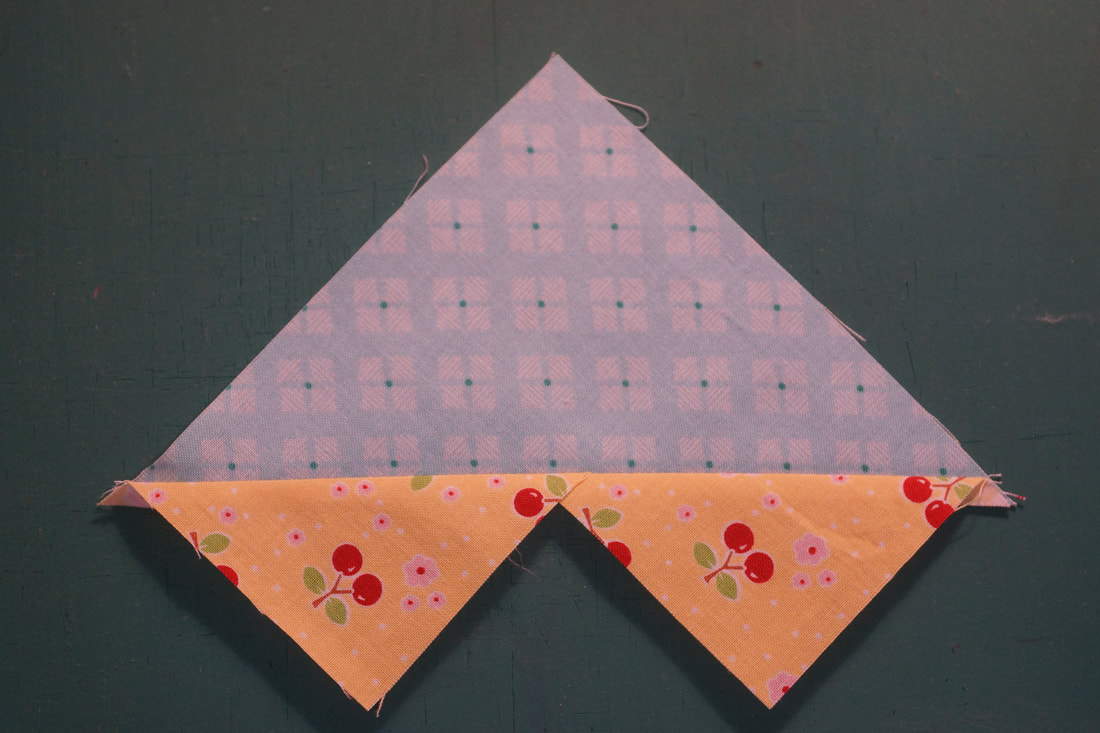
I cut these apart on the drawn line and press towards the small triangles. And just like that I have four Flying Geese. 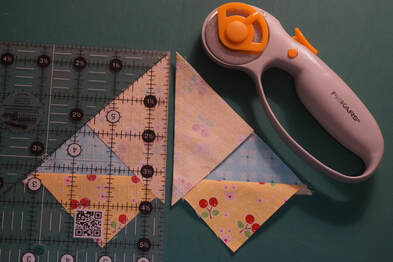 I really, really like Bloc Loc rulers for trimming Flying Geese. The notches in the ruler "lock" into place on the seam and I get a perfectly measured and square unit after trimming. 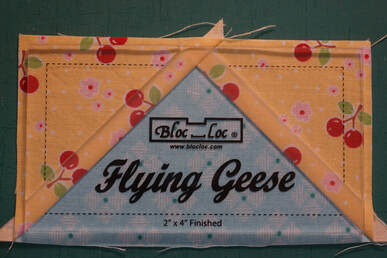 The draw back to these rulers is the cost, as you have to get the specific size ruler for the size you want to use in your quilt. I do tend to use the same sizes over and over so I get a lot of use out of them. Another nice alternative is the Ultimate Flying Geese Ruler by Creative Grids. I have this ruler also and have found it to work quite well. With it's multiple sizes it is a good investment. Creative Grid rulers have a surface on the back that helps to keep the rulers from slipping as much which I love. You do have to watch carefully to make sure you line everything up correctly with this one, but the results are very good. 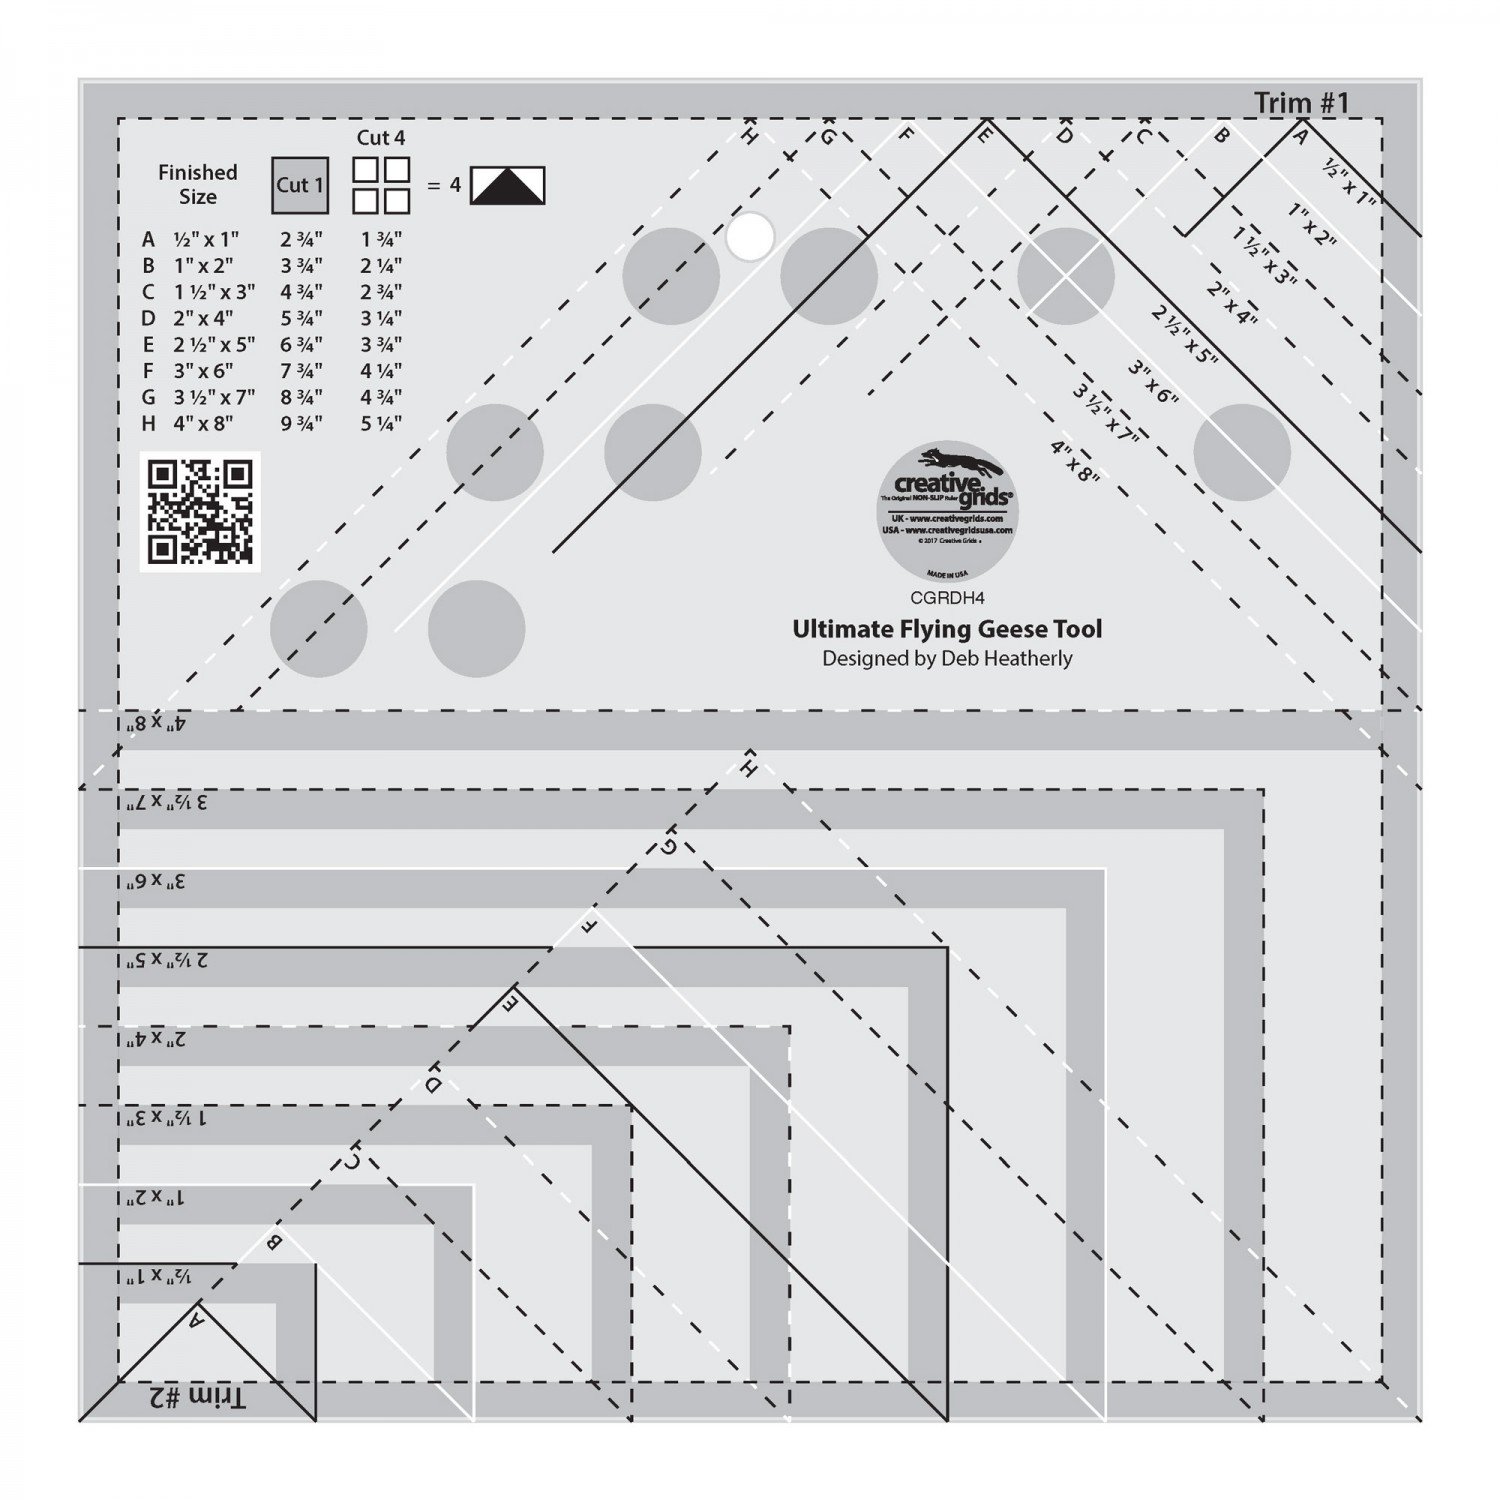 I do give instructions for how to cut these with a regular ruler as well. Again, my preferred ruler for this method is also made by Creative Grids. One of their small square rulers works well. I made a tutorial for this process to go along with mhy We Can Build A Snowman BOM and that video may be helpful to you as well.
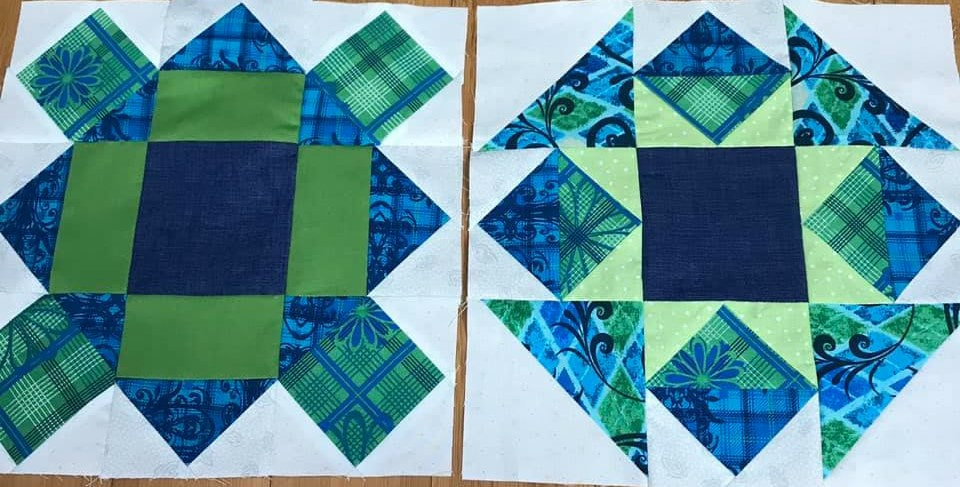
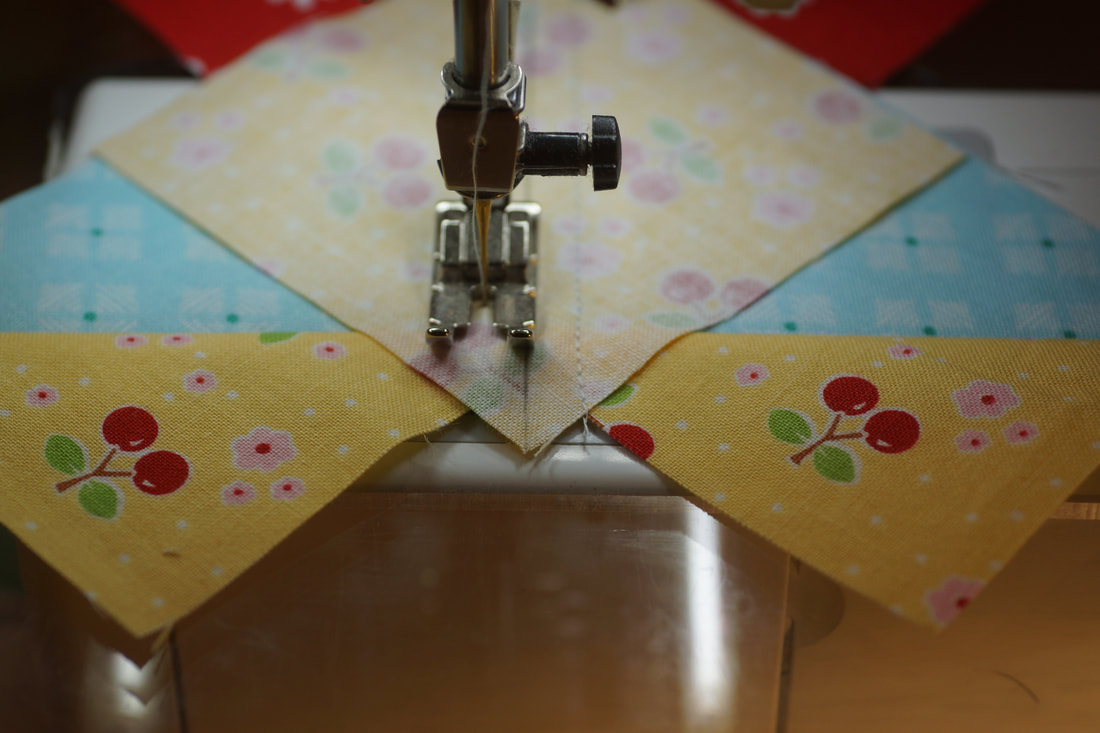
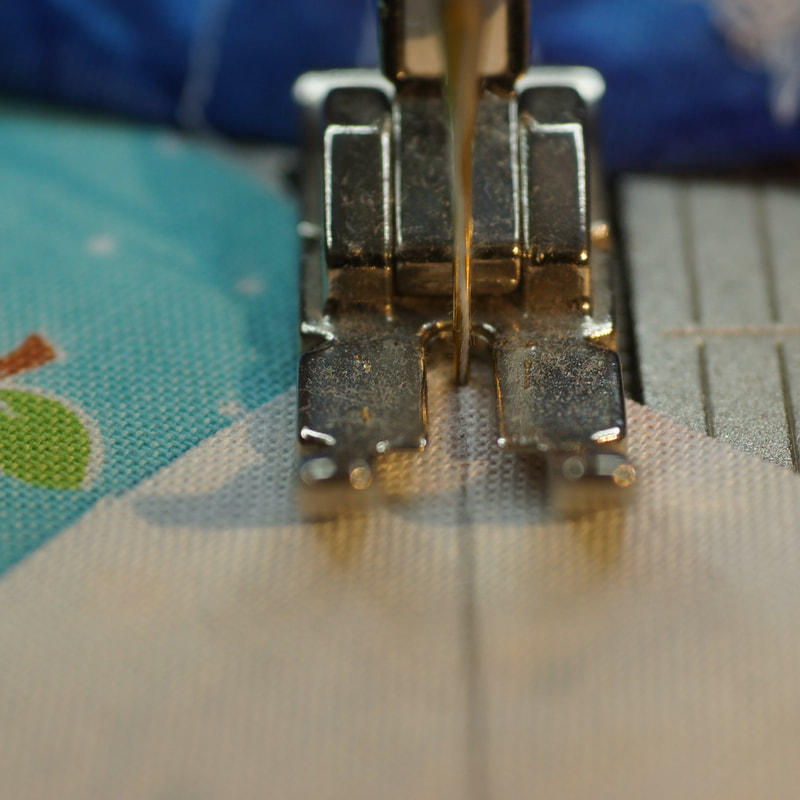
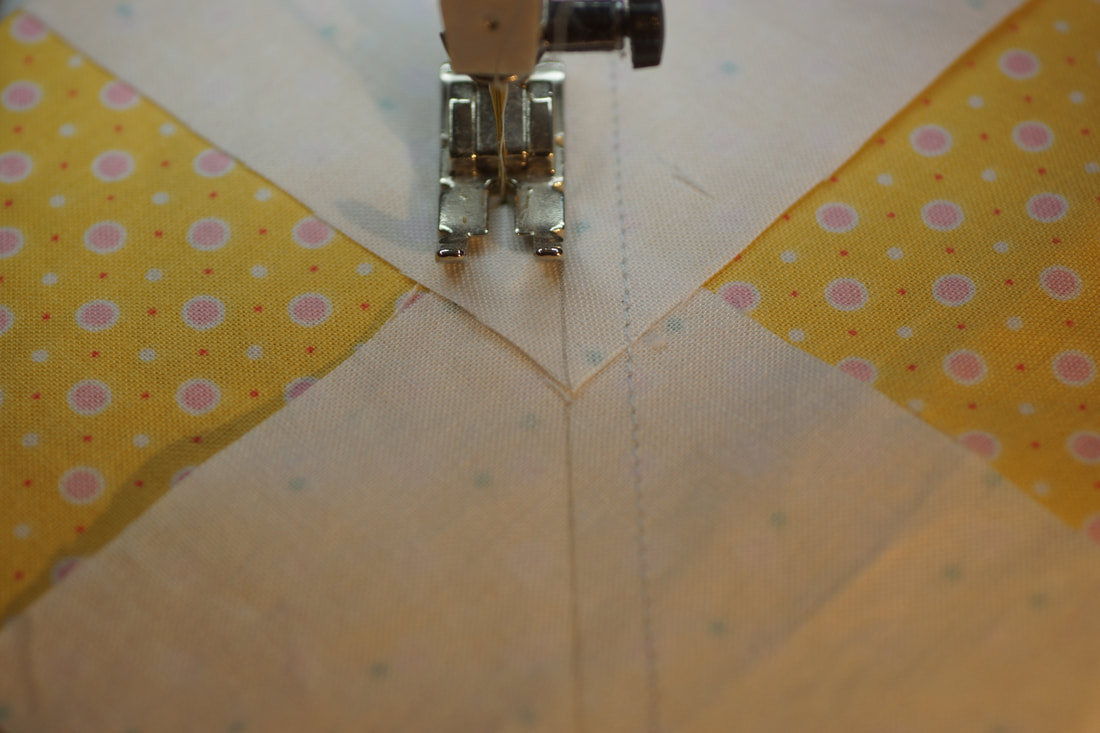
Now that we have all of the Flying Geese made and trimmed it is time to join them together. 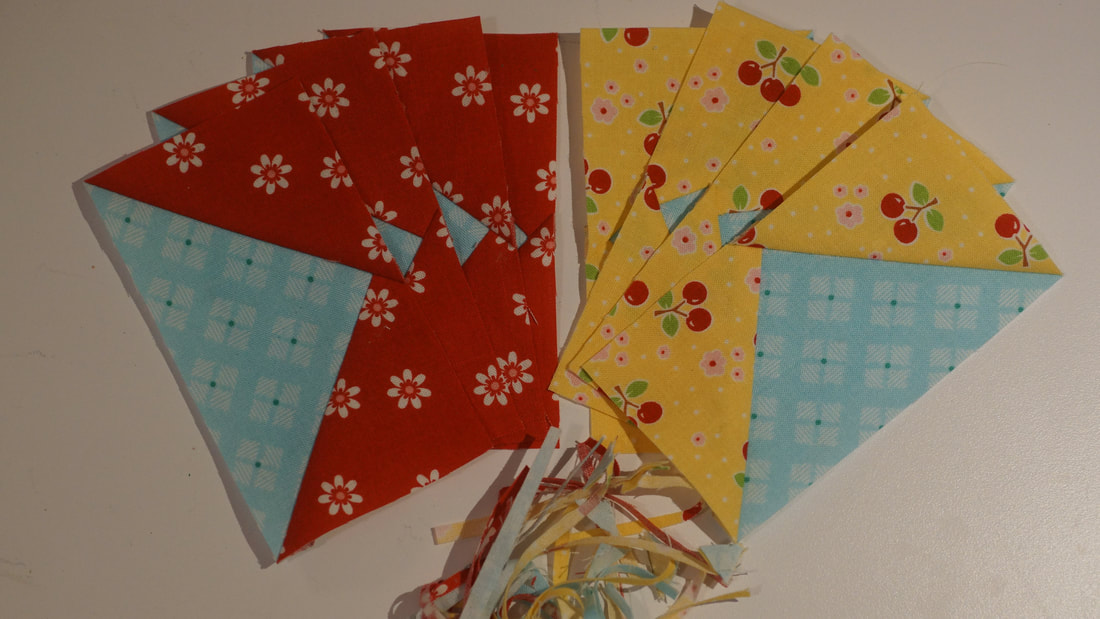 I have discovered that putting a small dab of glue along the edge I need to join helps to hold these in place. I use a washable glue pen for this and just put a couple of spots of glue along the edge, especially at the corners where my diagonal seams will meet. 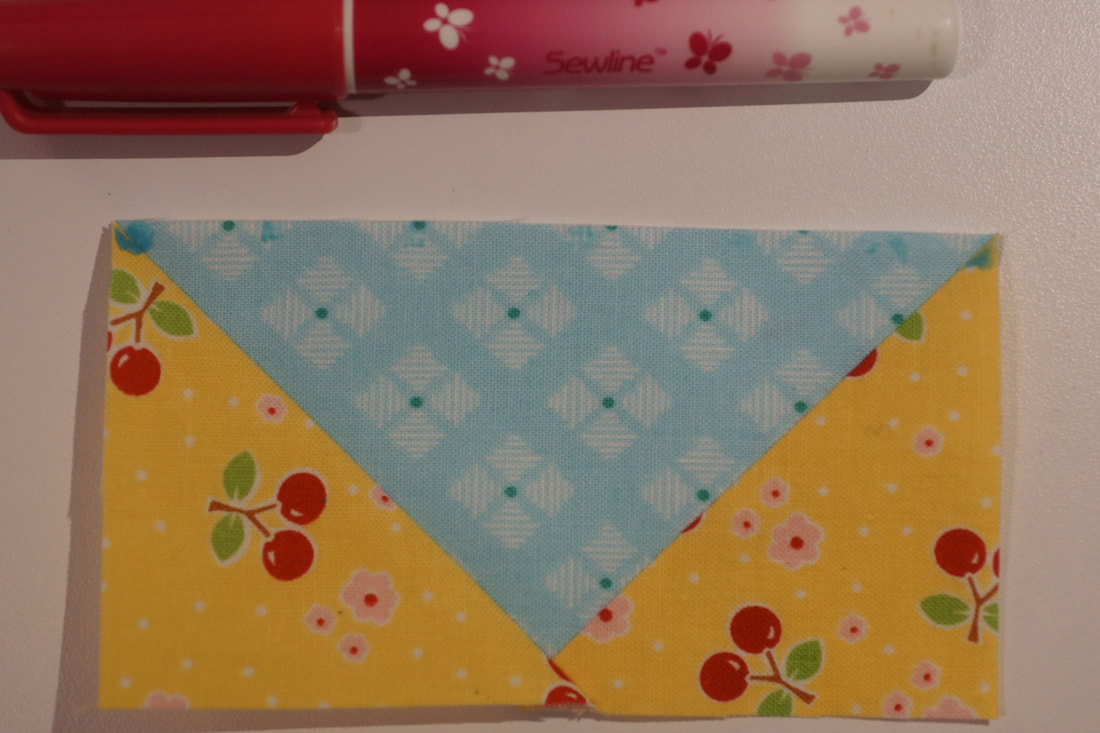 I did add a pin to one side as I noticed that seam was going to be facing away from the needle as I sewed and a pin will also help to keep it from shifting. Notice that for this I have pinned differntly than my usual method. This is completely optional; I just like the added security to keep those seams lined up properly. 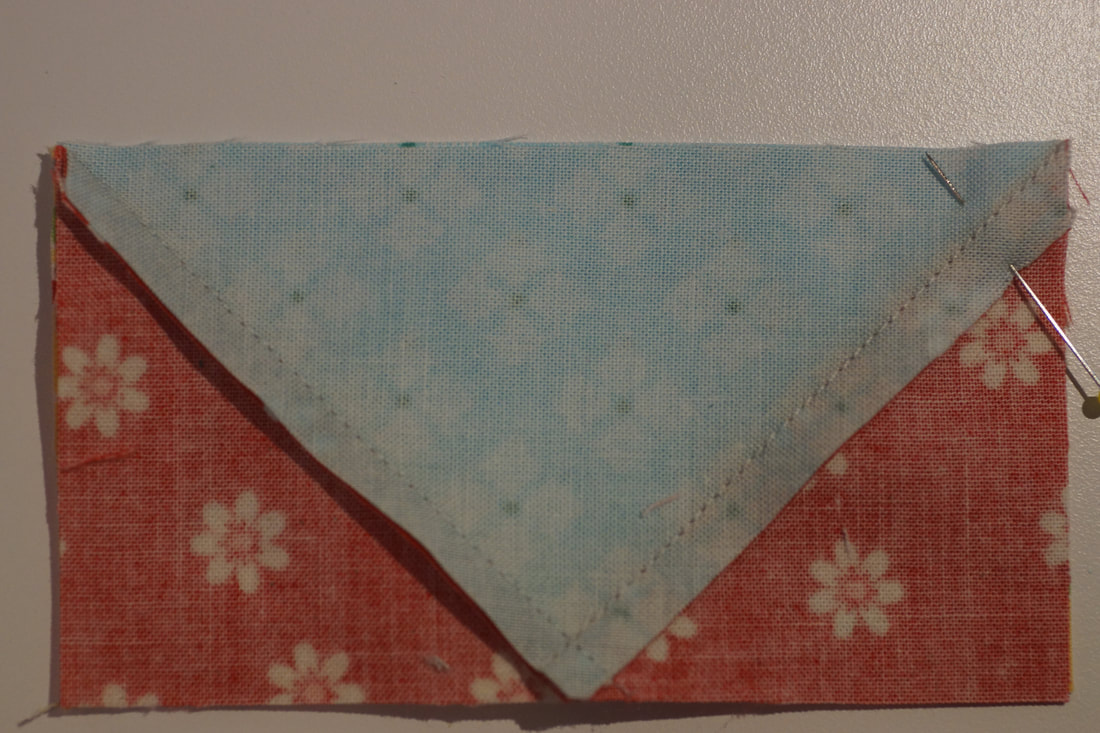 As I sew the Flying Geese units together I am going to watch the point in the middle. I want my needle to stay to the right of it-my goal is to land on it to achieve a perfect point. If my needle lands to the left of it that is how I end up with points that have been cut off in my final block. If all went well with my trimming than my 1/4" seam will allow my needle to land in just the right place. Still, I slow down as I come to this point and keep a close eye on my needle to help ensure that it lands right where I want it. Slowing down is sometimes the key to this process. 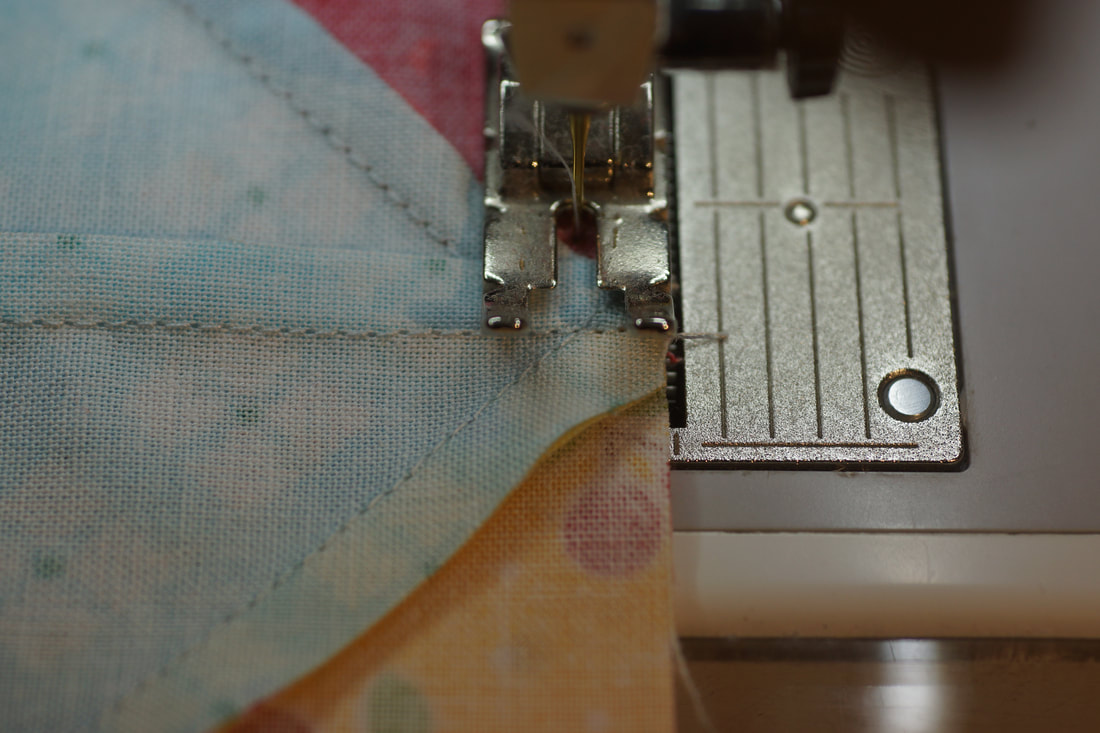 I just love how this block came out. I also love seeing your finished blocks so feel free to share in an email or on my Facebook page. My Facebook Sew Along page is like an ongoing quilt guild meeting with lots of love and encouragement and it gives me a chance to get to know all of you which is a real blessing for me. To get the pattern for this month's block click HERE. 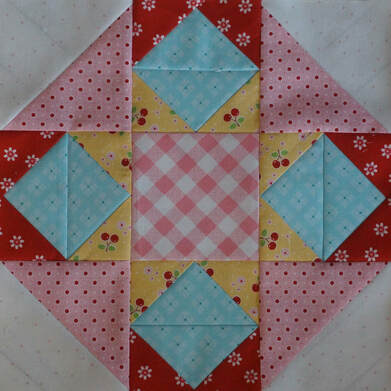 Here is a look at what my pattern testers did with their blocks...
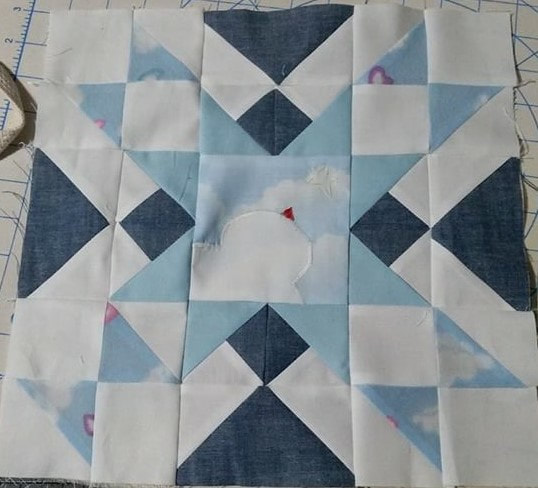
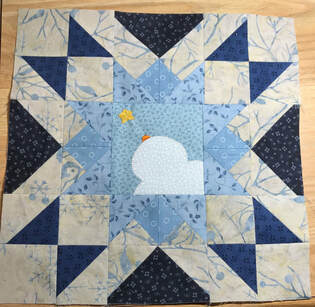
 Jeanet's first two blocks together. I hope to close each of the posts for this BOM with a recipe. I found a couple that I just might have to try. The first one is on the King Arthur Flour website-I pretty much have loved all of their recipes.  But this second one adds chocolate to the mix-I just don't see how one could go wrong! I found it on I Am Baker's blog-this site is not at all good for my weight loss goals, LOL. Click on the photos for the recipes. 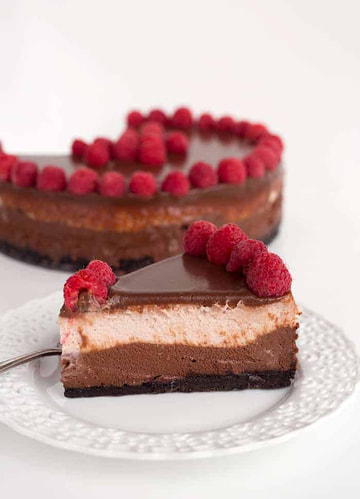 Have fun and Happy Quilting!  I know I am not alone in saying that February has been an interesting month, especially in regards to the weather. We started the month here in Southern Oregon with our snowpack at 60% of normal and ended it with those numbers jumping to 118%. Most of our new snow came in the last week and closed down major highways, interstates and even the passenger trains. We have quite a few deer that wander through our backyard and I snapped a photo of these two in the midst of one of our very snowy days. 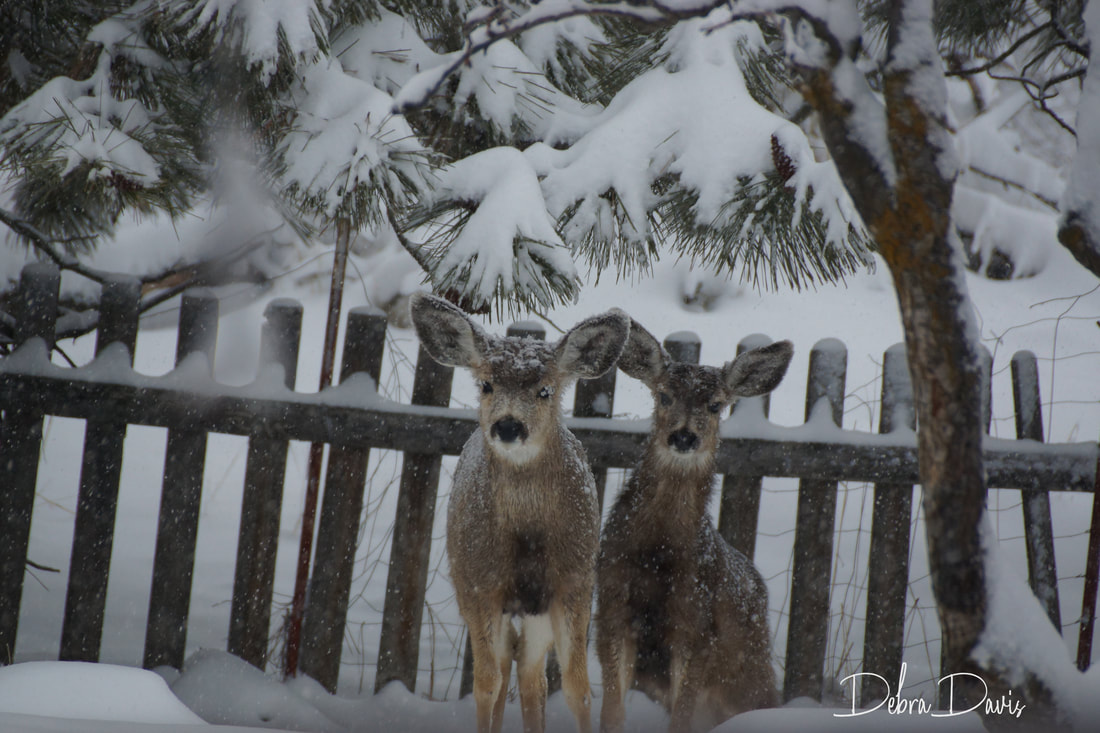 We do not live far from Crater Lake National Park, normally we take a trip up there to photograph our beautiful blue lake after a good snowfall but that is not possible right now. Crater Lake shared this photo from this weekend-those buildings are two stories high. Last report I saw they got over 123 inches but that was before the snow event had ended. I am sure all of this makes our snowmen very happy. One of the reasons we like to go up to Crater Lake on a cold and snowy winter day is to stay and take in the stars at night. The air is so clear at that elevation and the sky affords amazing views-at least for those brave few who bundle up for the very cold nighttime temps. I knew I needed a stargazing snowman in my quilt and titled this month's block "Ain't it Thrilling." Purchase the pdf for Block 10 here 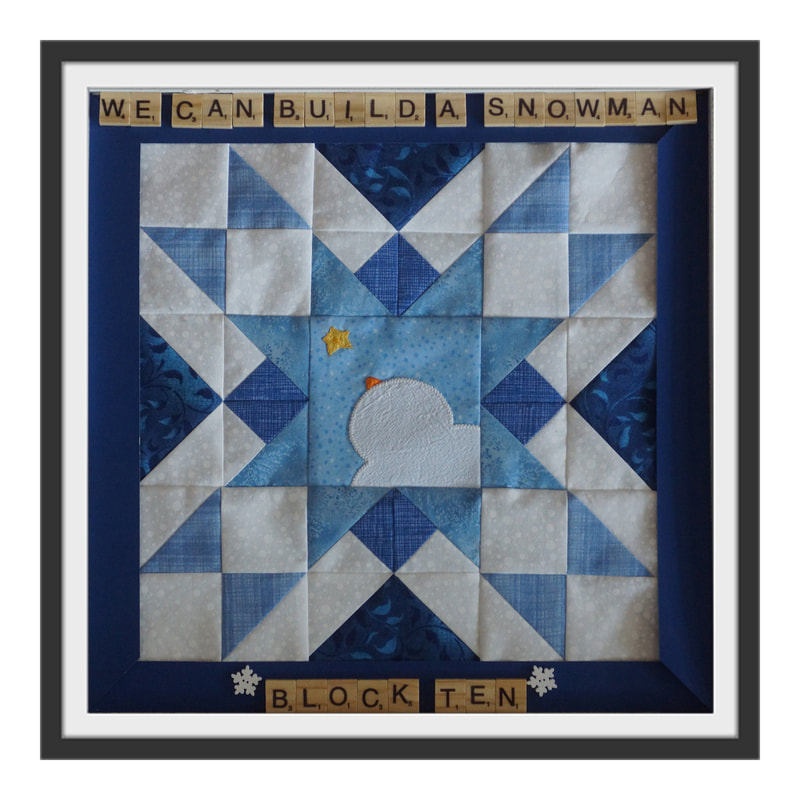 My testers had fun with this block and made some creative changes with their fabric choices.
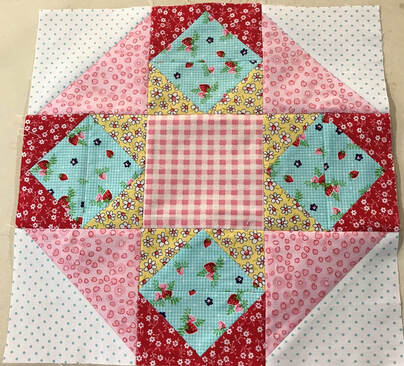
 Susie I have made a video tutorial to help you with making the Quarter-square triangles. I used a new embroidery stitch for the star and made a little video tutorial for it as well. I hope you enjoy making this month's block as much as I did. And I hope that wherever you are you are safe and loved no matter what is happening outside your door. Happy Quilting!  Block 1-Chocolate CakeI love to bake, I love to eat what I bake; so when I found these blocks named for desserts I knew I had to make a quilt. I will be sharing a new block with you each month for the next 12 months. I have a Sew Along group on Facebook where others will be sharing their blocks as well and I hope you will join me there. www.facebook.com/groups/tuningmyheartsewalong It is the best way I have found to engage with all of you as we develop a quilting community there. For this block you will need a copy of this month's pattern which can be downloaded here: Block 1 pdf download If you need a copy of the fabric requirements they can be found here: Just Desserts BOM 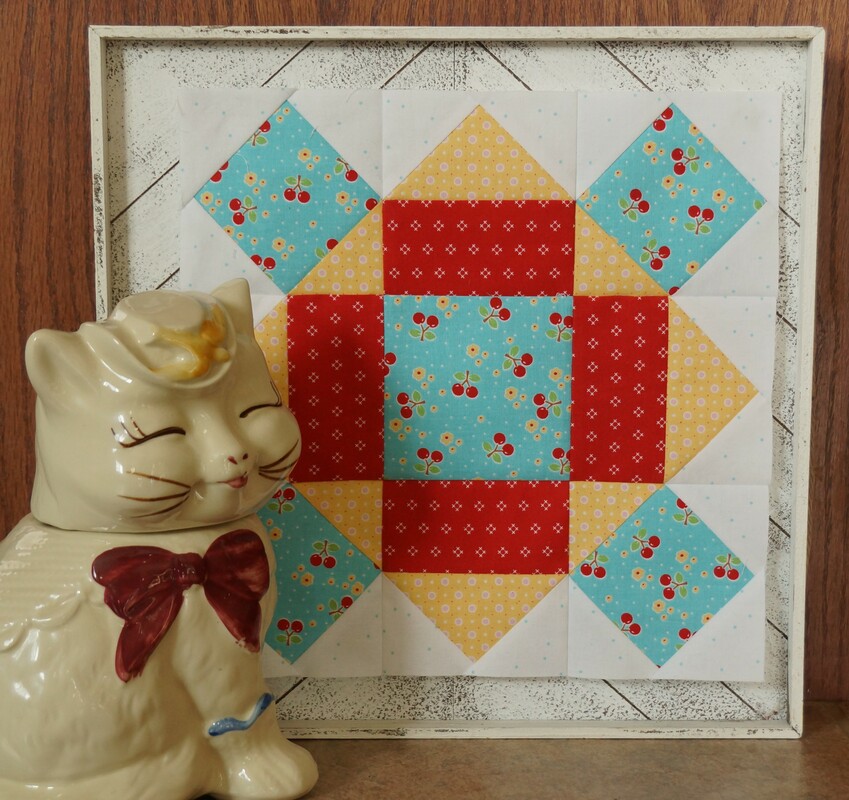 Each month I will share my tips for making these blocks. It is my desire to give you as much help as I can so that you can succesfully create your own blocks even if you are new to quiltmaking. So let's get started. The first thing we need to do after cutting out our pieces is to draw a diagonal line on the back of the B squares. To make this easier I have a clipboard with a piece of very fine sandpaper attached. This keeps the fabric from shifting as I mark my line. For this technique it is best to use a pencil, something that will not show through to the right side of the fabric after you sew. I have a fancy mechanical pencil that can be refilled with a variety of colors of ceramic lead, but a cheap mechanical pencil works just as well. You just need a line that you can see to follow as you sew, so make it as light as possible, but dark enough to see easily.  Before we get started sewing I like to mention that a new project gets a new needle in my machine. Having a sharp needle can impact how well your piecing goes. I make sure to use a needle that is right for the weight of thread I am using. For piecing I am using Masterpiece by Superior Threads. It is a 50wt Egyptian cotton thread and works best with an 80/12 needle. (I prefer using Topstitch needles for piecing as they have a sharper point than a Universal needle) Your thread and needle combination will actually have an affect on the accuracy of your piecing so I always recommend you do a little practice first to make sure you get an accurate 1/4" seam allowance. I wrote a little tutorial on the subject a few years ago to walk you through this process: www.tuning-my-heart.com/tutorials/what-is-a-scant-14-inch-seam
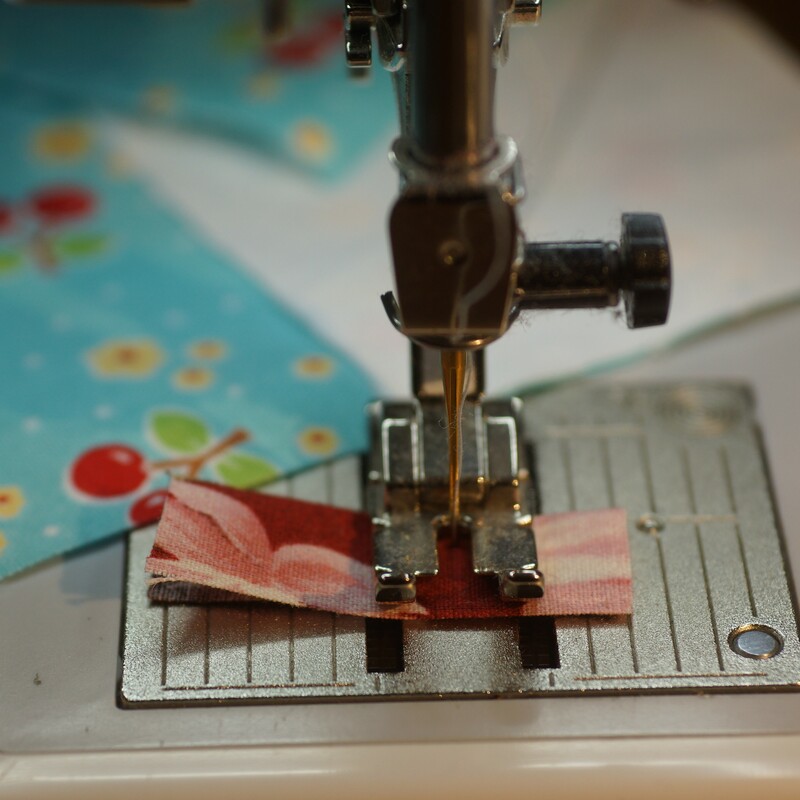
I like to chain-piece whenever possible. I start with a scrap piece of fabric and my needle in the down position. This eliminates those long thread tails that need to be clipped and solved my problem of having the fabric not feed nicely under my needle when starting to sew. Notice I have sewn across my "leader" fabric, taken a few stitches beyond it and then, with my needle down, place the pieces I want to sew right up next to the needle. I do not feed them into this position, but have stopped my machine, lifted my presser foot and aligned my pieces right where I want them before sewing any further. 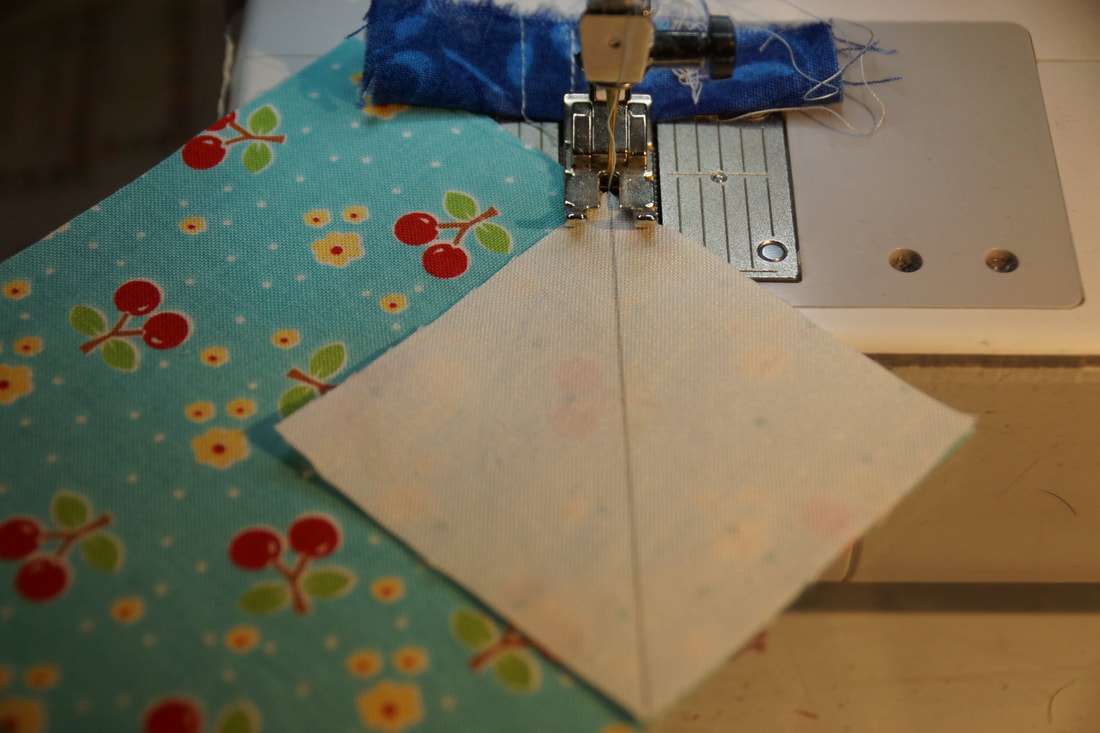 For this particular technique of making these corner units I will sew just to the outside of my drawn line. I have found that if I sew right on top of that line my resulting triangle will be too small. When I finish sewing all of these units I sew off of the last one onto a scrap of fabric called an "ender."
Now before I go any further I am going to check my corner triangle. I flip it over to make sure that it covers the square underneath. If it does I am good to go. 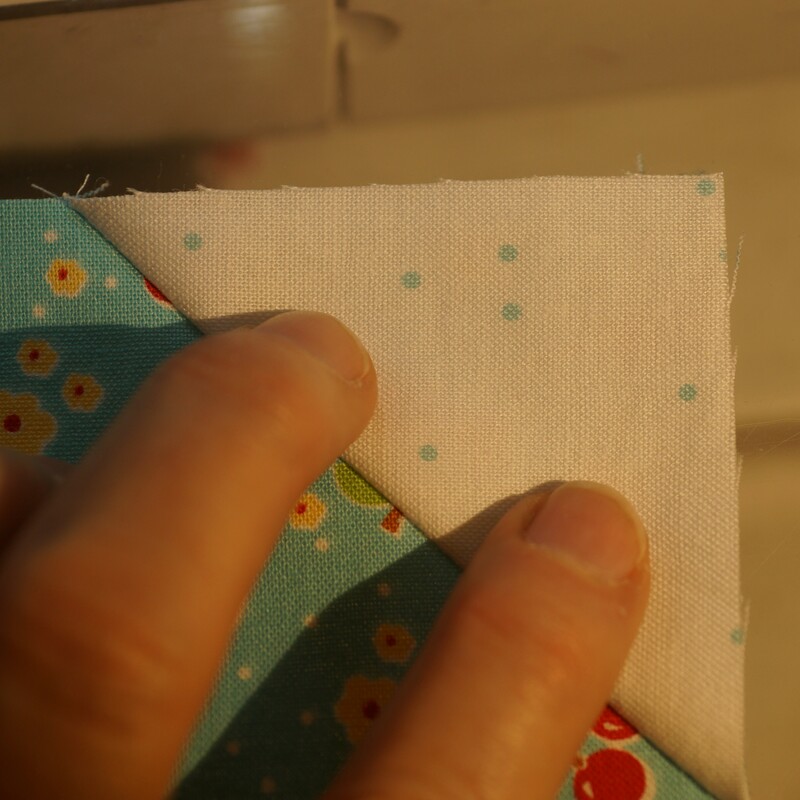 But if it does not quite cover there is a little trick I can do. This will work if you are no more than 1/8" off from covering the square underneath. 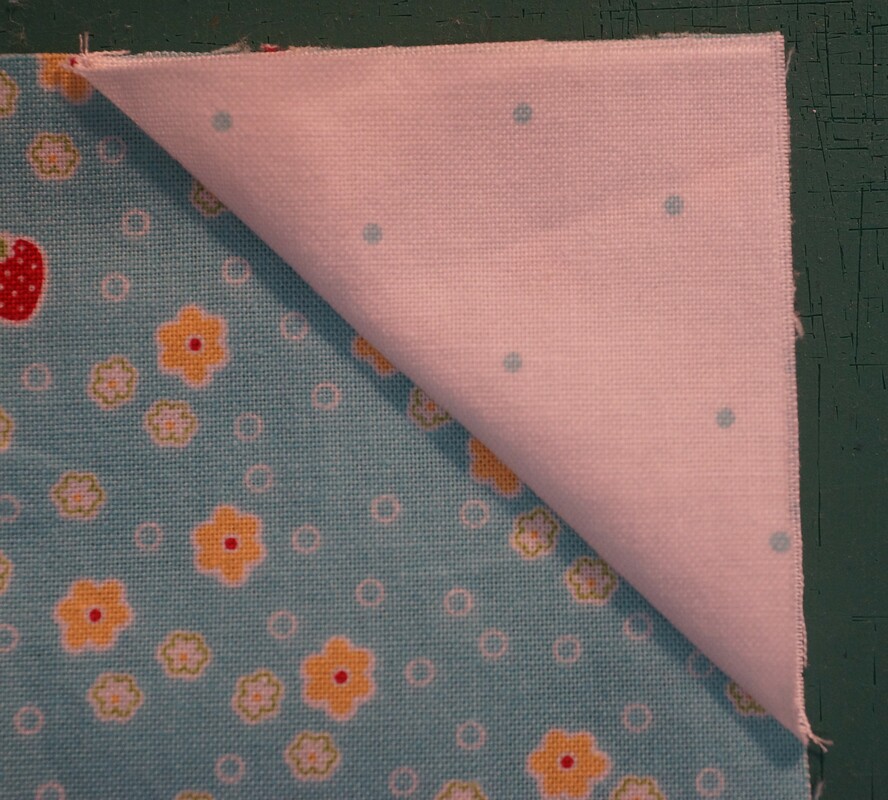 Normally I would trim off both fabrics 1/4" from the stitching, but if that top triangle does not cover the square, I only trim off the extra top fabric; leaving the A square underneath intact. Now I know that when it comes time to sew this unit in place I will still have the correct measurement needed for it to work in my block. That is one of the reaons why I like this particular method for making these types of corner-square triangles.
If my B square has covered the A square and I have trimmed off both fabrics, after pressing I take the time to square up the block again. I do this each time I add a new corner triangle to the A square. I need the size of my square to remain the same after each addition. 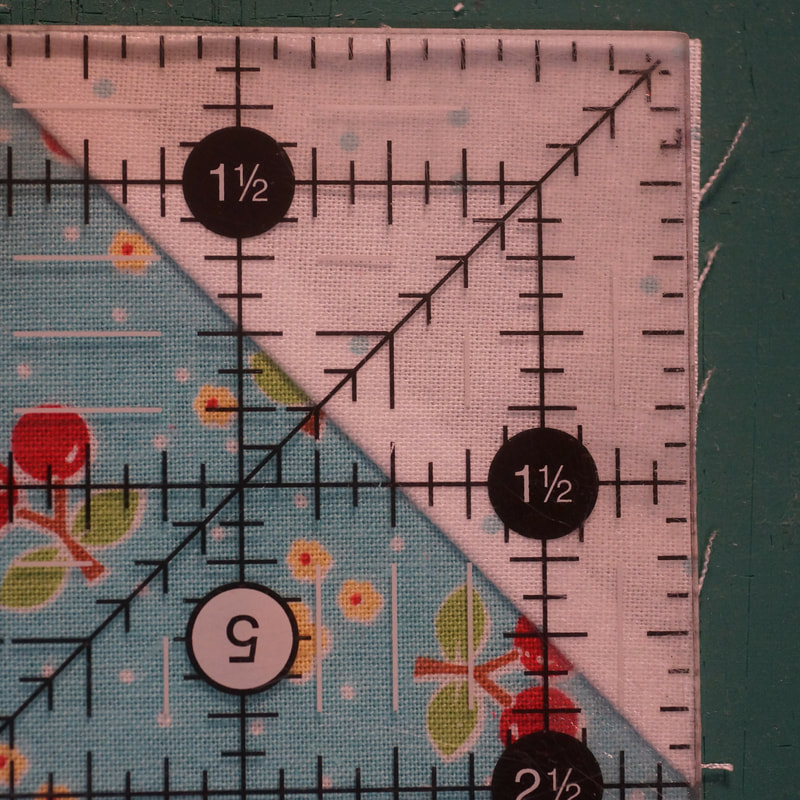 After completing the Corner Units we need to make Flying Geese. I really like the No-waste method for making these. I made a video tutorial for the We Can Build a Snowman quilt which is really helpful if you have never made these before. Both quilts happen to use the same size Flying Geese so the trimming instructions are perfect for these as well. My tip for sewing these is to make sure that the point of your top squares point away from your needle as you approach it.
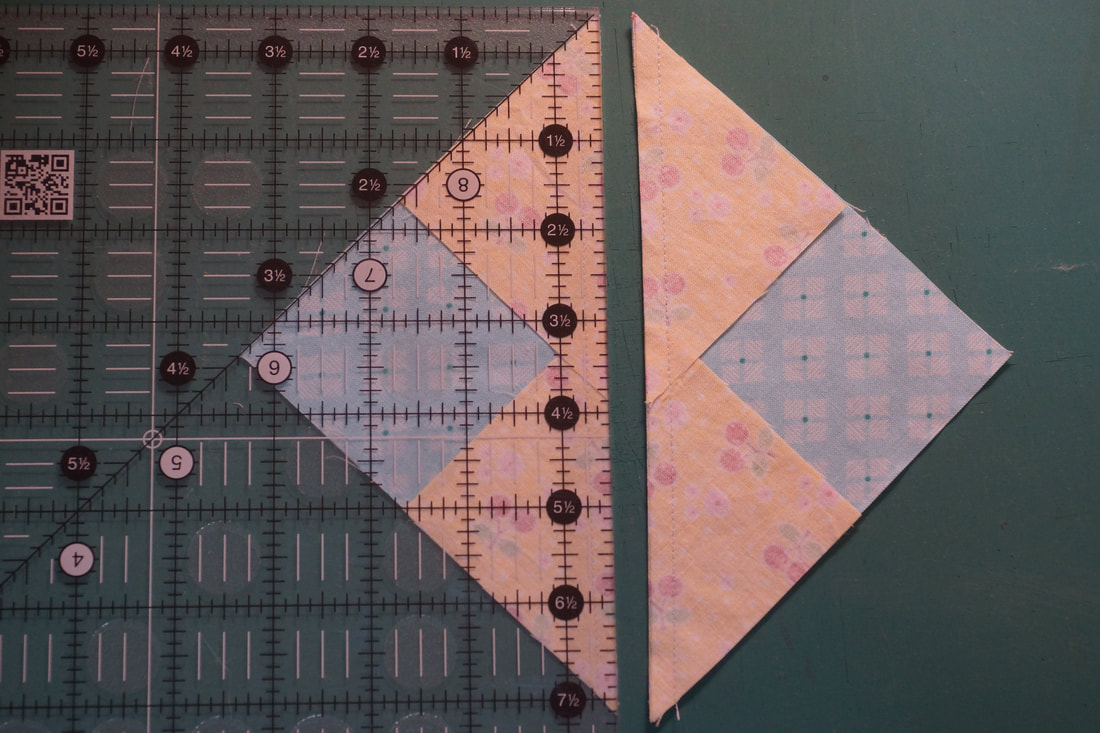
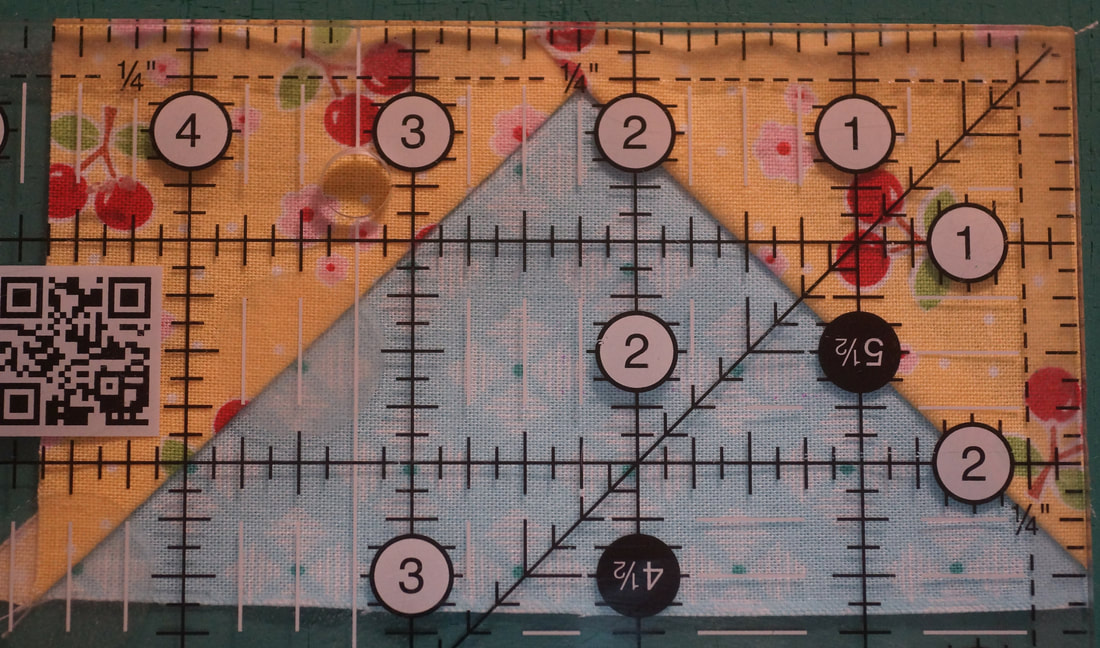
My favorite tool for trimming Flying Geese remains the Bloc Loc ruler. There are five more blocks in this Sew Along that will make use of Flying Geese in this size, so it is important to get comfortable with making these. 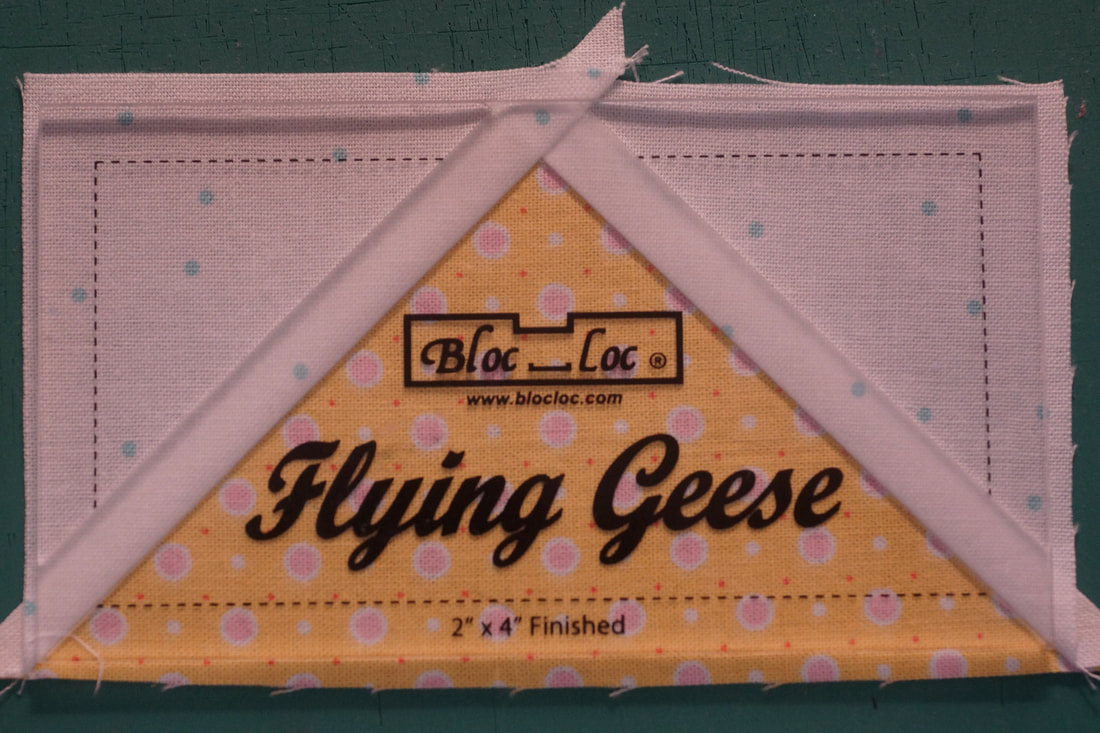 If you are using a regular ruler be sure to line up the 2 1/4" inch mark on the ruler with the tip of your "goose" leaving 1/4" of fabric beyond it for the seam allowance. (see circled area) You will also need to line up the 2 1/2" mark of your ruler with the bottom of the "goose." (see arrow) 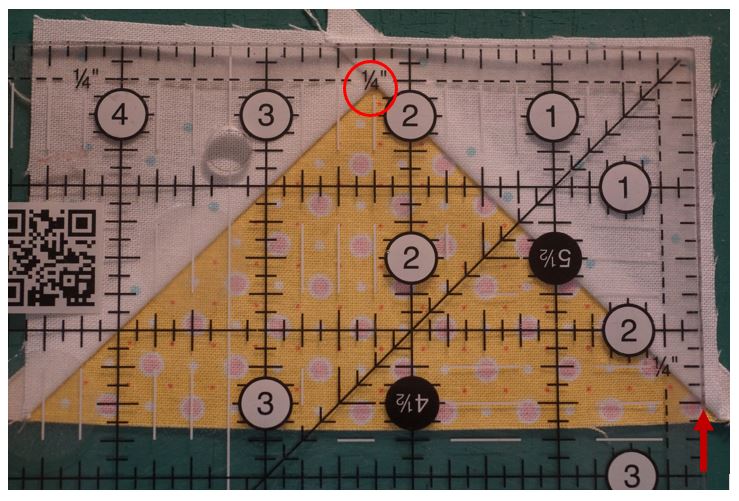 After rotating the block line up the 2 1/4" mark again. You also want the diagonal line of your ruler to line up with that diagonal seam and the 2 1/2" and 4 1/2" lines to fall on the trimmed edges of your Flying Geese units. 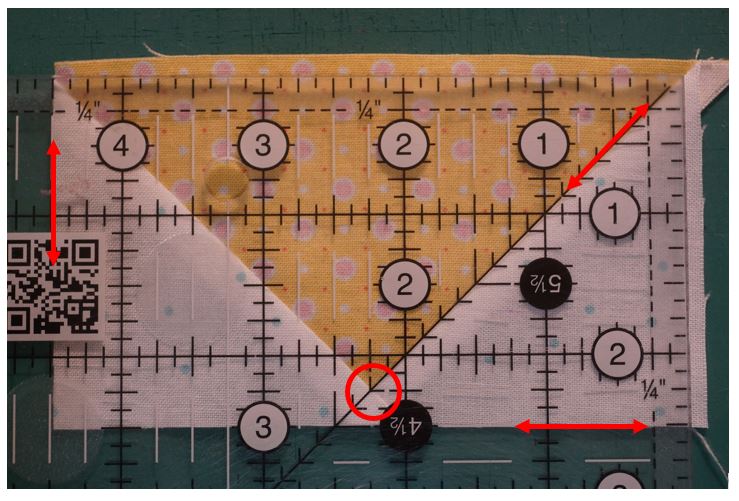 When we come to the part of the block where we join the F rectangles to the Flying Geese I sew with the Flying Geese on top. This way I can watch where my needle falls. I really want my needle to land on that point where the seams intersect. If I sew to the left of it I will loose my points when I press the seam.  As you join the rows together I want to show you how I pin my pieces. It is very different from what I was used to with garment sewing. I pin as shown below. When I come to a pin, I do not sew over it, but stop with my needle right next to it. Then I gently slide the pin out and continue sewing. 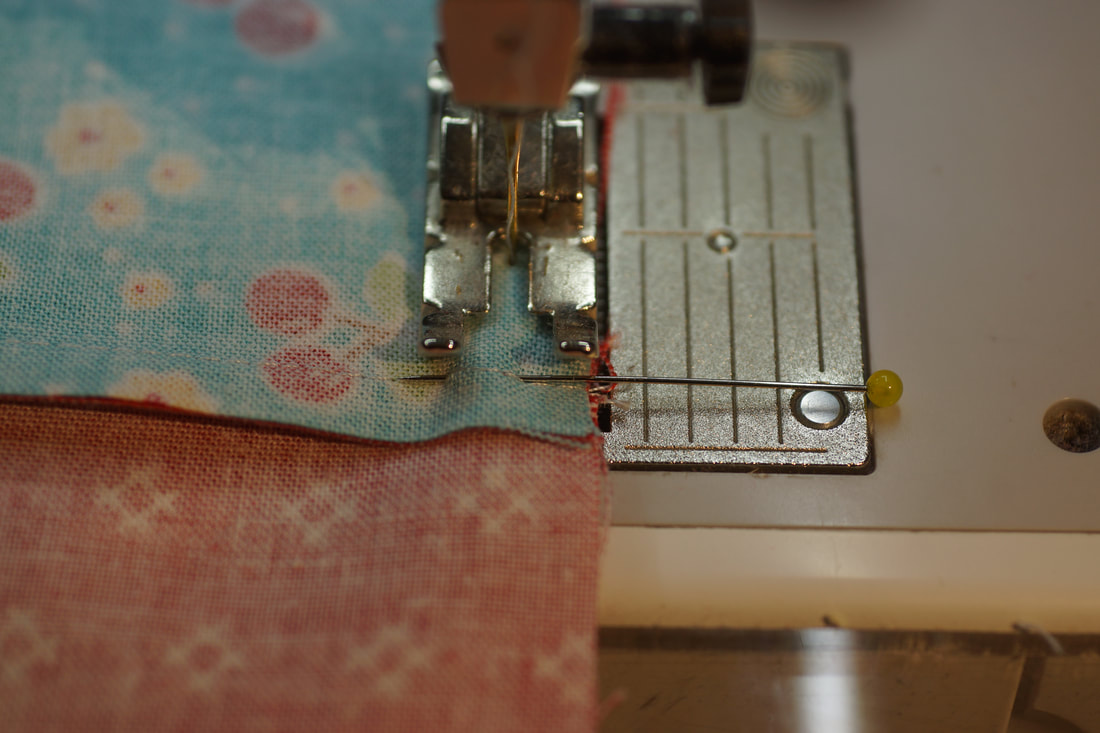 I hope these little tips help and that you have fun making this month's block. 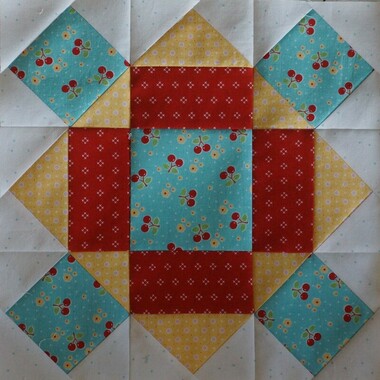 While you wait for next month here is another version of Chocolate Cake for you to try from I Am Baker. 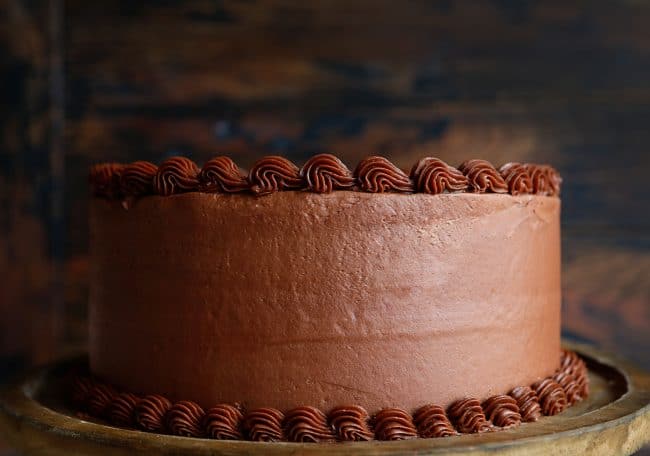 Happy Quilting!  |

Welcome to the site of Debra Davis-a woman who loves the Lord and loves to quilt.
My other blog where I share about my walk of faith:
Sitting at His Feet 
|


 RSS Feed