Announcing my 2024 Sew Along So what do birds, flower baskets, and love of friends and family have in common? They all show up as part of my latest quilt pattern. This pattern has been in the works for awhile and was actually completed last year. I've kept it on hold waiting to get my quilting mojo back. I'm so happy to announce that Heart's Delight will be my newest BOM project. There will be some changes to my usual pattern offering, the main one being you will need to purchase a membership in order to receive the thoroughly tested monthly pattern and any videos that go along with this quilt project. I struggled with this decision, but to be honest it costs me quite a bit of money to do what I do. I have to pay pretty hefty subscription fees for the program I use to write my patterns, there is also the cost of hosting my website, and of course there is my time and talent-which my economist son tells me is extremely valuable. All of these have led me to the decision to require a small membership fee to help cover my costs. 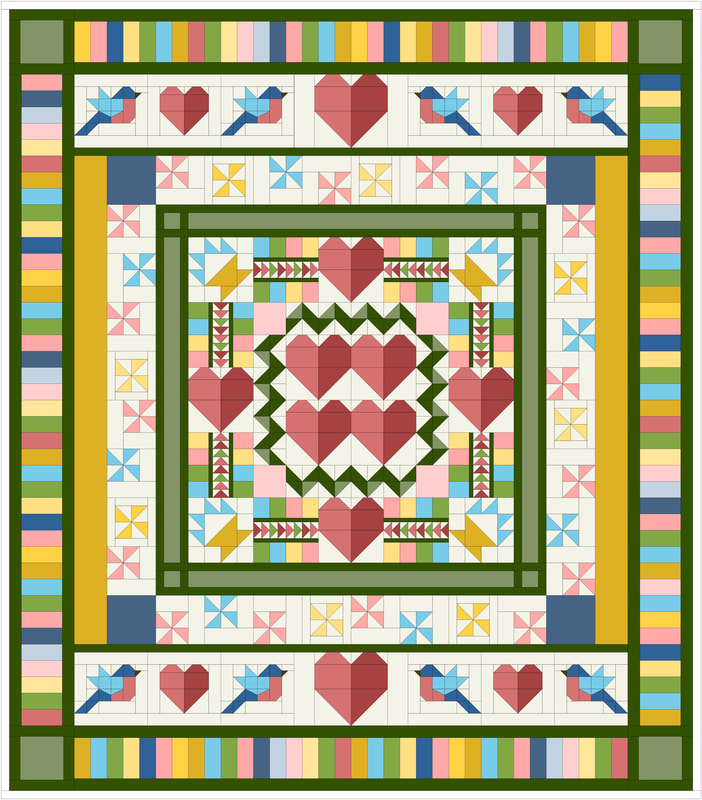 So on to more of the details about this Sew Along. It will kick off in January and run for ten months. Each month on the 15th the next part of the pattern will be released. The quilt shown above is the queen size version which measures 84" x 96". Included in the pattern is an option to do a smaller lap quilt measuring 72" x 72". 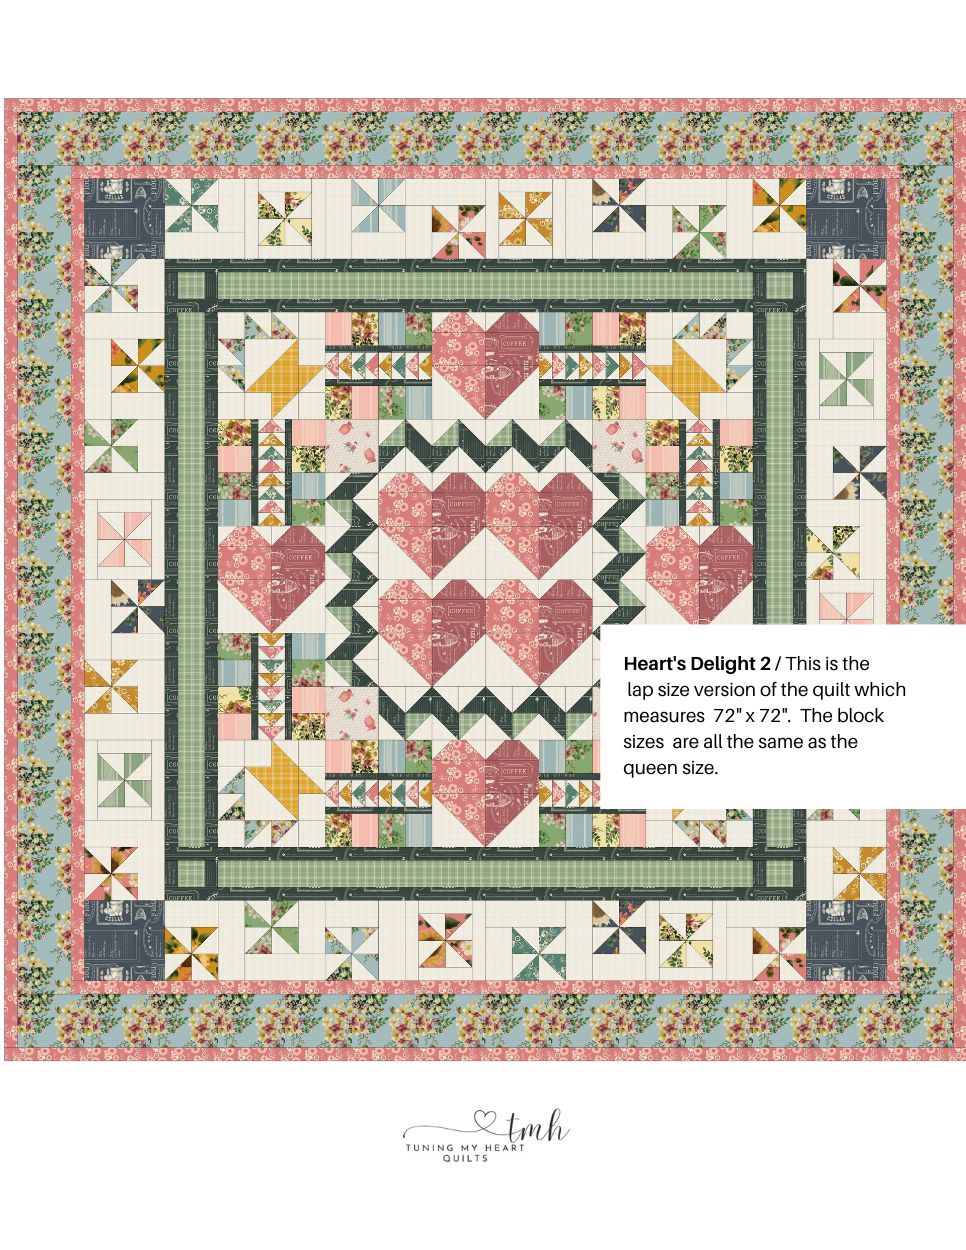 This really is a perfect quilt for using up your stash as it can be quite scrappy and look really lovely. In my sample I used a group of fat quarters I had sitting on a shelf waiting for just the right quilt, and where needed, I got some coordinating larger amounts of fabric to work for the various borders. I also added some stash fabrics for the birds and repeated those fabrics in the piano key border to pull it all together. 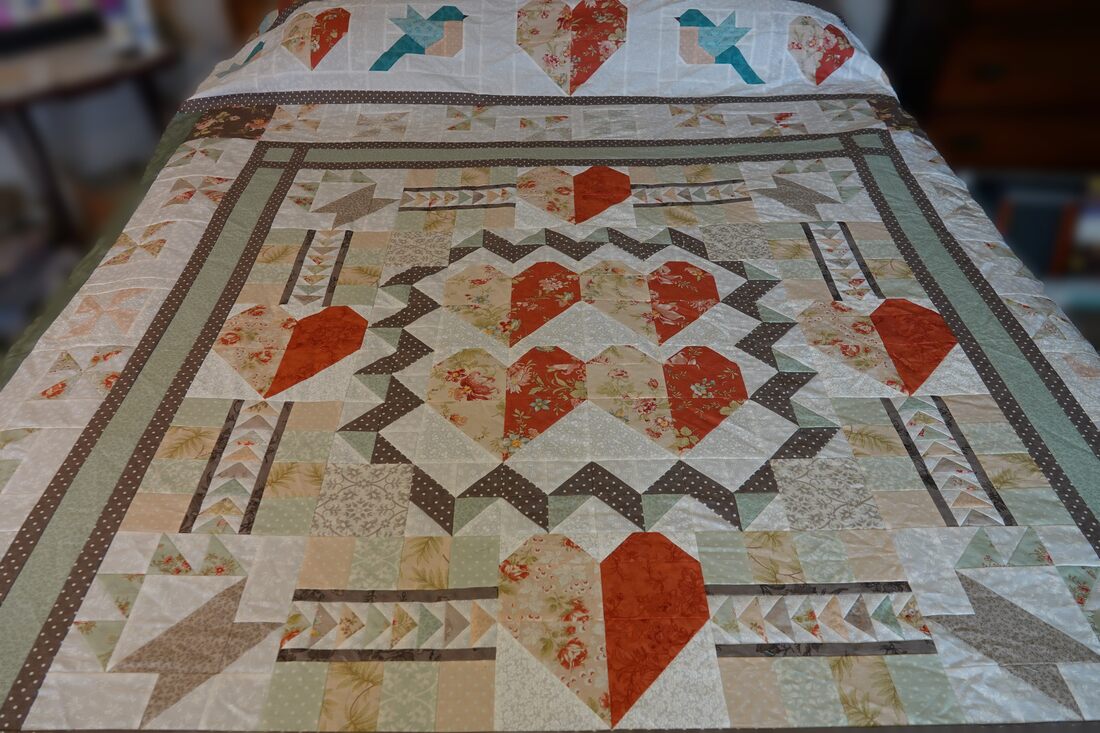 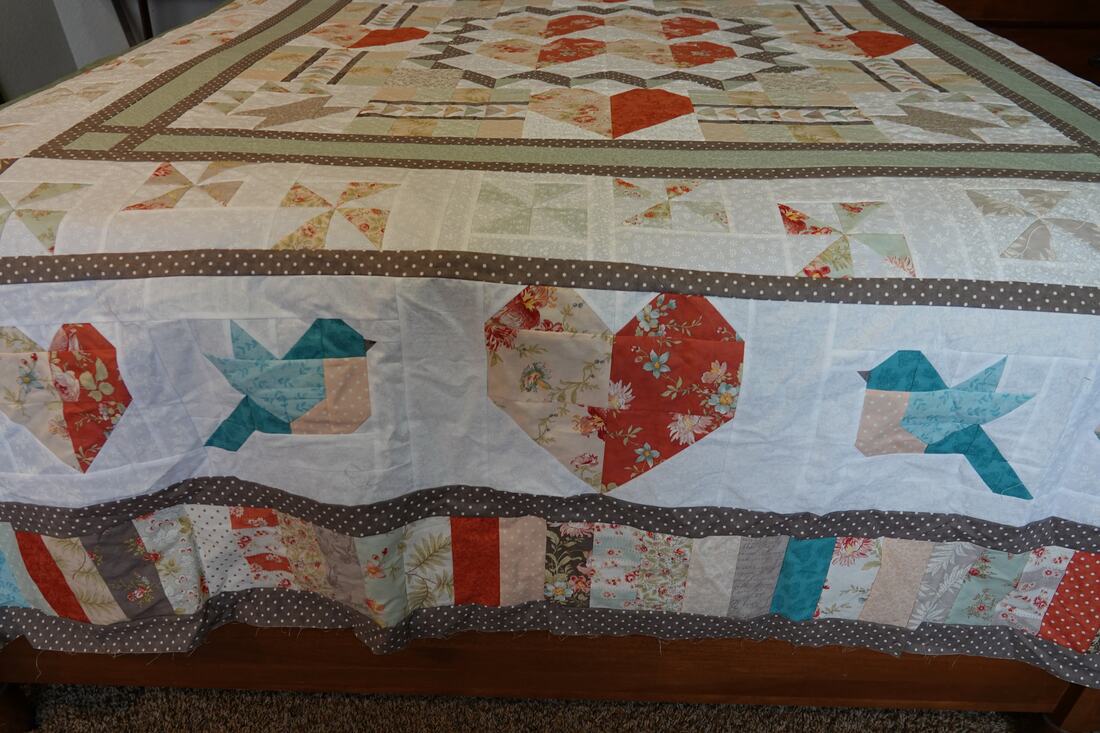 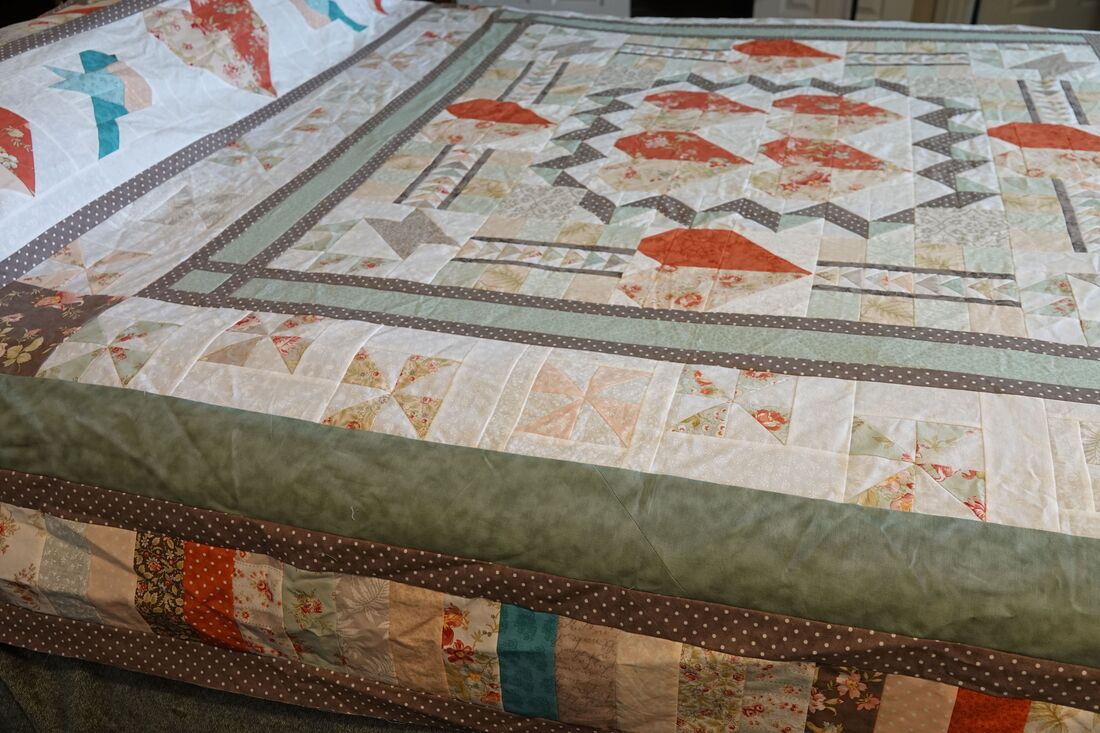 I still need to choose a backing fabric and quilt this top. I hope to sew another one during the months of the Sew Along, and I am leaning towards this blue and red idea, I like this coloration for as it's not Christmasy but will work as a winter quilt on our bed. I really want something that will emit a cozy feel for the dark days of winter here in Oregon where the sun rises about 7:30 and sets around 4:30. LED candles are my bright spot around the house in winter. Also, have I ever mentioned that my husband is colorblind and can only really see the color blue. 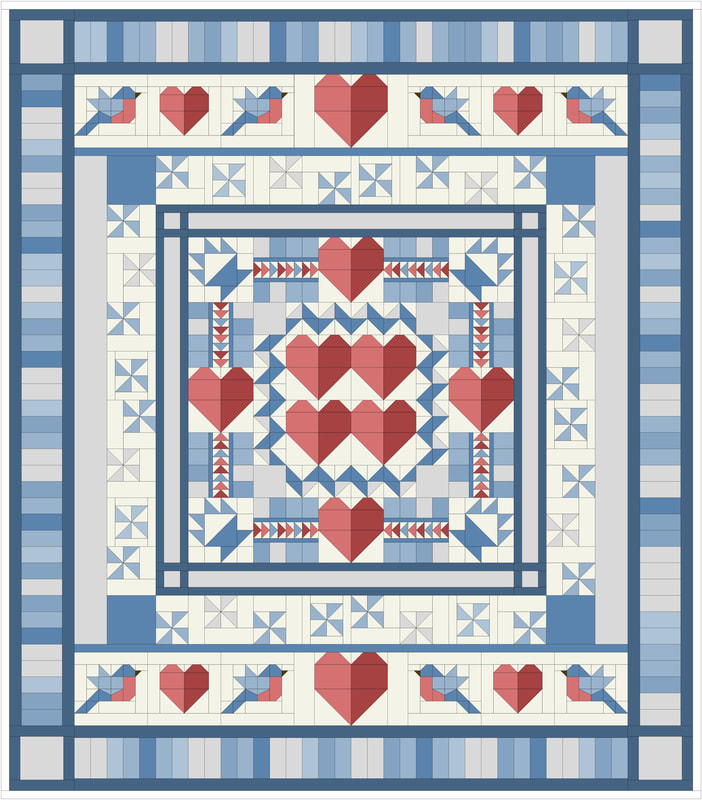 Or do I go with this one, which has colors representing my Swedish heritage by popping some yellow with the blue...This seems more summery to me. It may come down to what fabric I have in my closet, HA. 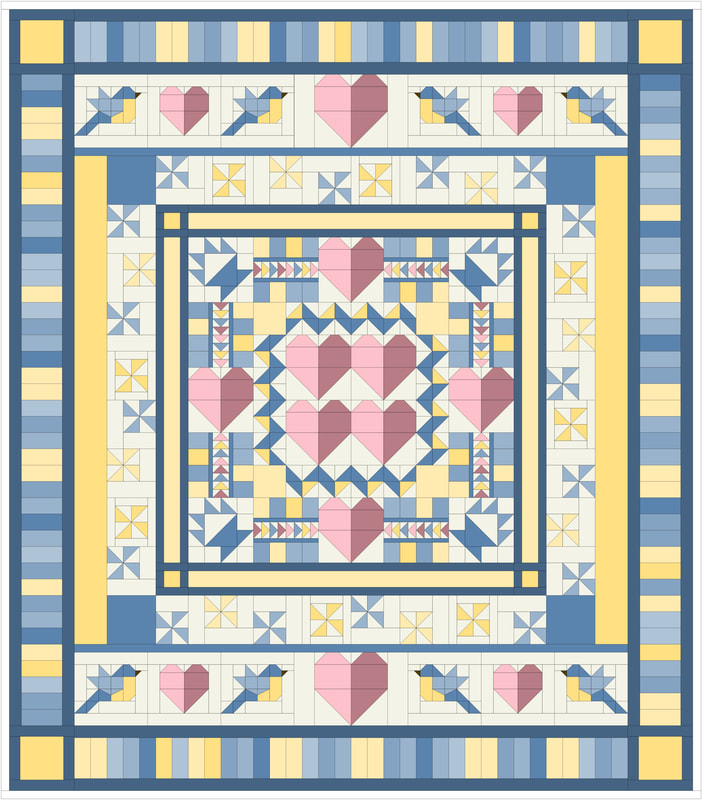 I have played with a few color variations and love how no matter what I do, this pattern just looks good. Here are a few more variations that I came up with yesterday. This one was inspired by the sea glass I find on our trips to the beach. What a soft, muted look. 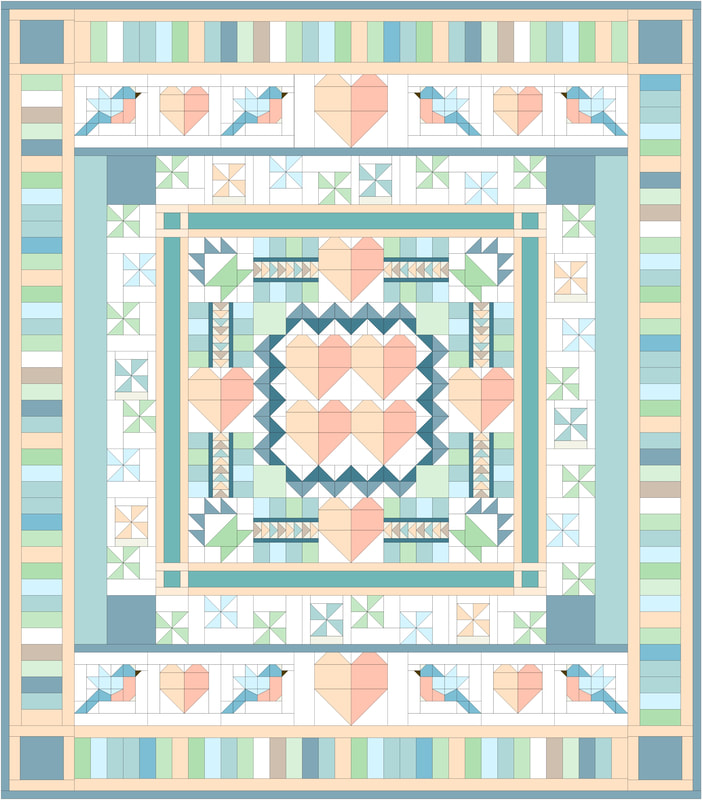 Here I just traded the peachy colors of the hearts and birds for grays and I like how it evokes calm for me. The more I look at this one, the more I get the beachy vibe I was hoping for.  I wondered what would happen if I popped in some purples... I've a daughter-in-love who goes for anything purple. 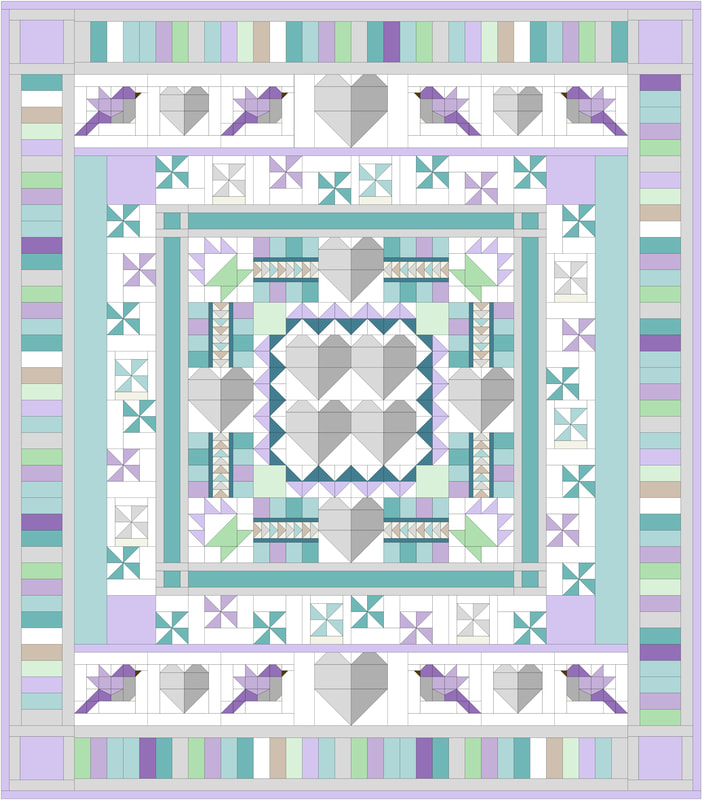 And then I tried a dramatic color theme. 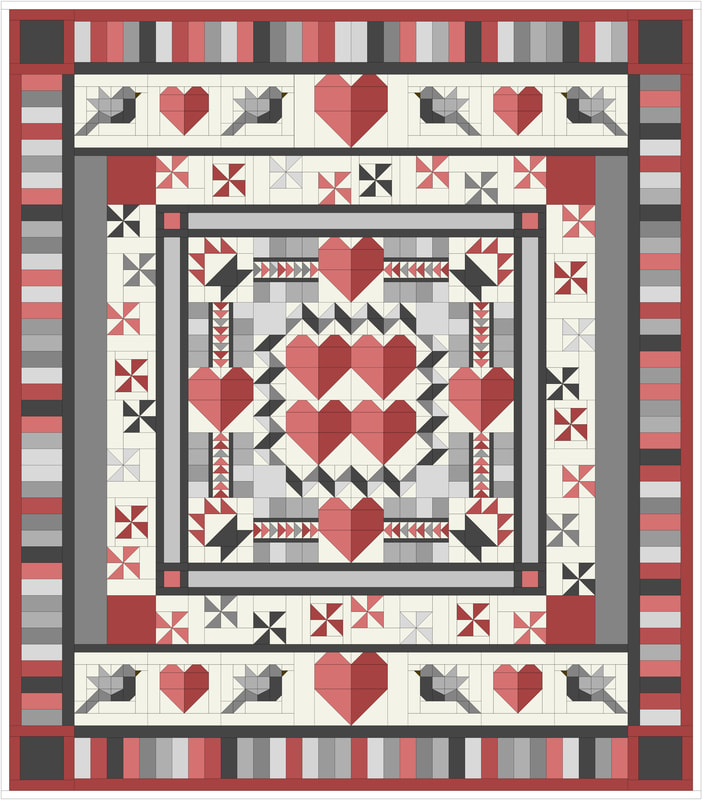 And of course this is similar to my sample...slight variation from colors I had in my stash, but pretty close.... 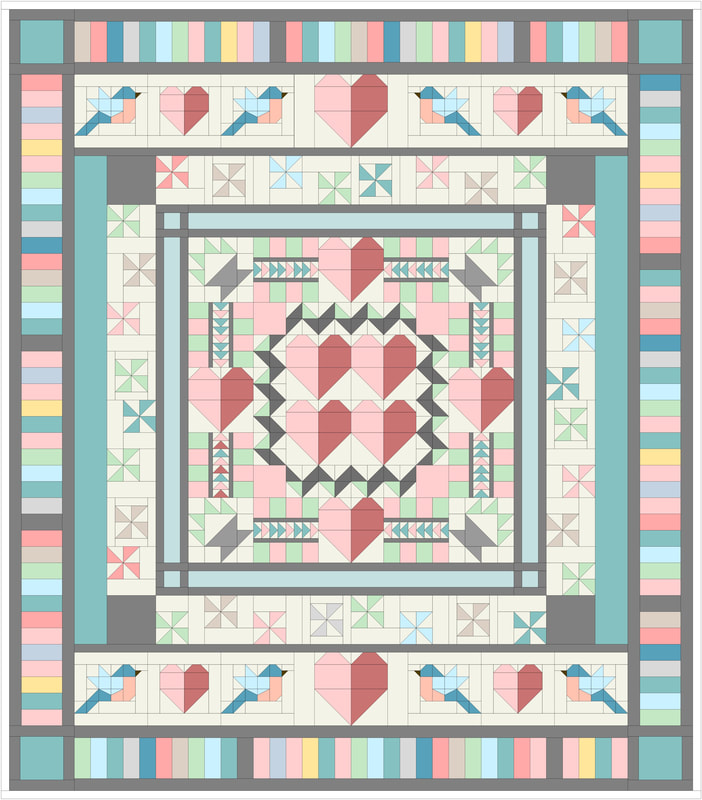 Do you have a favorite color combination you would like to try? Choosing fabrics is often the hardest part of the whole process! I do hope that you are inspired to join me. Registration for membership into the Heart's Delight BOM will open on Friday with a discount running through the rest of the month of December. The regular membership cost will be $20, but December registrations get a 50% discount by using the code DEC2023. This code will only be good until December 31 at midnight Pacific Time. As you know I am pretty free with my copyright, there is no limitation placed on what you can do with your finished quilts. But I do need to insist that you honor me by not sharing the files for this quilt with anyone. When you join you have permission for your own use and nothing more. Each person needs to purchase their own membership to get the pattern. At the end of the quilt along the entire pattern will be available for purchase as a stand-alone pattern, but you really get the best bang for your buck by purchasing a membership. You can read all the details about the benefits of membership on my shop page: If you are not already a part of my private Facebook group be sure and join my us at www.facebook.com/groups/tuningmyheartsewalong
This is a great group of quilters who enjoy sharing and encouraging one another and is the best way for us all to enjoy the quilts we are making together. So I do hope you will be a part of the show and tell that happens there. Remember to use code: DEC2023 for 50% off your membership through the end of this month! Happy Quilting my friends! Debra  Image by Kerry Barbour from Pixabay Hello my quilting friends. Well, it has been some time since I last posted anything, it's been quite some time since I have done any sewing as well. Without going into much detail I have spent the last year just recovering mentally and physically from an illness that took me by surprise and impacted my life in equally surprising ways.
This summer I have been working on building up my strength and stamina, which has been a slow process. I just celebrated 62 years this month and this gal does not seem to bounce back like she used to, but I am just so happy that I was up to short hikes earlier this month with some of my family on a trip to Yellowstone and Grand Tetons. Best birthday present was getting to celebrate our oldest son's birthday with him during that trip. (He was an early birthday gift the year of his birth, coming just three days before my birthday.) I chose the golden aspen trees in this photo as a reminder that things are looking up. As we head into fall I am getting the urge to create again, which so far has meant taking up watercolor again-something I've not done since college years. Finding beauty in the little things has been really therapeutic. The changing leaves in all their beauty also signify an end and a beginning. The year is starting to draw to a close, the leaves will fall, the trees will go dormant, and yet they reveal an inner treasure that is hard to appreciate when they are covered in their leaves. This year I am embracing the fall as the beginning of renewal, which seems at odds with how it us usually viewed. But the old is falling away and new life is waiting to spring forth. Sometimes we have to let the old go, sometimes we have to make changes that are difficult. But for me at this time, the gloom of depression is lifting and I am looking up. If you have followed me for long you know that I have placed my faith in Jesus Christ. This is the faith that has sustained me in the valley and has me looking forward with anticipation to what lies ahead. Even in my darker places His love has surrounded me in such palpable ways. All of that to say, I am getting anxious to start quilting again. I have a plan in place for a project to begin in January 2024, the one I was hoping to start last year with you. But first I need to clean out my sewing studio. Oh boy! It has become a dumping ground for things I've not wanted to deal with this past year. I am too embarrassed to even show you a photo of the work I have to do. Maybe I'll start doing before and after photos as you cheer me on to a space that I can once again love to enter and spend time in. So my short term goals...refresh my sewing space, share with you the quilt plan for a sew-along that will take us through 2024 together, find something beautiful in each day, and thank God for each breath He gives me, even when sometimes it does not come easy. Have a blessed day, and if you are on my facebook group please share photos of any thing that has been bringing you joy. Inspire me with your quilts, or whatever. I am looking forward to connecting with you again, you have become my dear quilting friends. Debra  We can relax our way through this month's block for Row 11. We are doing another version of the Hourglass block. With this one we get a completely different look than the one we did for Row 5.  ROW 5  ROW 11 By now you have probably gotten pretty familiar with making the Hourglass block, but let me run through my tips for this particular row. I always sew with my needle in the "down position" ; which means whenever my machine stops, the needle is down. I do this so I can lay the next piece right up against the needle. This has been the key to getting my starting stitched nice and straight and not getting any ugly fabric bunching as I begin to sew my pieces together. 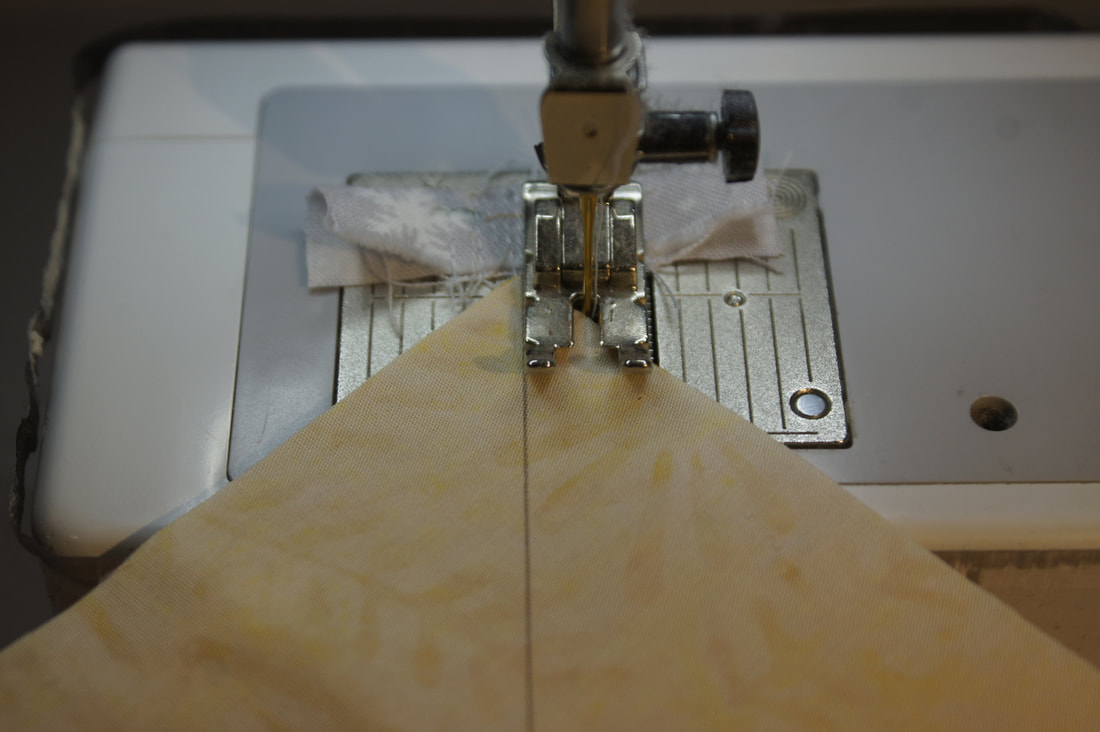 A key to achieving the look I wanted with this one is to use a golden yellow in all of the Hourglass blocks. I just make sure to pair up my other colors so each has a yellow with it. 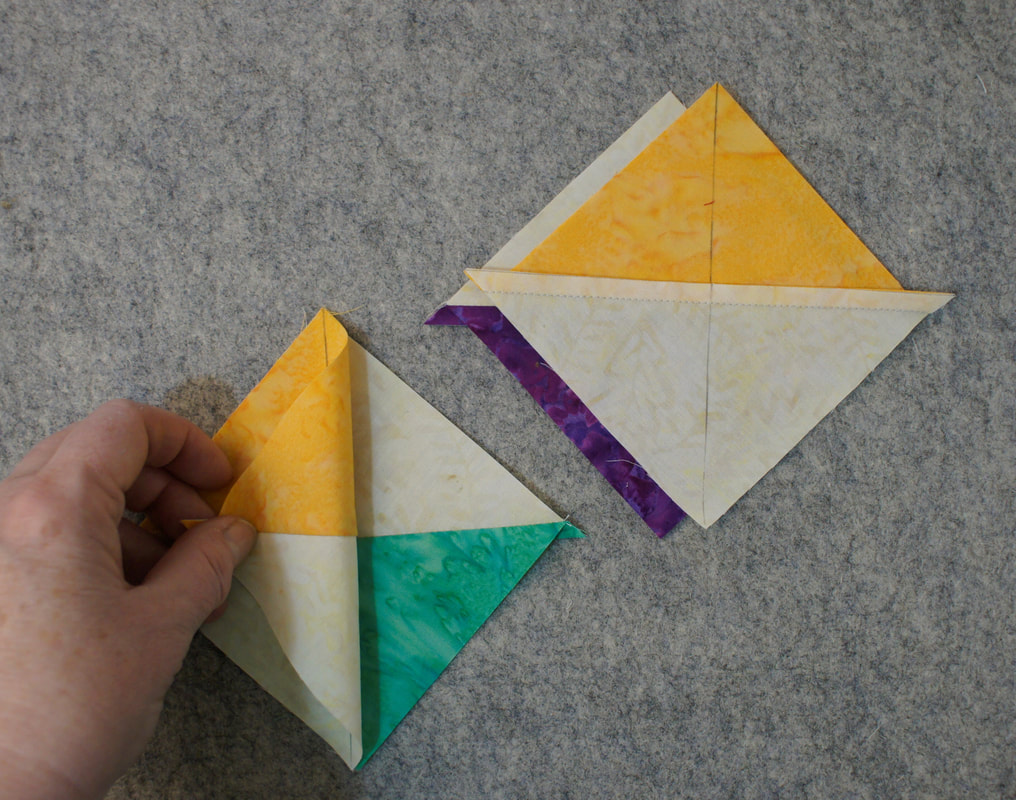 When I am sewing these I like to work so that the seam on top is always facing towards my needle. This helps to "push" those seams together giving us sharp meeting points. 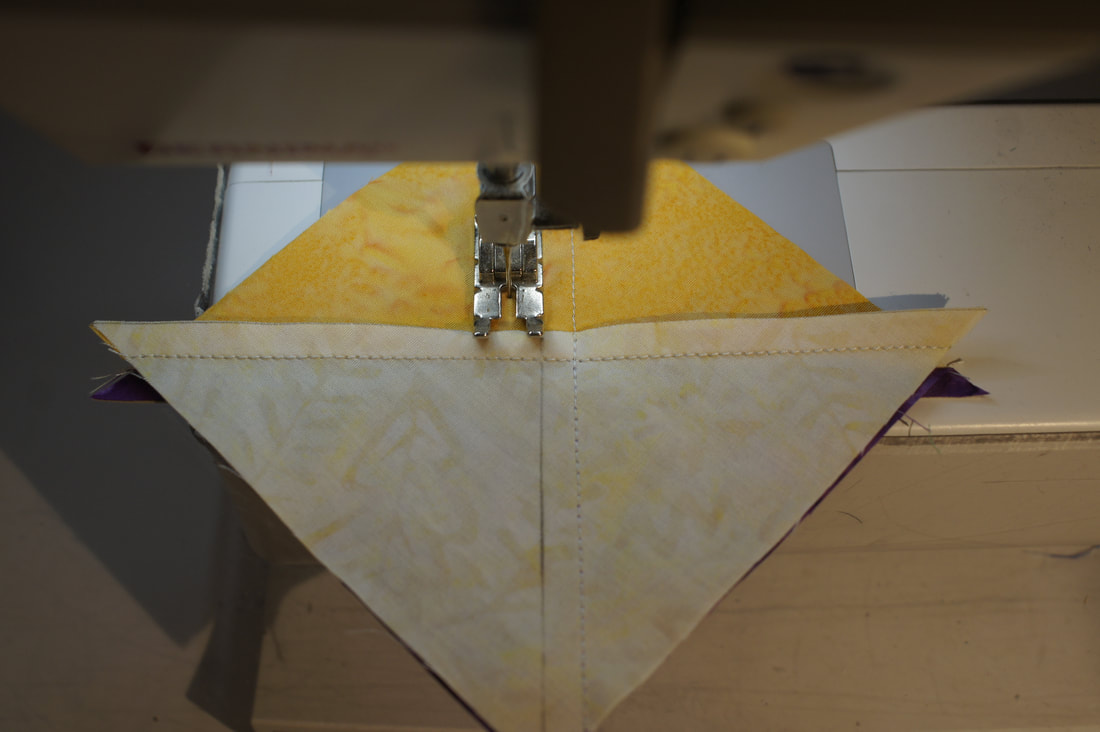 All of those seams coming together in the middle get rather bulky so I prefer to fan my seams up. This is done by using your fingers to first pull the seams in the direction they will naturally want to go and opening up that middle bit which allows them to do so. I then give it a finger press before turning it over and doing a final press with my iron. The result is a block that lays very flat.  It's all been pretty straight forward at this point. Now we have a couple of key points to go over. First the trimming. It is important that we use the diagonal line on our rulers to guide our trims. To get everything nice and square we have to know the midpoint of the trimmed size of our square. In this case the midpoint mark is 1 3/4". Do you see that mark and how it falls right at the middle of my block where all four points of the hourglass come together? That mark is key. I can then make my first two trims. 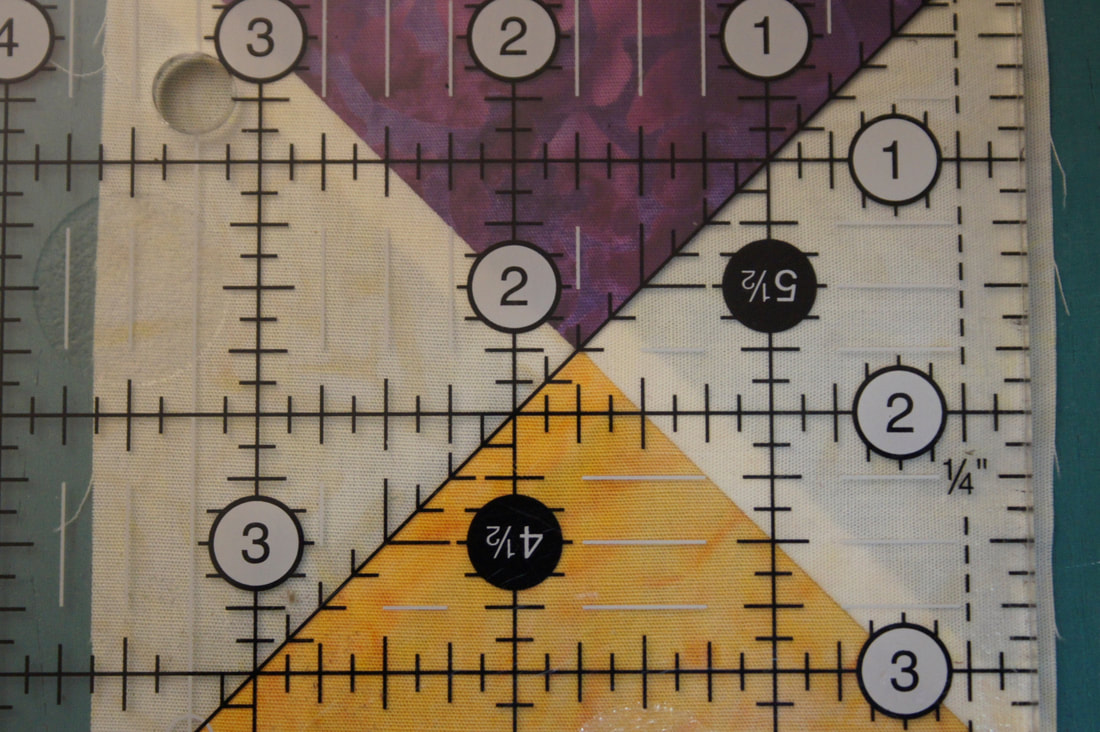 For the next trims I just rotate the block and line up m diagonal line again as well as the two outside edges I just trimmed (in this case right along the 3 1/2" lines.) 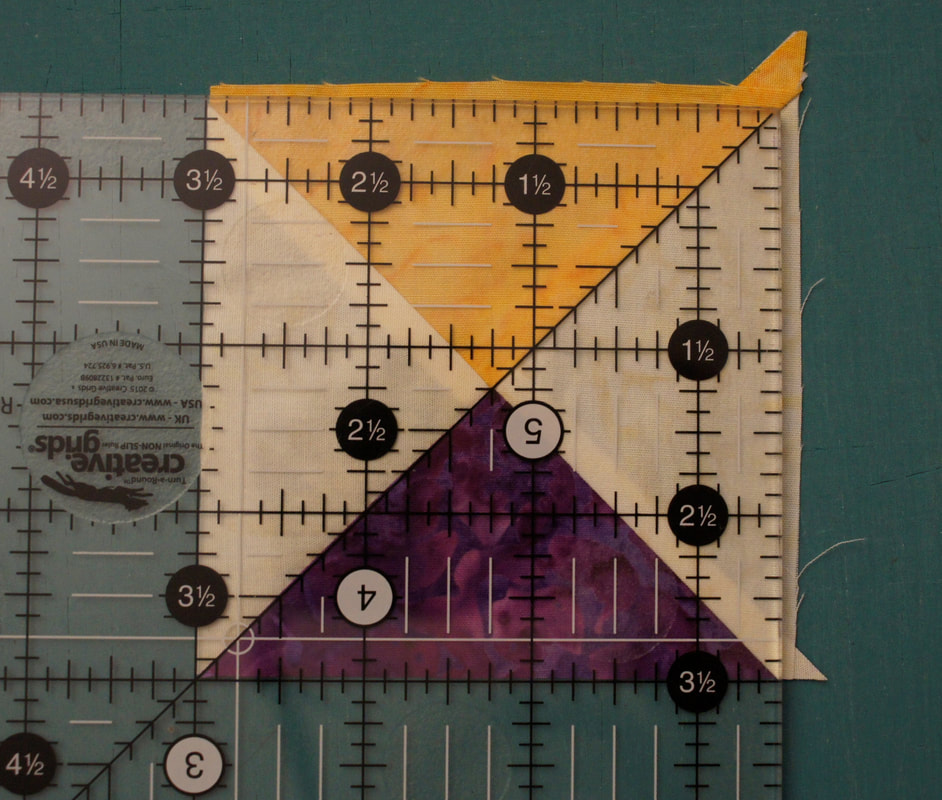 The only other issue I had was when it came time to join the blocks together to make the row. Most worked out just fine, but there were a couple where my pressed seams ended up going in the same direction. 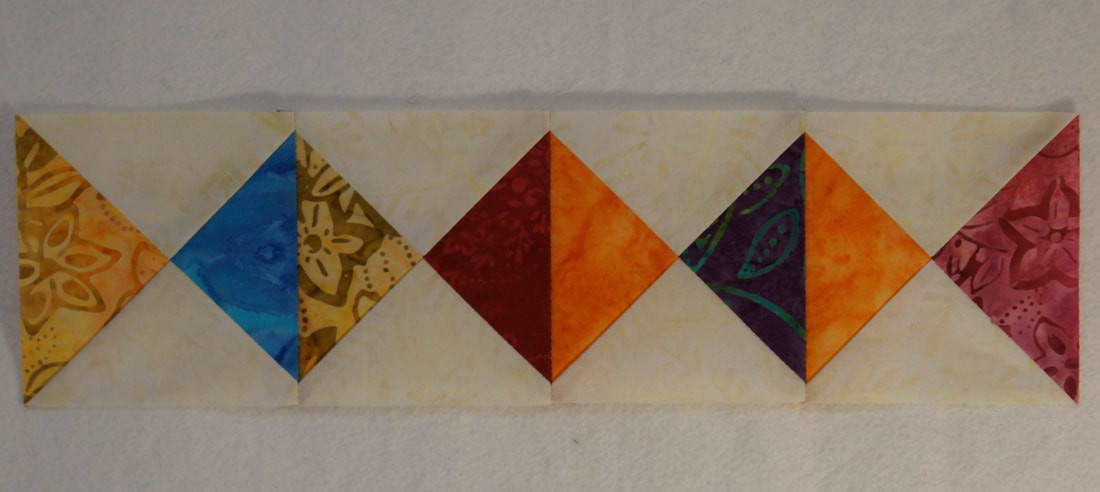 Here is how I handled that in this case: As I am sewing I will flip one of the seams over so that they lock in place. Notice I chose to flip the bottom seam, again so the top one will feed into my needle in a way that pushes it into the lower seam. 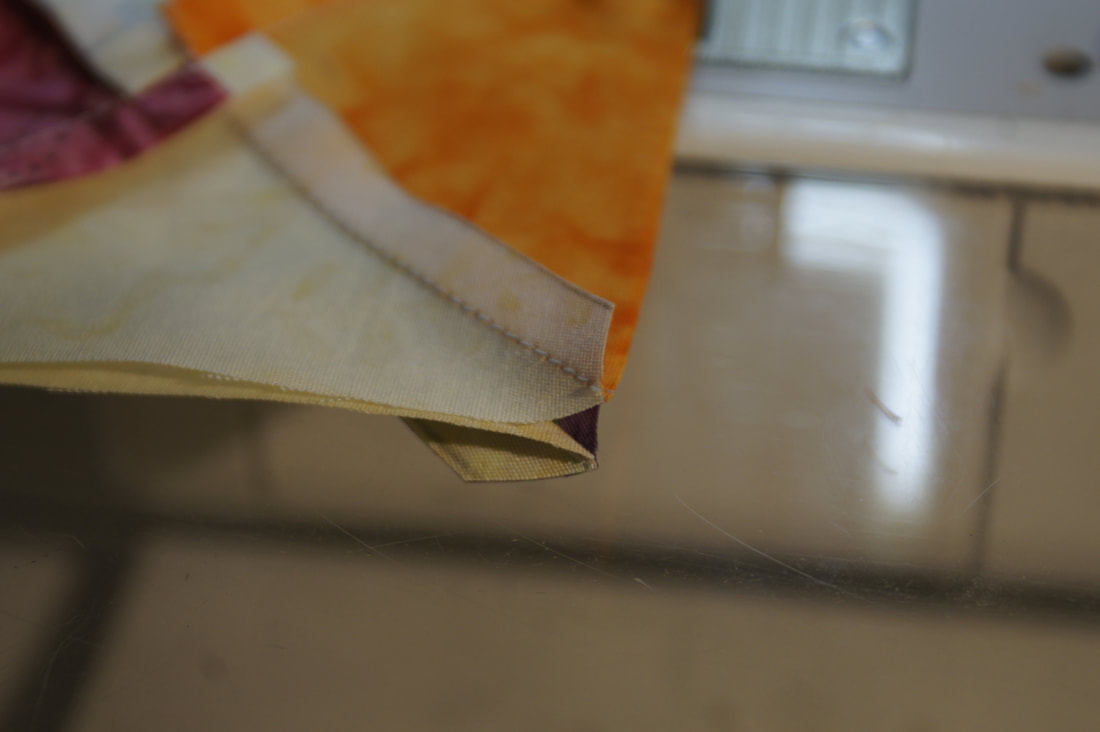 But then I have the problem of this wonky seam that does not lie flat. 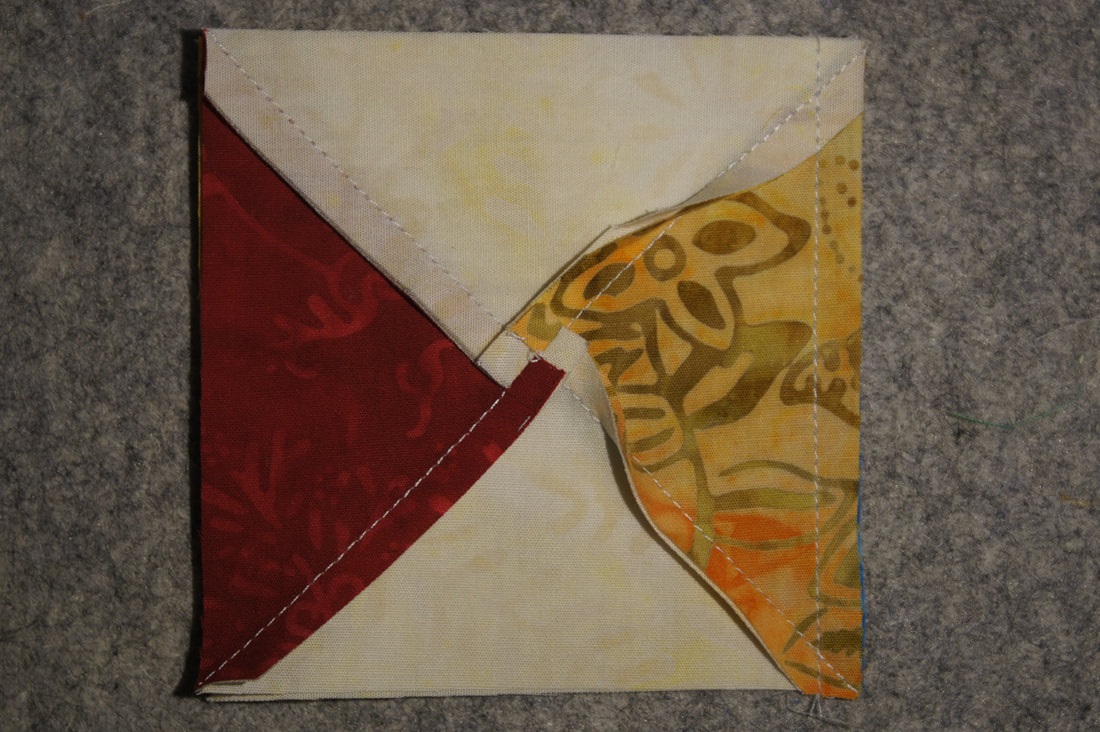 So the trick is to get out my scissors and clip that seam right up to the stitching, allowing it to lie flat again. This is a technique I employ at times rather than using a dab of glue to hold seams together that are facing the same way. I learned this technique of doing a cut in the seam like this while making my first Moda Blockheads quilt with some of the big names in the quilting world and have since used it to deal with this particular issue when pressing seams did not achieve the desired results. 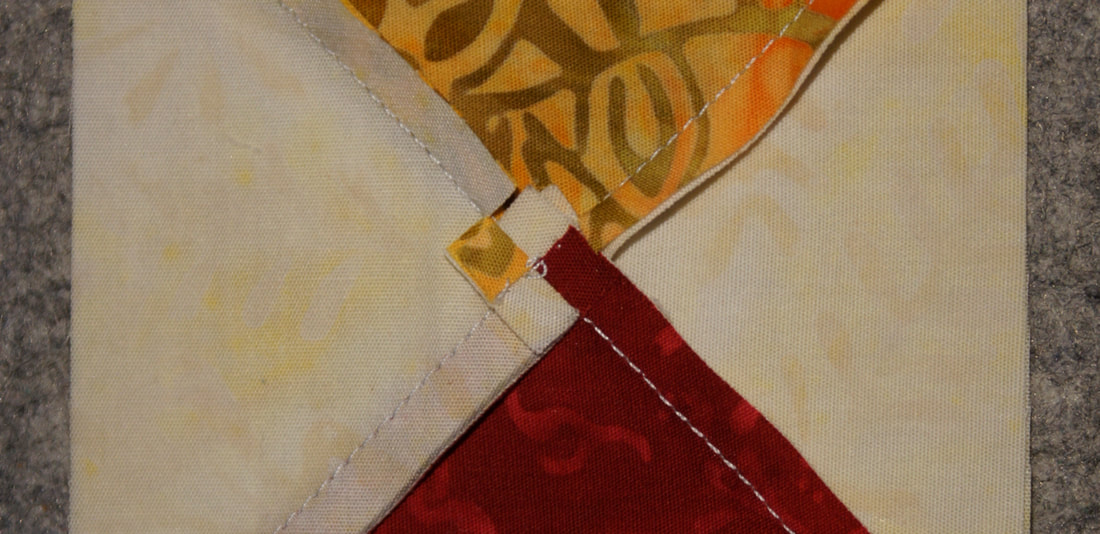 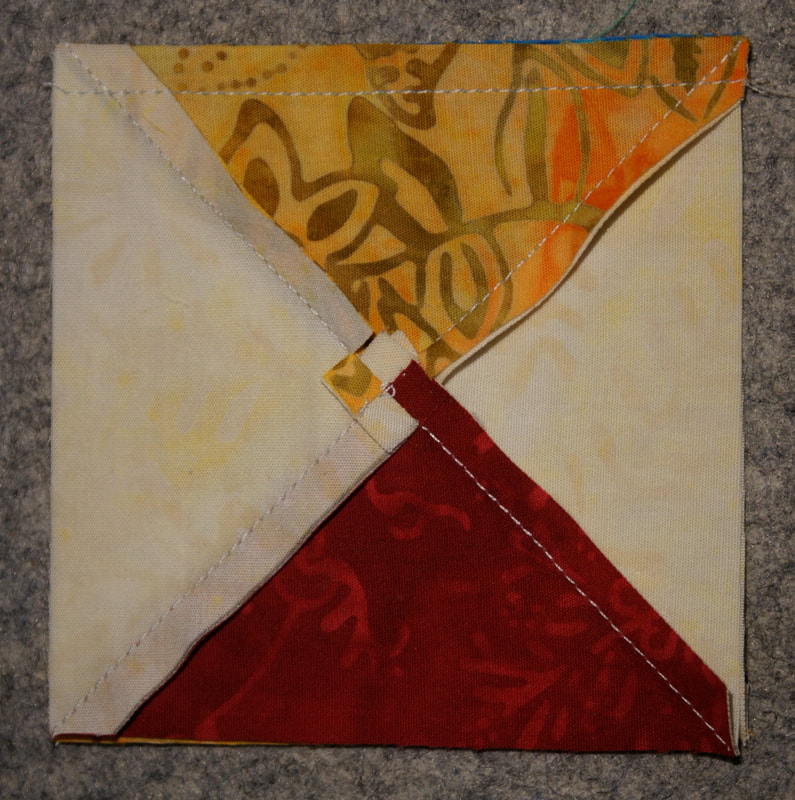 Since this process made two of each block combination I laid them out in two identical rows and then joined them together to make my long row for the quilt. 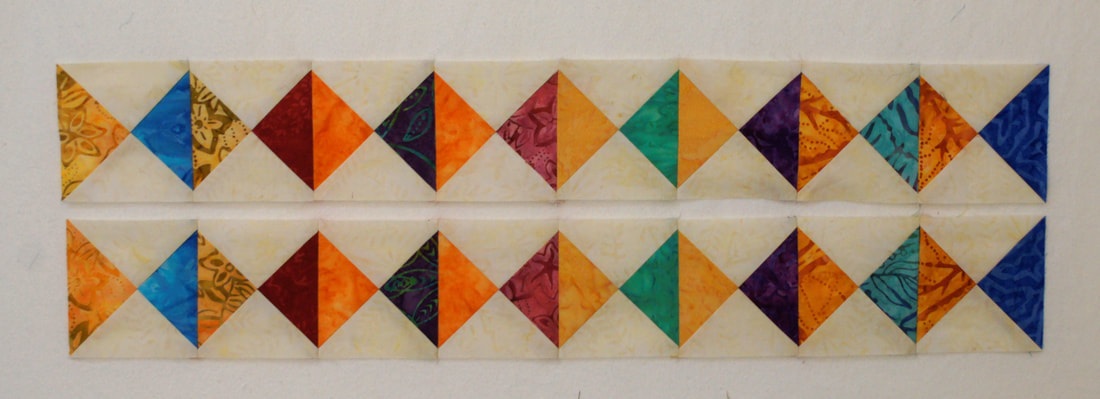 And that's it for this month. Next Month we will wrap up this project with our final row. I am really enjoying seeing all of your beautiful quilts in our Facebook group! I know those birds last month were a bit of a challenge, but wow! They are just the cutest. Well done!!! Click on the link below for the free pattern. Happy Quilting!
Debra |

Welcome to the site of Debra Davis-a woman who loves the Lord and loves to quilt.
My other blog where I share about my walk of faith:
Sitting at His Feet 
|


 RSS Feed