|
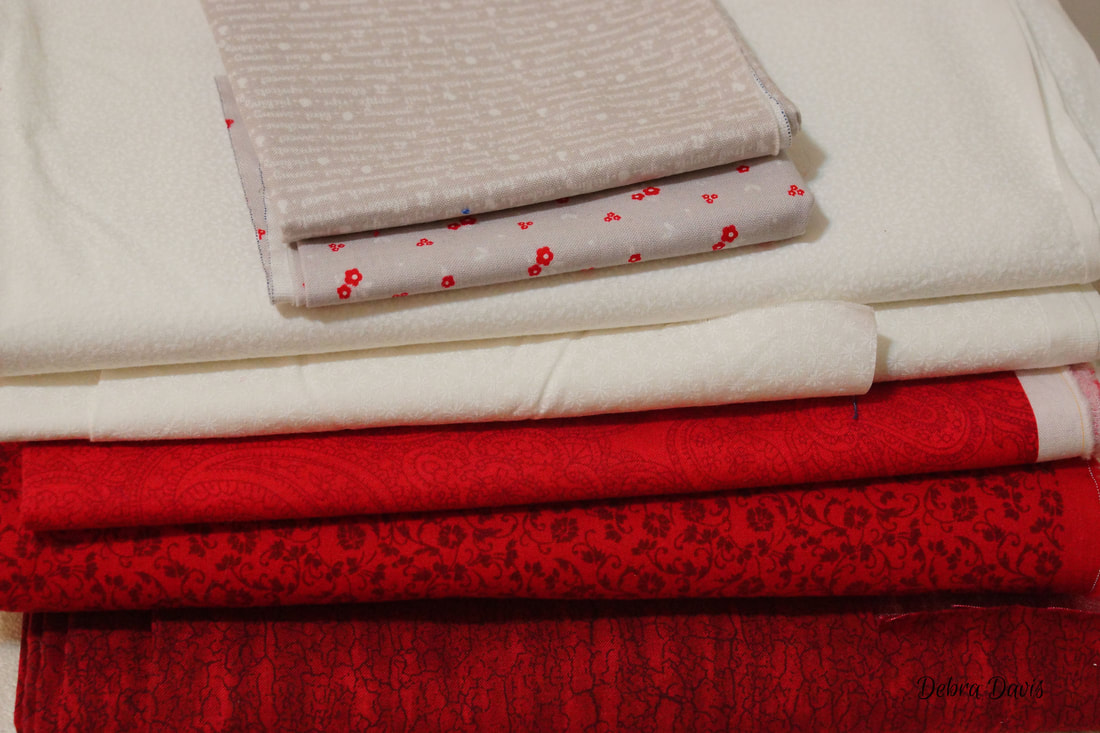
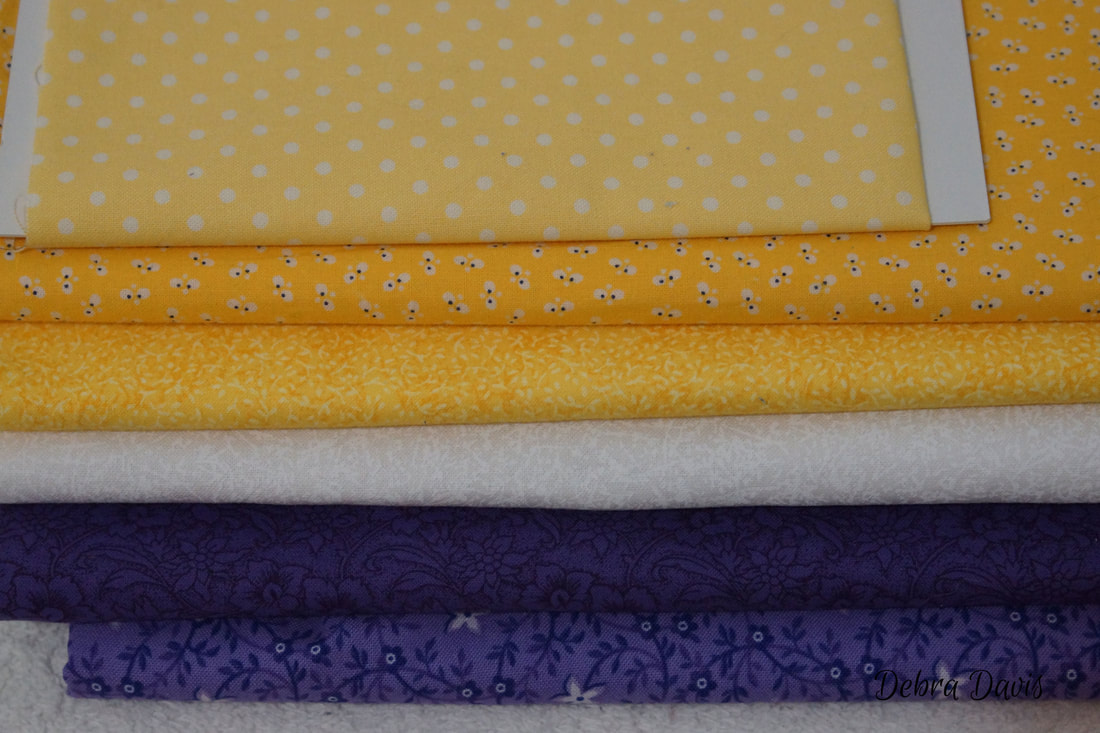
It's Monday and that means I can finally introduce to you the first block in my 2018 Block of the Week. The pattern can be downloaded HERE. In this post I will provide a detailed tutorial on how I put my blocks together so that hopefully even a beginner will be able to successfully create the blocks. All of the files you need can be found on my Free Patterns page and on the Tuning My Heart Sew Along Facebook group page under "Files." -And stay tuned for a little fun at the end of this post... This first post is a bit lengthy as I share lots of tips that will help in the making of all of the blocks to come. So bear with me as I cover some basics. 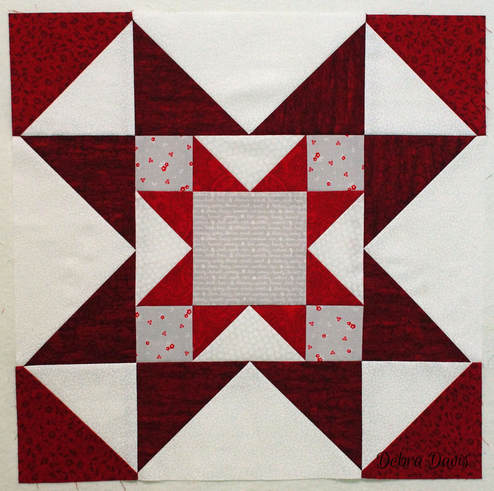 Let's get started. I have pulled the fabrics I am using in this block; both the red version and the color version. I am a prewasher- mainly because I want all of the shrinking to take place before I begin sewing. Color transfer has never been a problem, but if I am at all concerned-like with those deep reds- I will add vinegar to the wash in the place of fabric softener. I also have learned to love starch and have had no issues with Faultless Heavy Spray Starch. It adds stiffness back into the fabric which seems to help with accuracy. One thing to note is that fabric that has been starched should not be stored long term as it can attract bugs so I tend to starch only what I know I will use. There are other options that do not have this issue, but I just prefer my cheap spray and so does my budget.
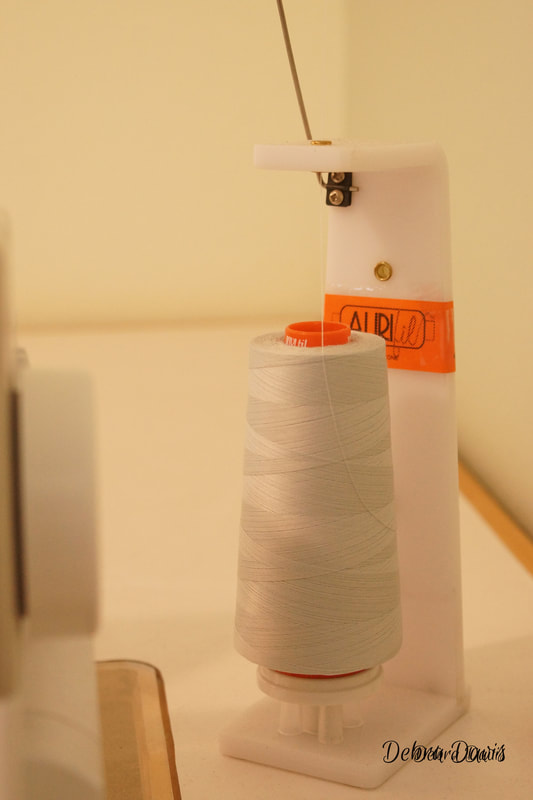
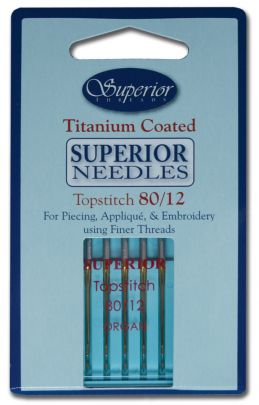
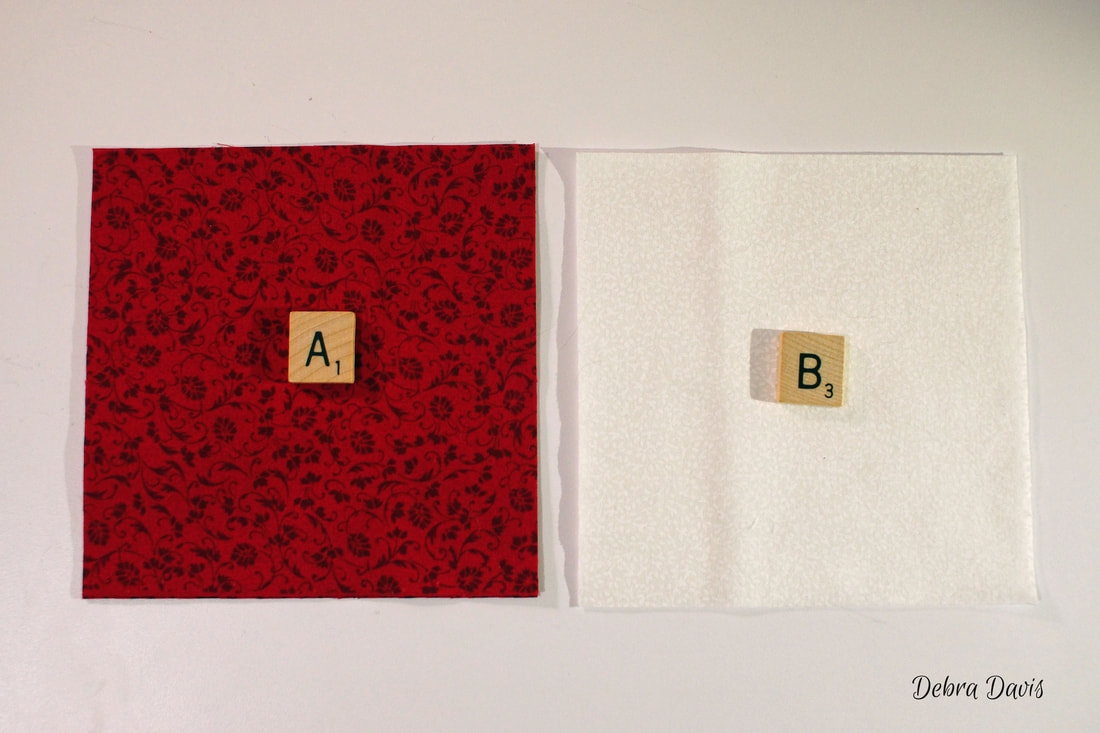
Following the cutting directions for the colorway I am using I cut out all of my pieces first. I found it less distracting to my measuring if I simply turn my cutting mat over so I do not have all of those lines on the background. I only use my rulers for squaring things up and it makes for a cleaner looking work surface. This is a good time to make sure I am using a sharp blade on my rotary cutter-if it is not cutting through all of the layers easily then it is time for a new one. 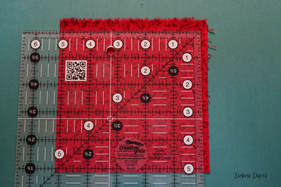 Starched, labeled, and ready to go 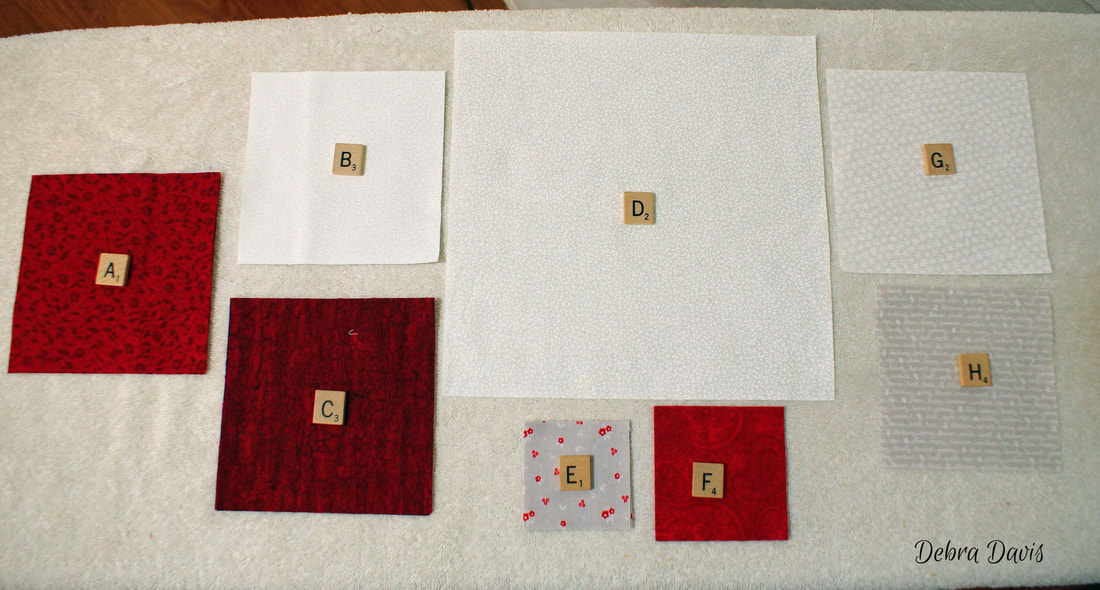 A little more prep details to go through. For piecing I like to use a grey thread-I picked up a cone of Aurifil color 2600 on sale and it lasts a really long time-I have lost count of how many quilt tops I have put together with this cone and it still has lots of quilts left in in its future. I always start a new project with a new needle- and since I am using a 50wt thread I am putting in a new 80/12 topstitch needle.
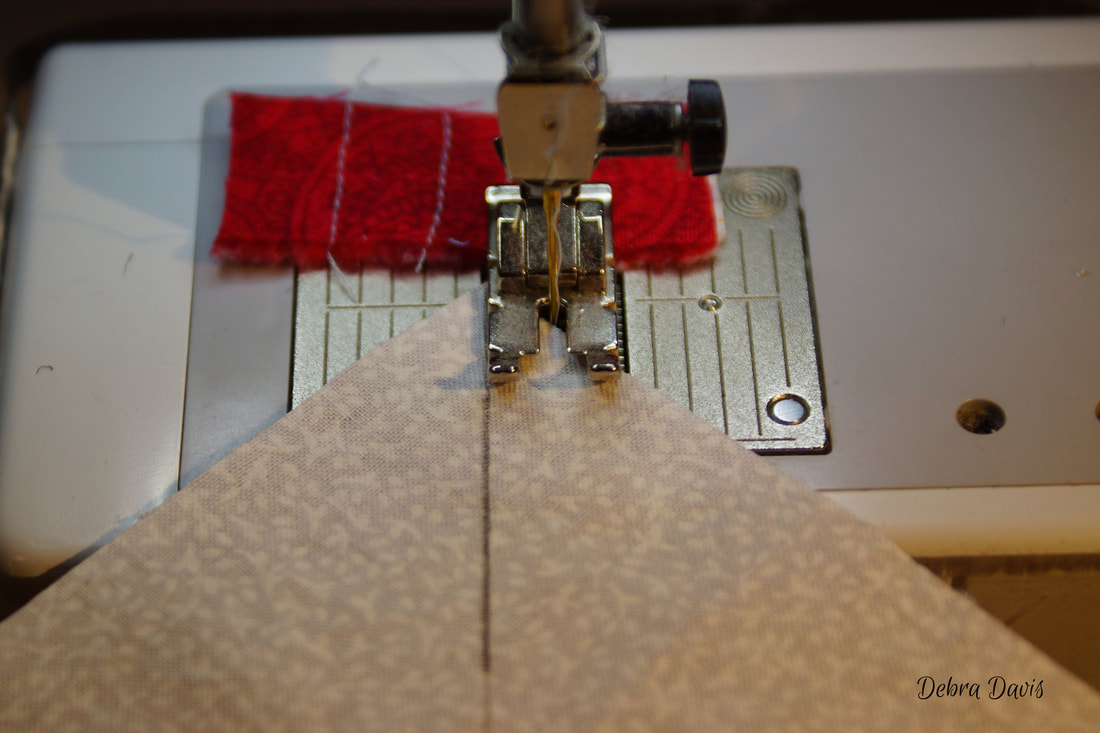
As for my machine-I have my stitch length set to 2.1 and my needle in the down position. 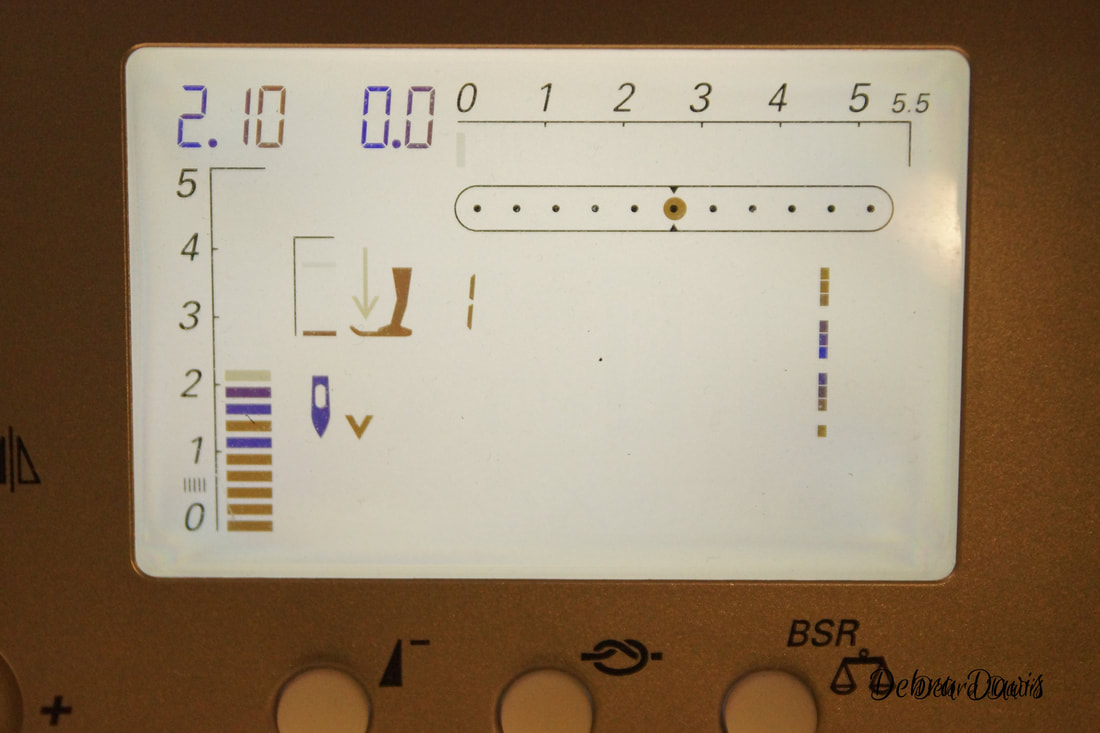 And now I am ready to start putting my block together. I begin by making the Half-square triangles (HST's) with the A and B squares. This is a technique we will be using a lot in the making of this quilt. I first draw a diagonal line down the middle of the B squares. To keep the fabric from shifting as I mark it I have placed it on a piece of very fine sandpaper I picked up from the hardware store. A mechanical pencil works well for marking these. It is important that my line goes from tip to tip of the square.
Starting with an "leader" scrap of fabric I sew 1/4 inch from the diagonal line I have drawn. I always start with the new piece right up against my needle. This helps me to get a straight start to my sewing.
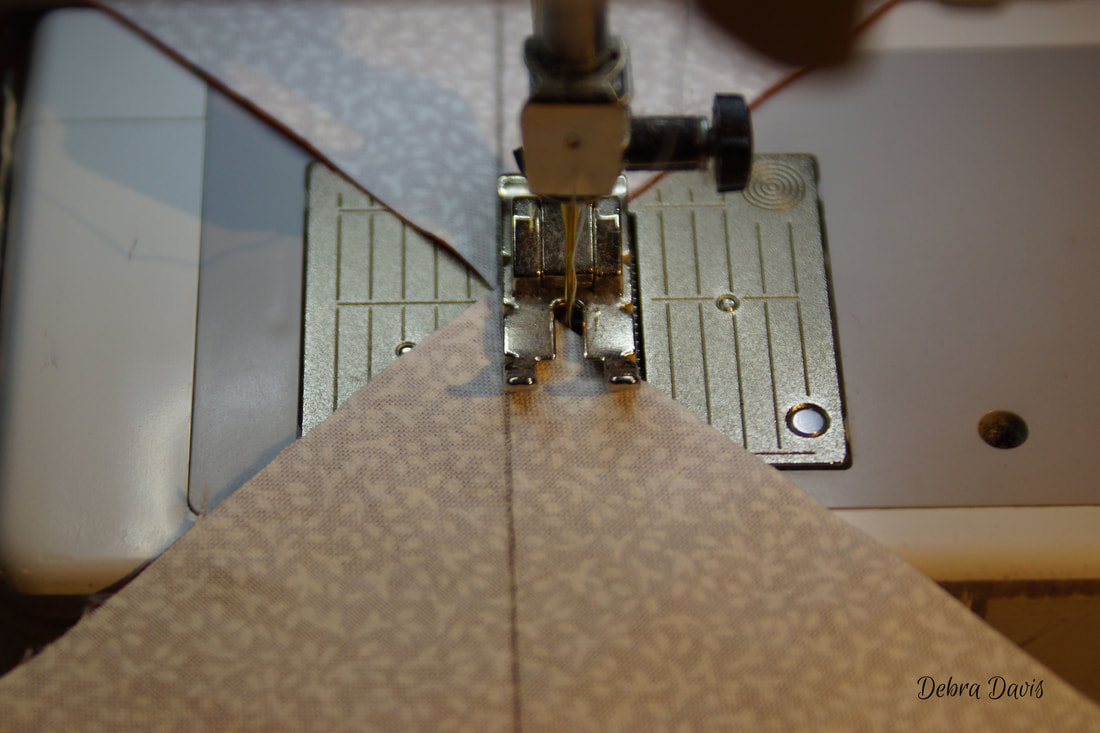
I sew right off onto an "ender" scrap that will serve as my "leader" when I start sewing the next step. Clip the units apart and sew 1/4 inch from the other side of the drawn line.
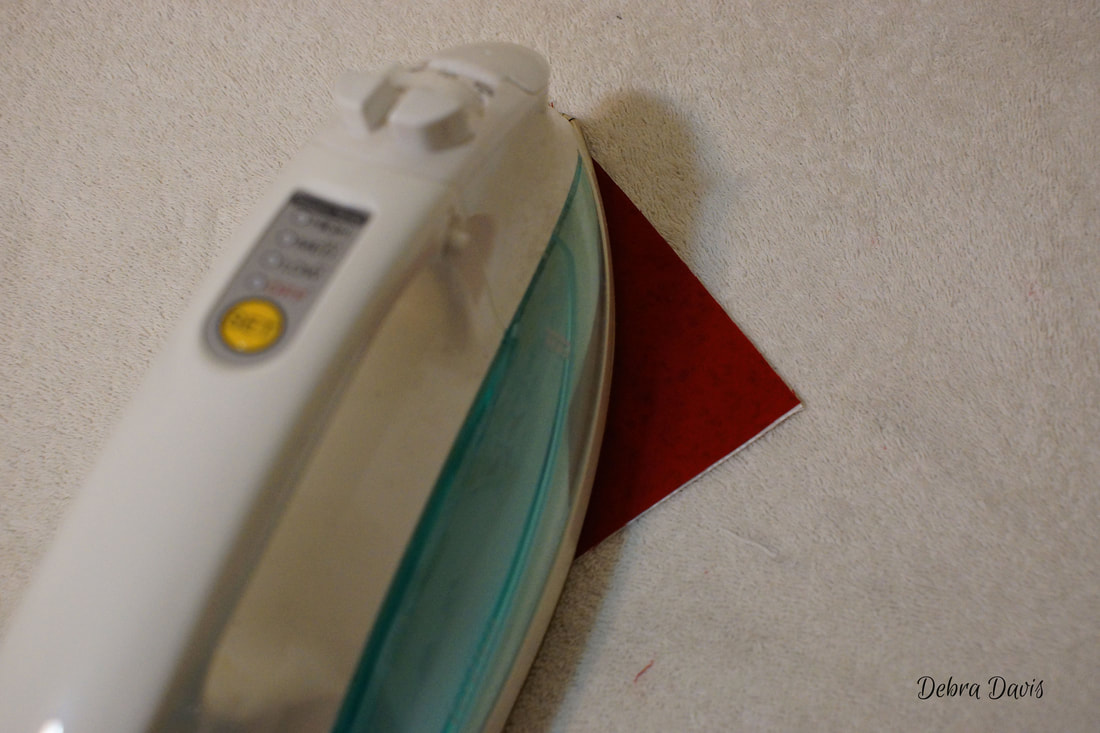
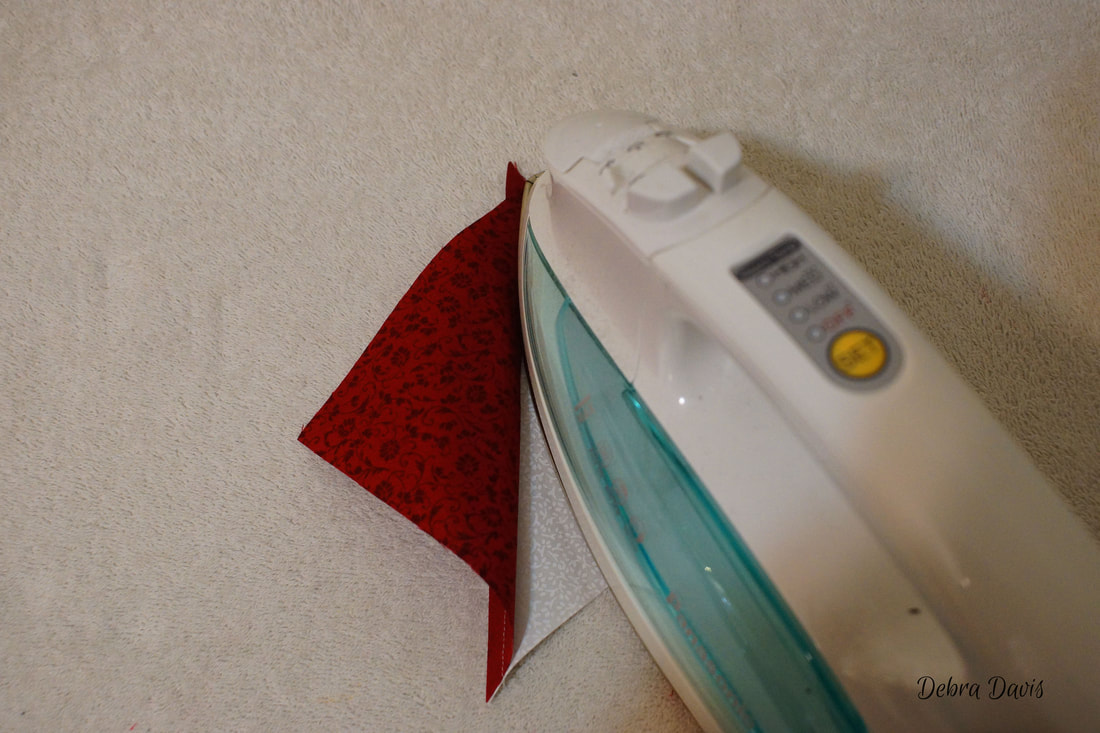
Using a ruler and rotary cutter I cut right along the drawn line. 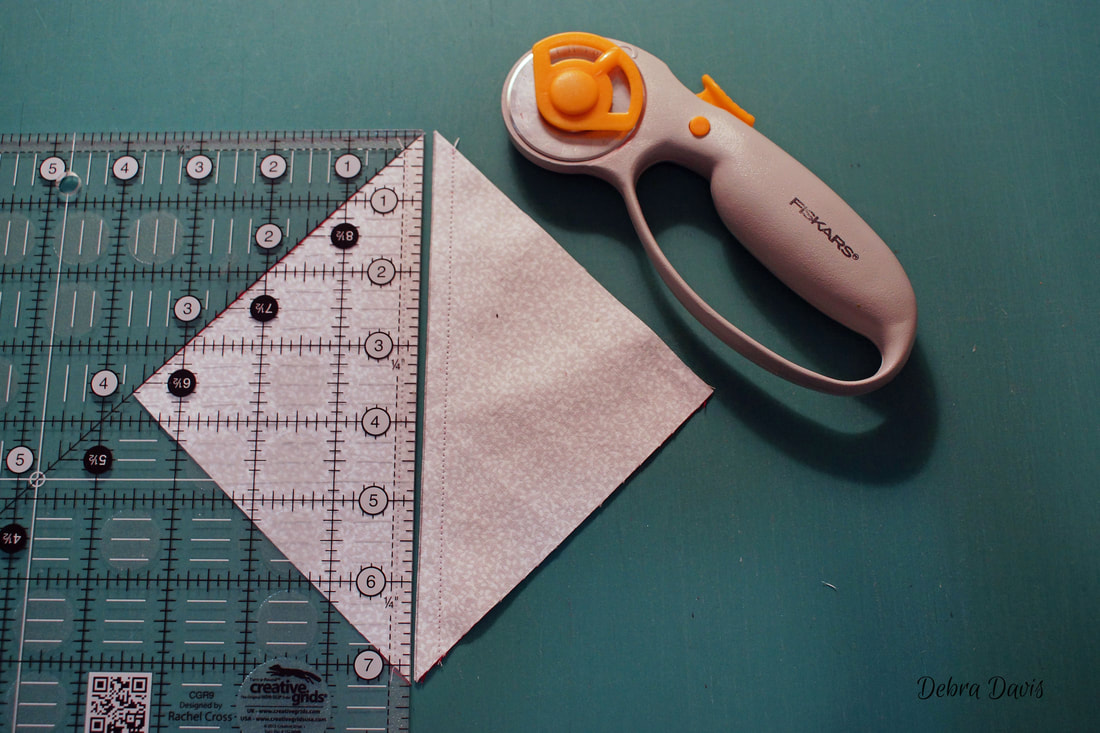 Next, it is time for some pressing-first setting the seam (simply place the iron on top of the seam that was sewn) and then pressing towards the dark side to open up the HST. This is a pressing motion-more like lifting the iron up and down rather than pushing it back and forth as one would to iron a shirt. I use a high heat setting and never put any water in my irons.
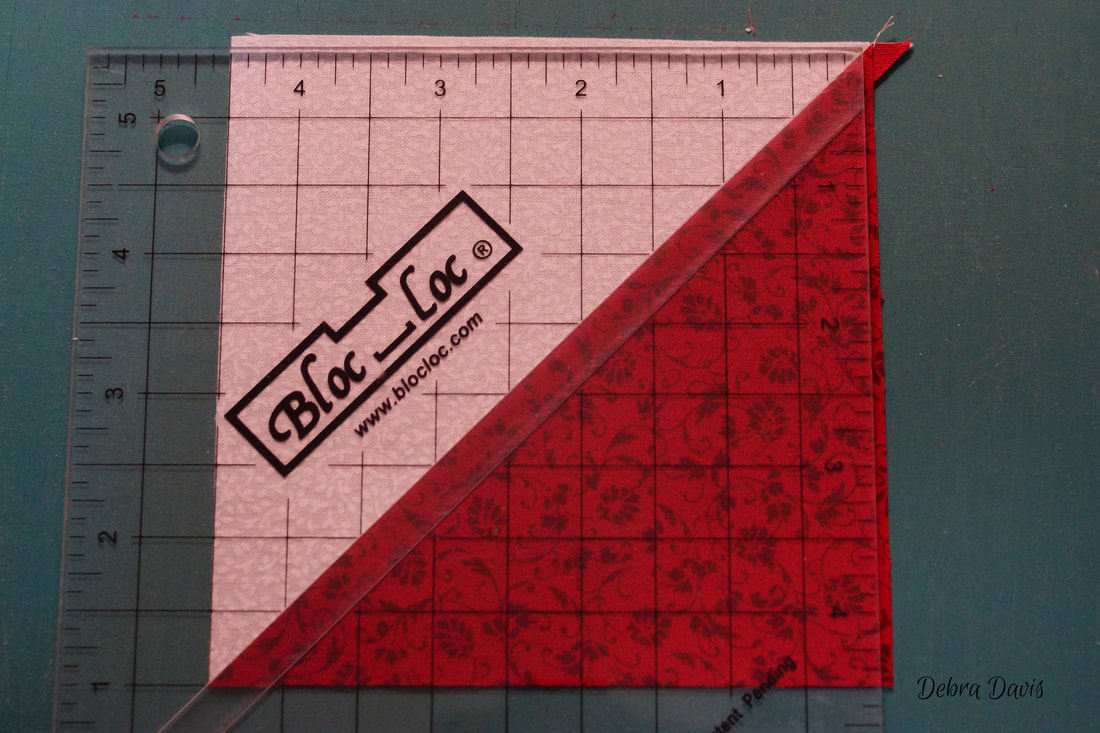
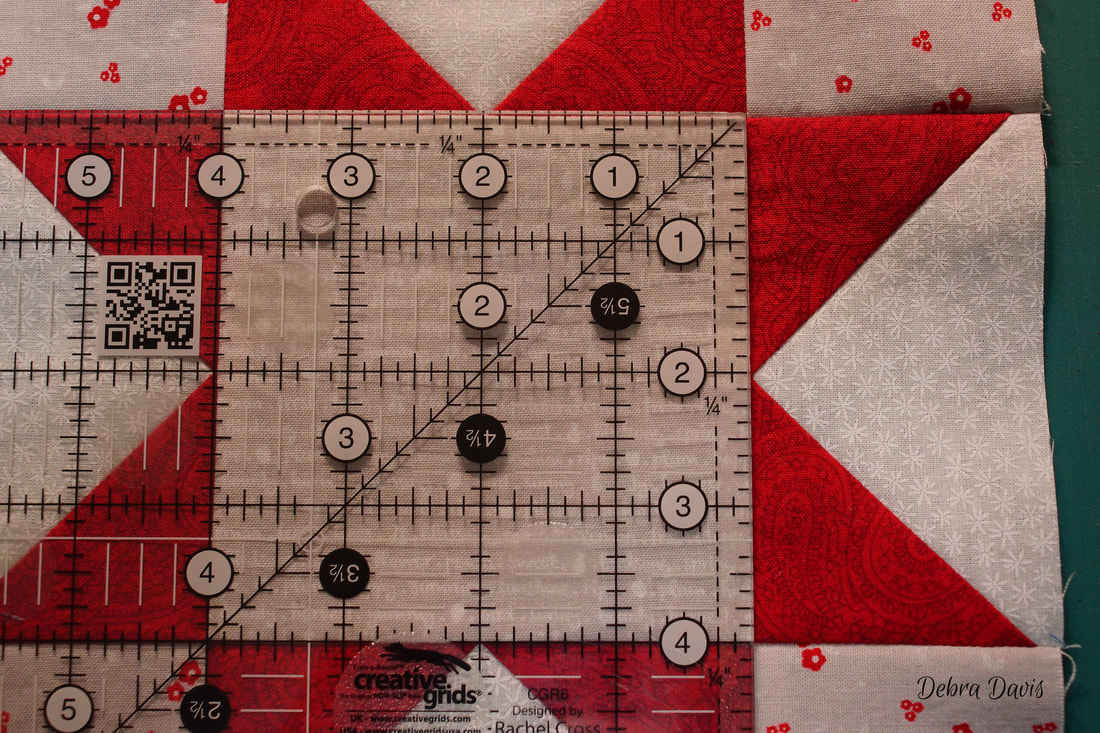
Once the Half-square triangles have been pressed it is time to trim them to size. For this block I need to trim them to 4 1/2" x 4 1/2". I do love my Bloc-Loc Ruler for trimming HST's as it has a groove that fits on the seam and holds it nice and straight for cutting.
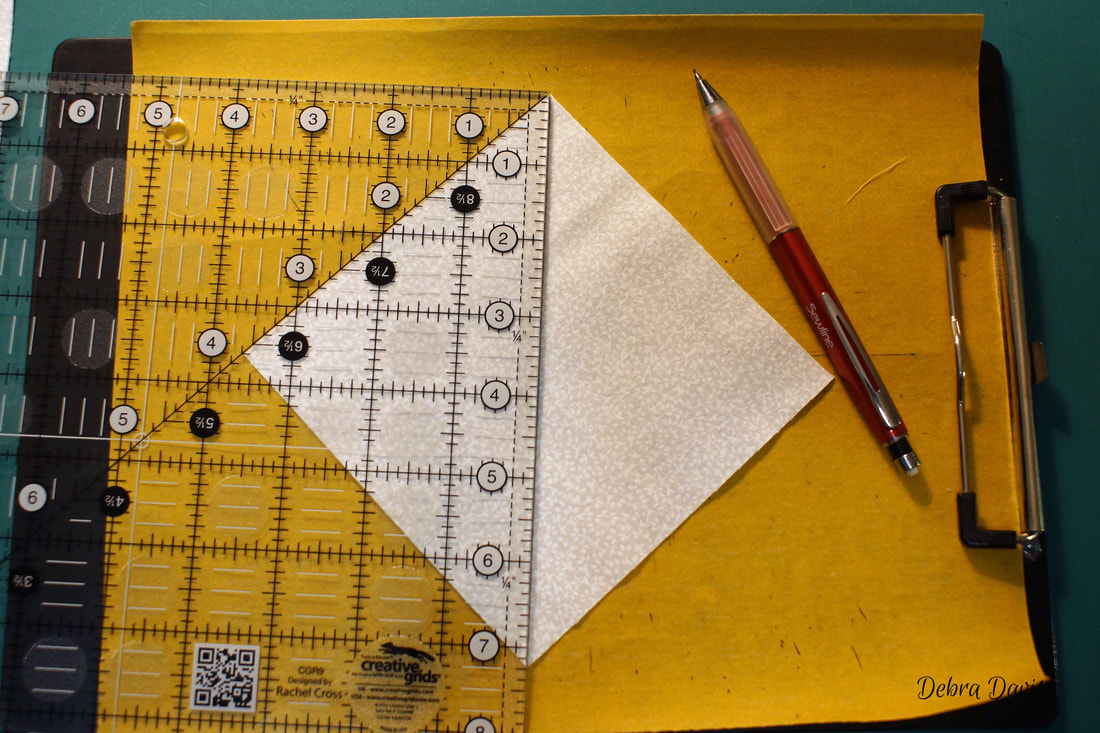
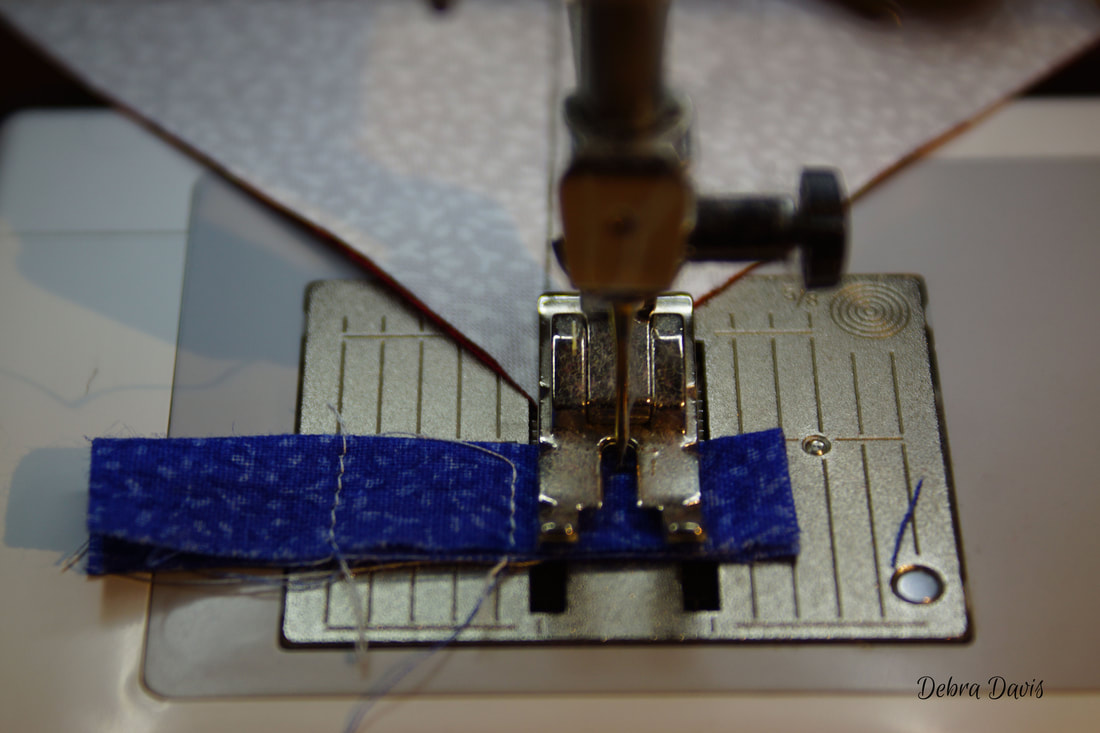
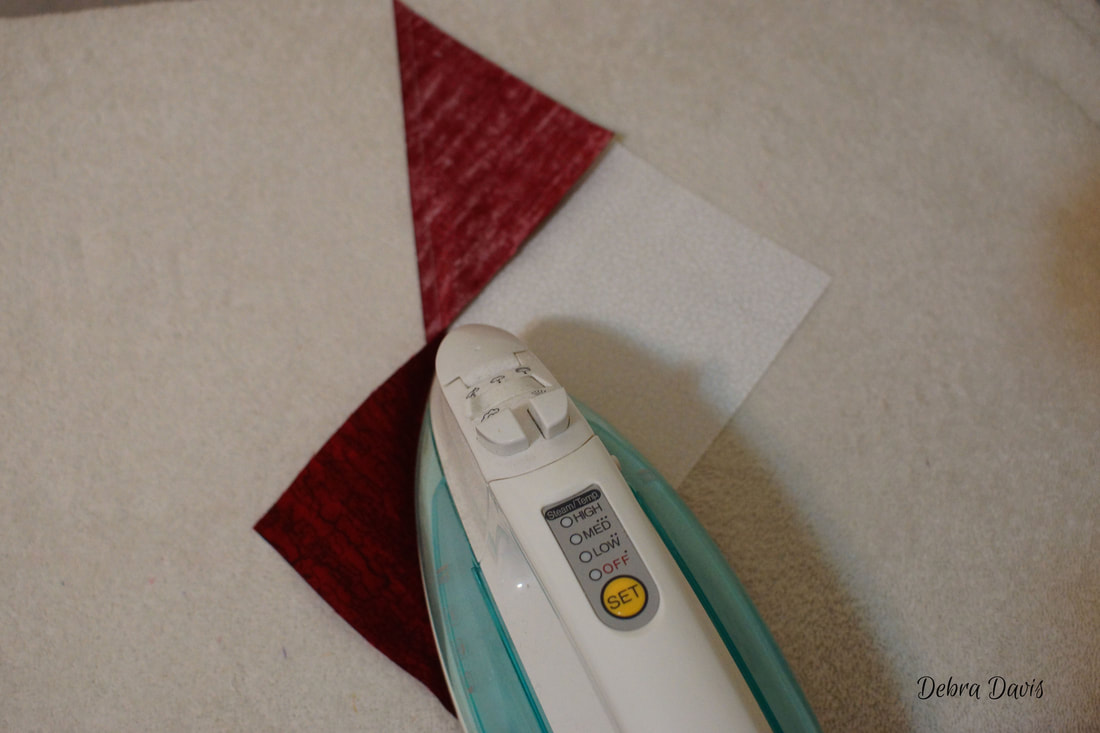
How you trim these units is very important for the end result so I want to show you what to do if you are trimming with a regular ruler. The diagonal lin on your ruler must line up with the seamline on your HST. Then move the 4 1/2" lines inside a bit and trim the first two sides. 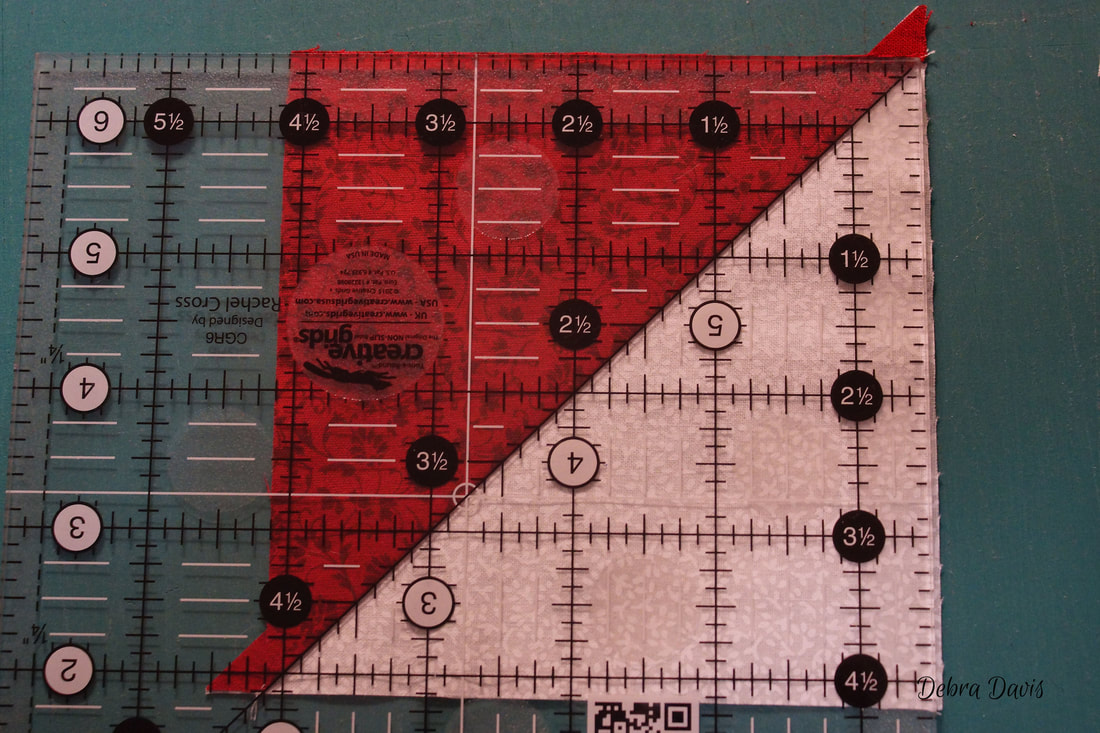 Rotate the unit, line up the diagonal line again and put the 4 1/2" mark of the ruler along the outside edges of the sides you previously trimmed. Once this is all squared up make your final cuts. 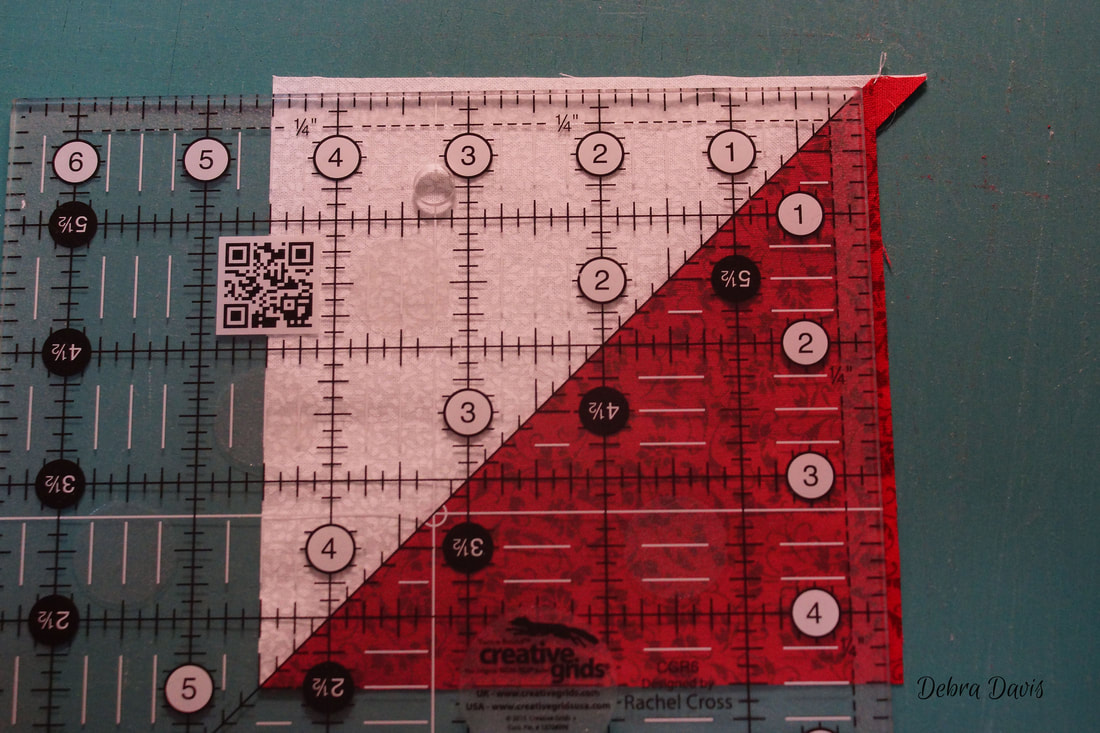 Setting those units aside for now I move on to the Flying Geese using the C and D squares. The "No-Waste" method is my favorite for these. It is not quite no-waste for me as I prefer to cut things a little larger and then trim to size. 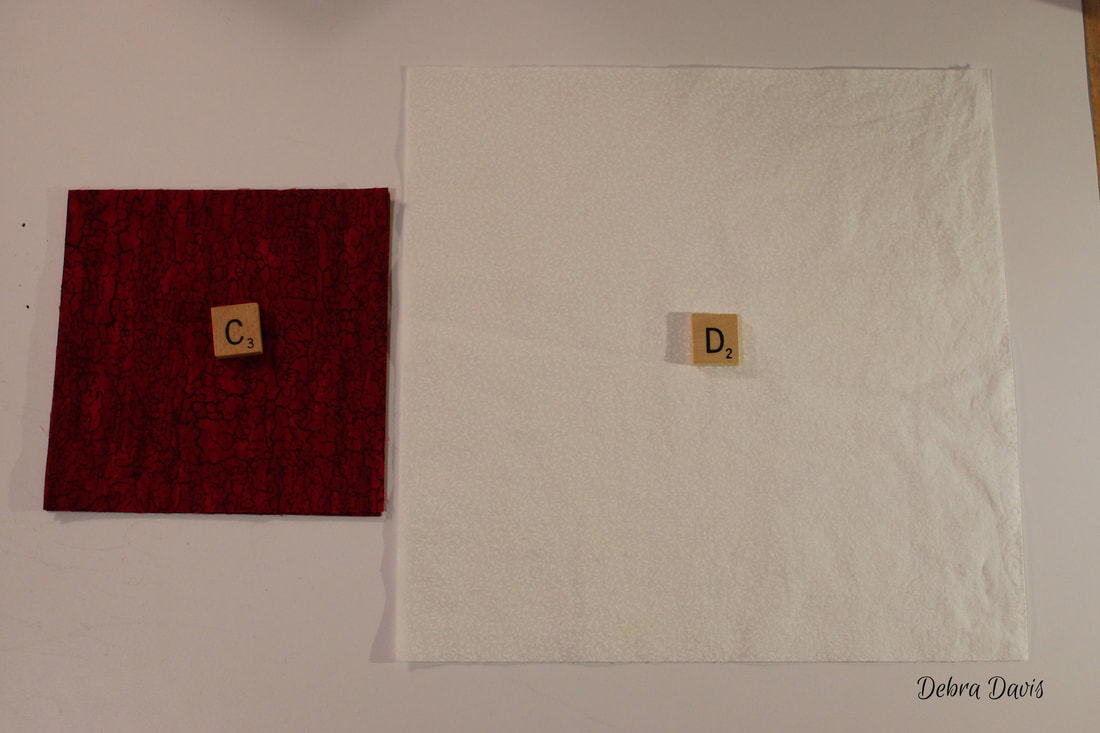 With right sides together place two C squares on top of the D square and draw a diagonal line down the middle. It is important once again to make sure that the line goes through all of the points of the squares and not off to one side or the other. 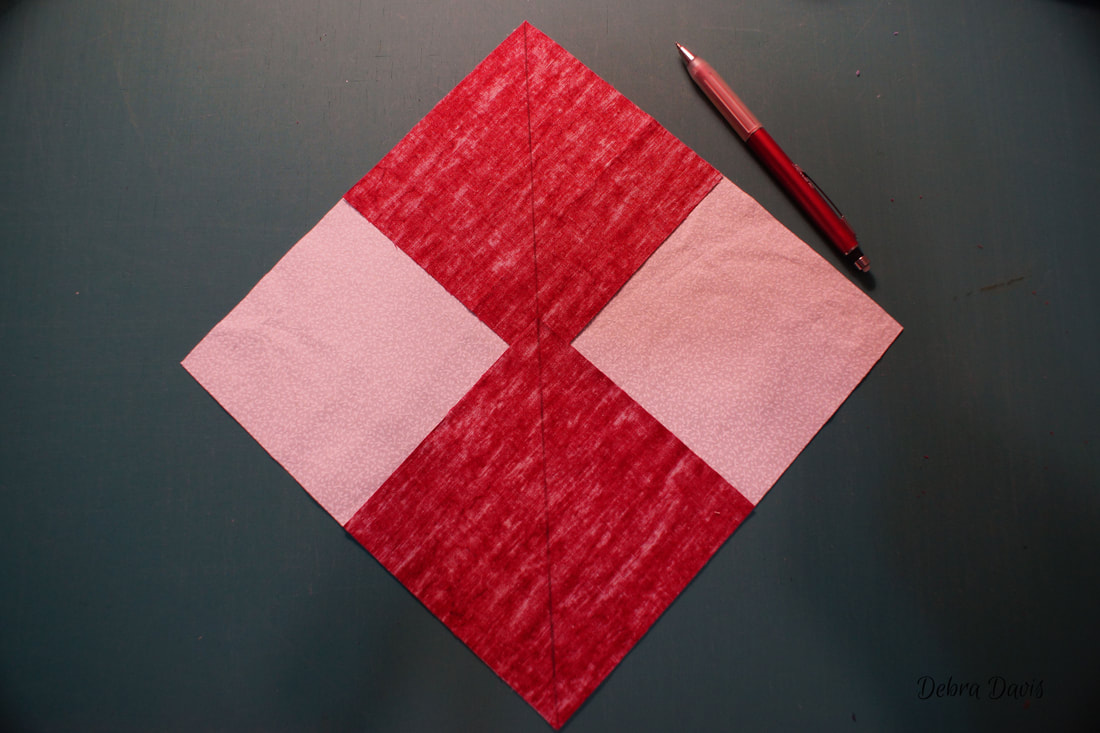 Just like with the HST's sew 1/4 inch from each side of the drawn line. A little tip here is to place the unit so that the tip of the top square faces away from the needle as you sew. 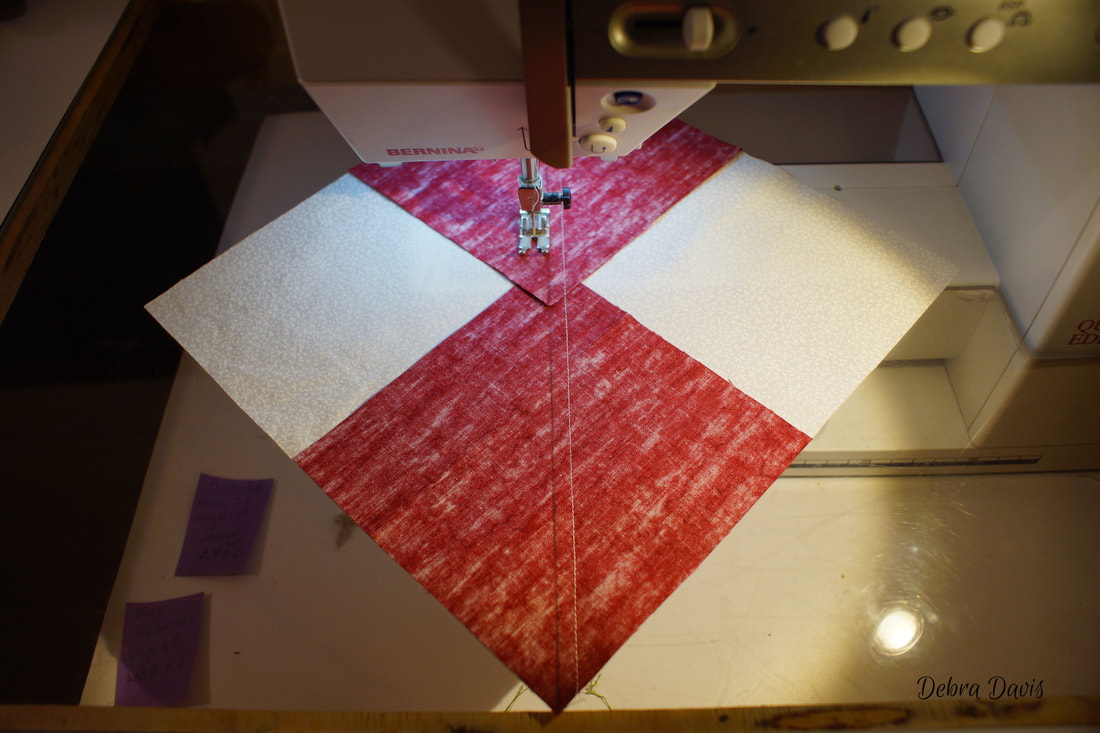 Cut apart on the line... 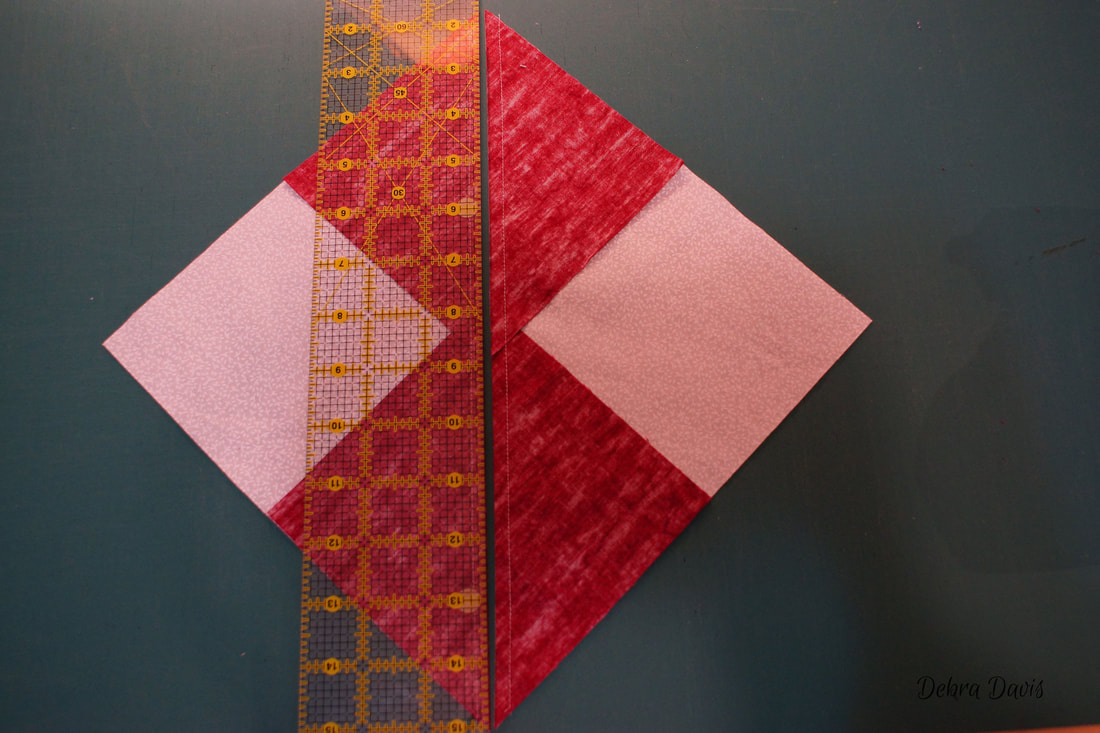 and press towards the smaller triangles. Be careful to press and not move the iron about as that can distort the unit. It is tricky to adjust to this method of pressing at first but will make a difference in how well the finished pieces look.
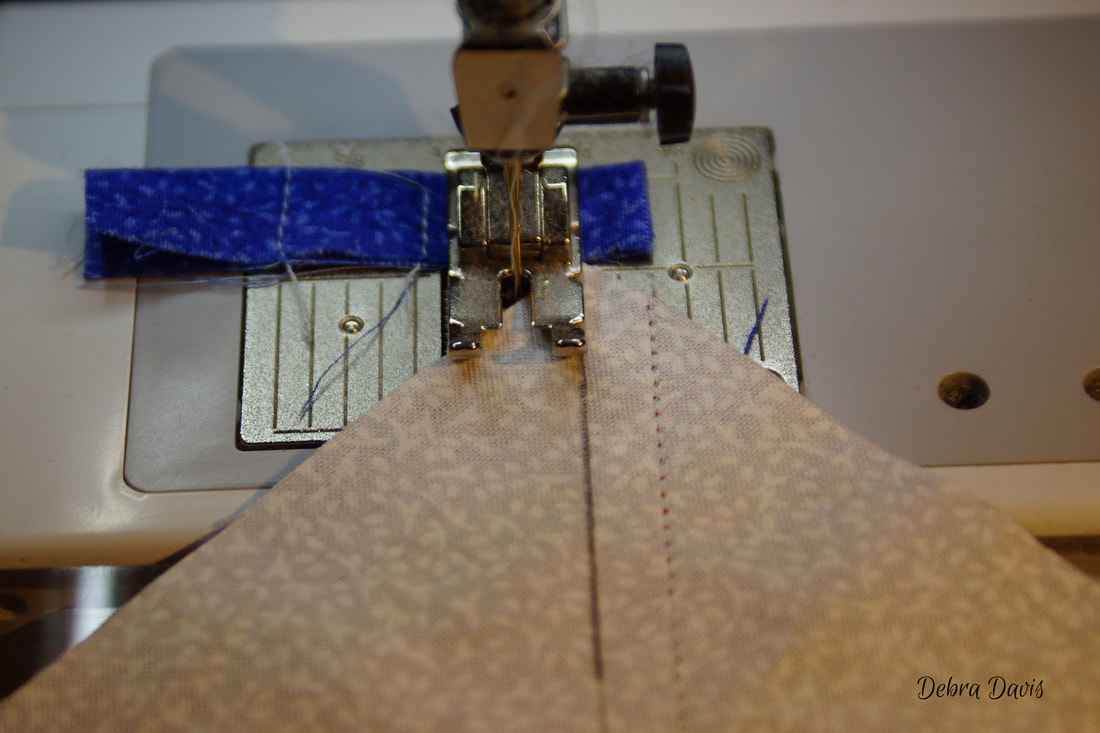
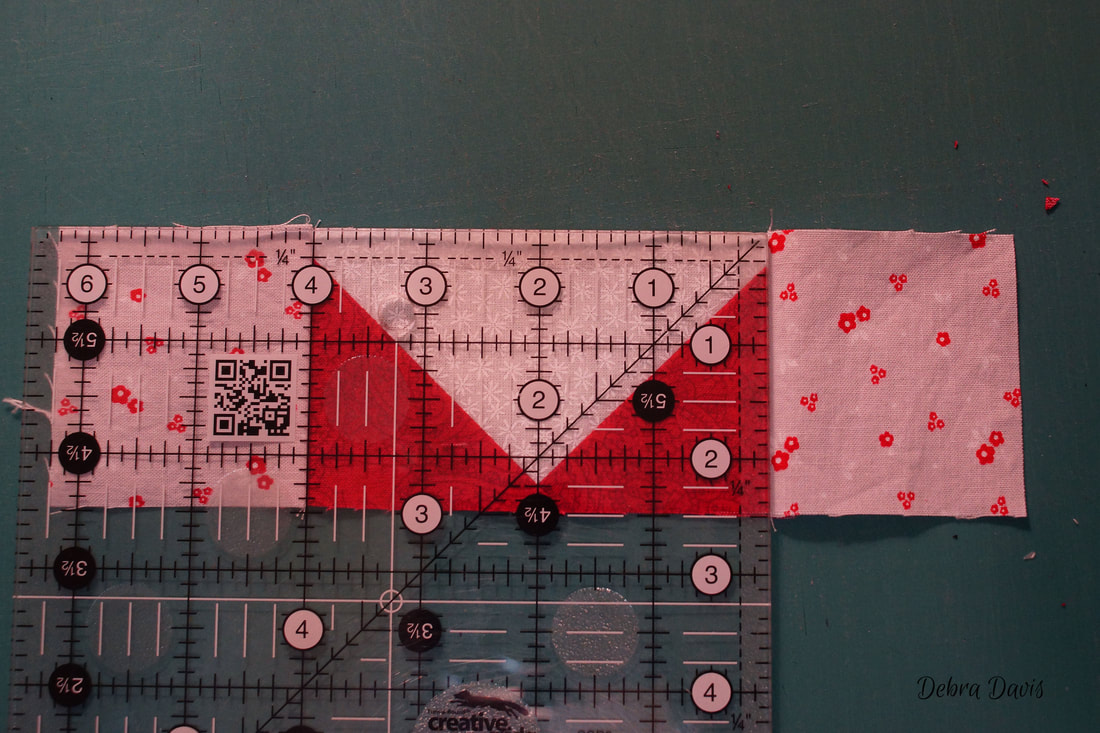
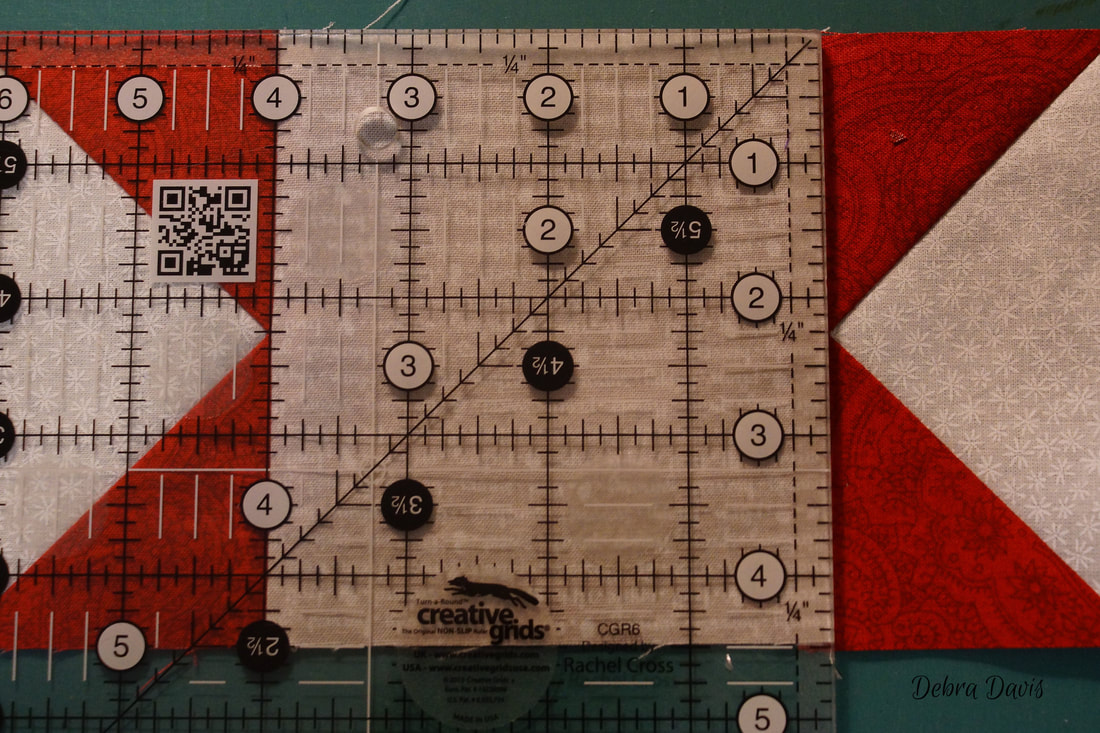
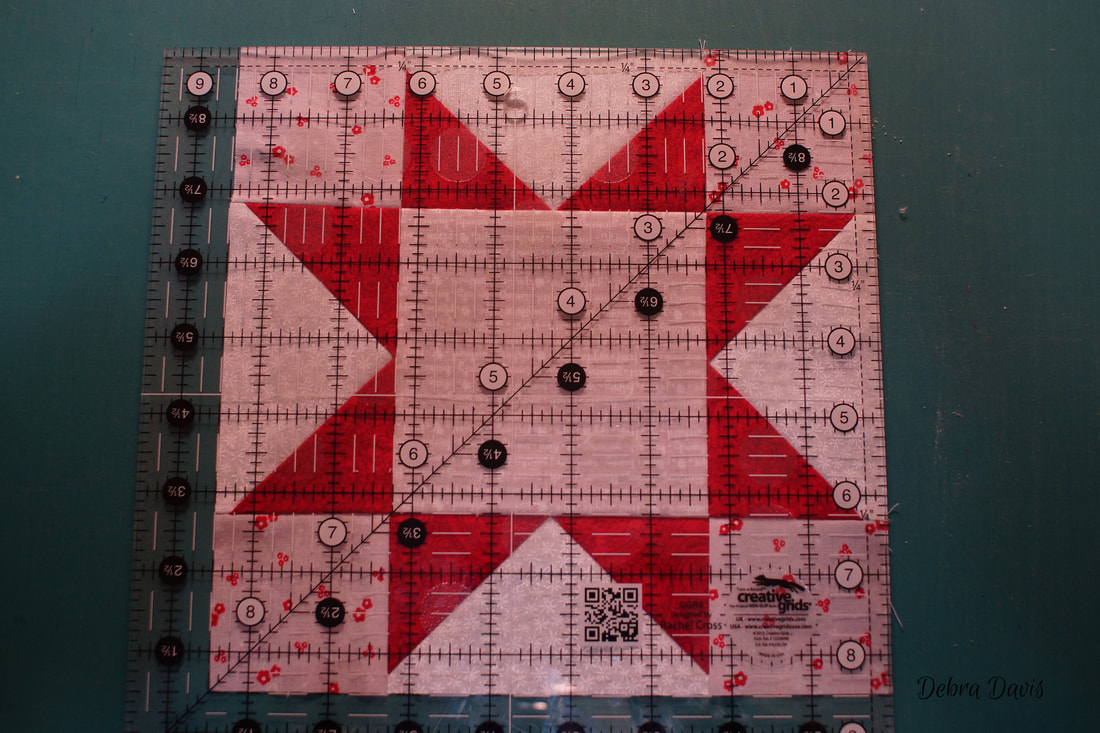
Next place another C square on top of the unit and draw a diagonal line down the middle. I see I missed the point a little here-I need to watch that as I sew. 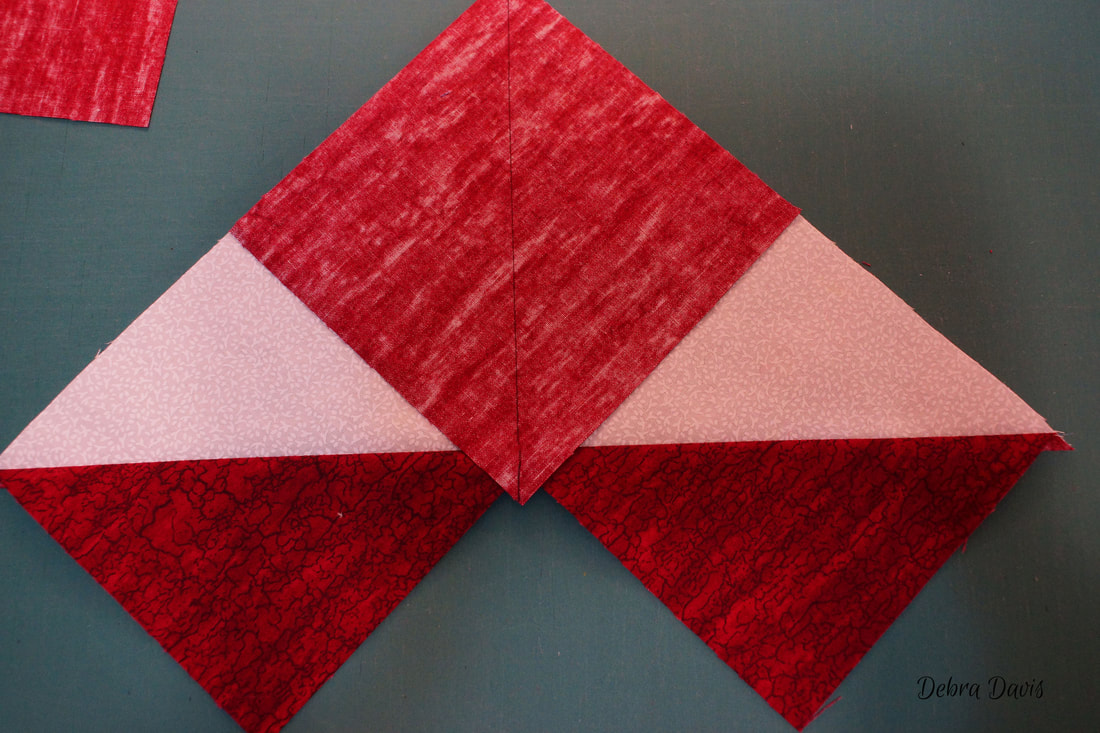 Once again, sew 1/4 inch from each side of the drawn line.  Cut apart on the line and press towards the small triangles to make four Flyng Geese units.  These all need to be trimmed to 4 1/2" x 8 1/2" So let me share the tips for doing this with a regular ruler. You have to know the midpoint-which in this case is 4 1/4" (8 1/2" divided by 2) place the 4 1/4" mark on the ruler right at thr tip of the large triangle (this is the sky of a Flying Geese unit) leaving 1/4" extending beyond that point. (This ensures that when you sew it in place you have a 1/4 inch seam allowance and are less likely to lose your points.) At the bottom of the unit look to see that the edge of the ruler on the right and the 8 1/2" marks on the left side land along the seam at the 4 1/2 inch mark. (see next photo for clearer picture of this.) 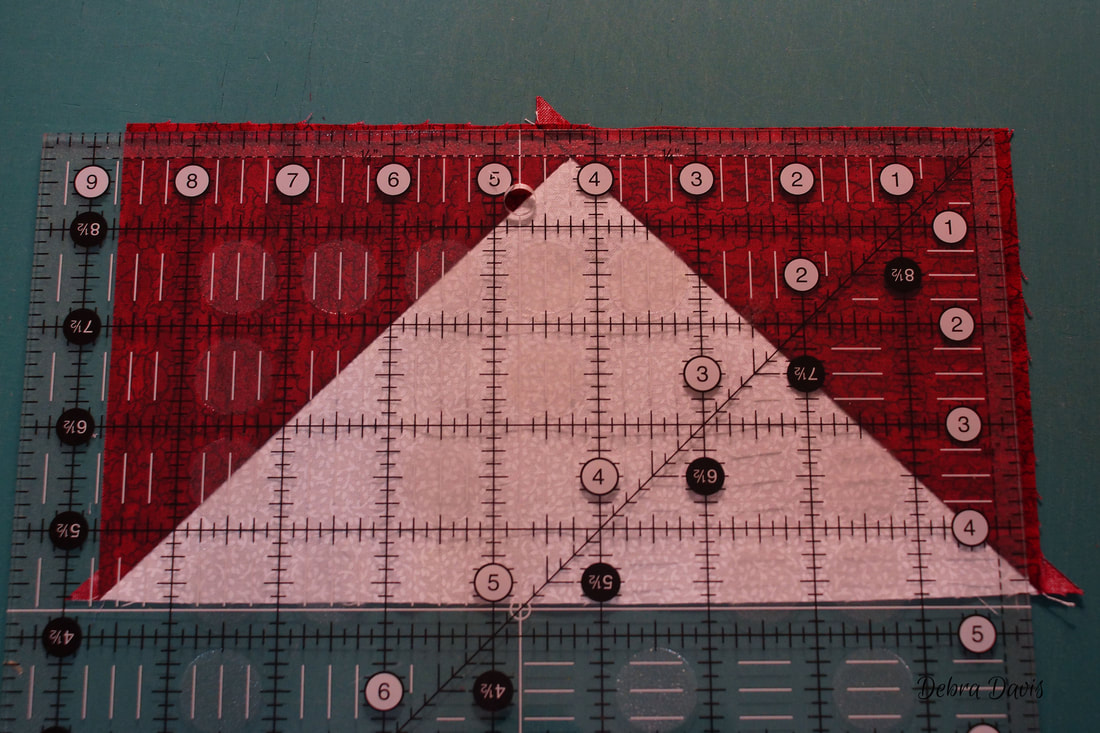 It can sometimes be hard to see the intersection of the two marks so I lay another rule along the 4 1/2 inch line. Now I can make any little adjustments to ensure that the bottom of the triangle commes to sharp points at the seam lines. Once I am satisfied I trim the first two sides. 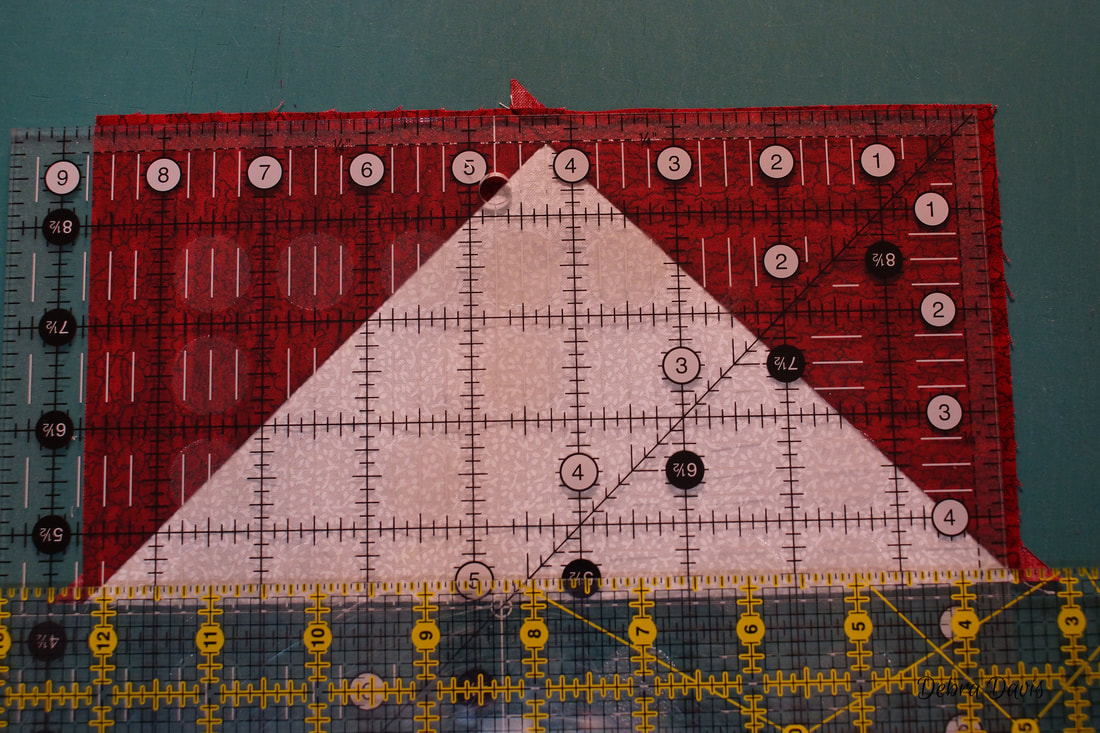 After rotating the unit I lay the diagonal line on my ruler along the seam line, placing the 4 1/4" mark at the top point of the triangle again-with a 1/4 inch seam allowance. Then I line up the trimmed edges with the 8 1/2 inch lines and the 4 1/2 inch lines and trim these last two sides. 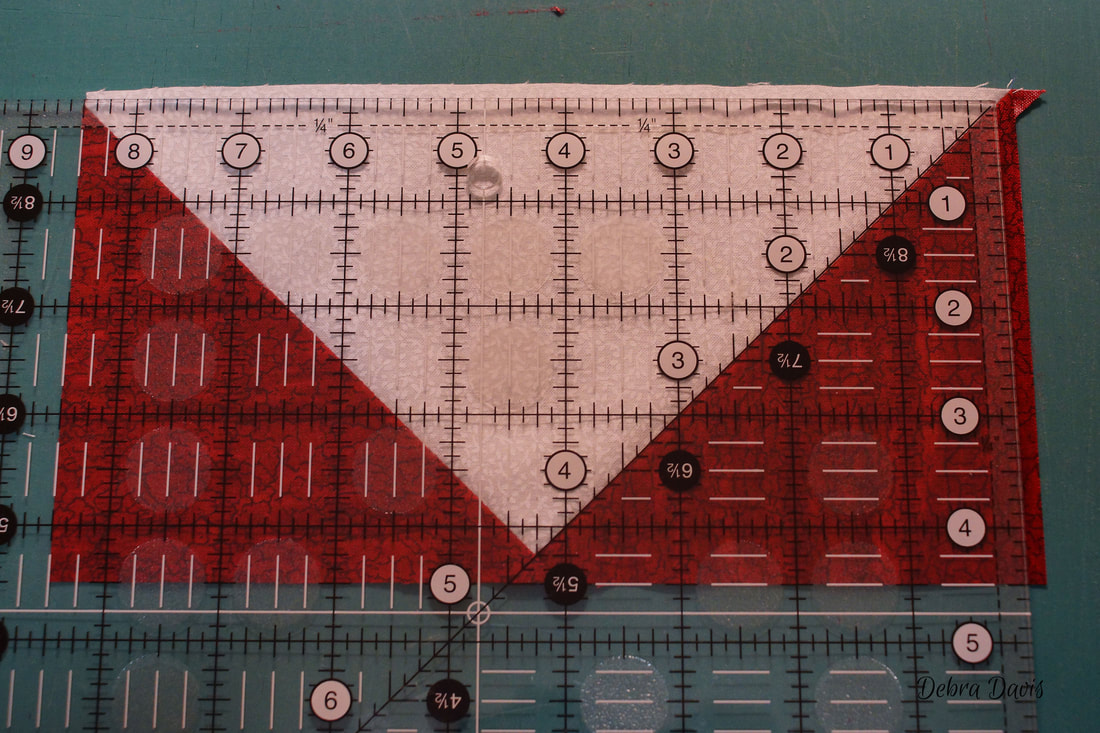 If you have been following my previous tutorials you know I love Bloc-Loc's Flying Geese rulers but they have one draw back-they are only good for a particular size. A while back a quilting friend recommended another ruler to me that could do multiple sizes so I was eager to try it out. It is made my Creative Grids with their no-slip technology and I have been very impressed with the results I ma getting with it. It is quite easy to use-simply identify the finished size of the unit-in this case 4" x 8"- and line up the appropriate diagonal lines with the seam lines on the Flying Geese unit. The 1/4 inch seam allowance is figured in for you. 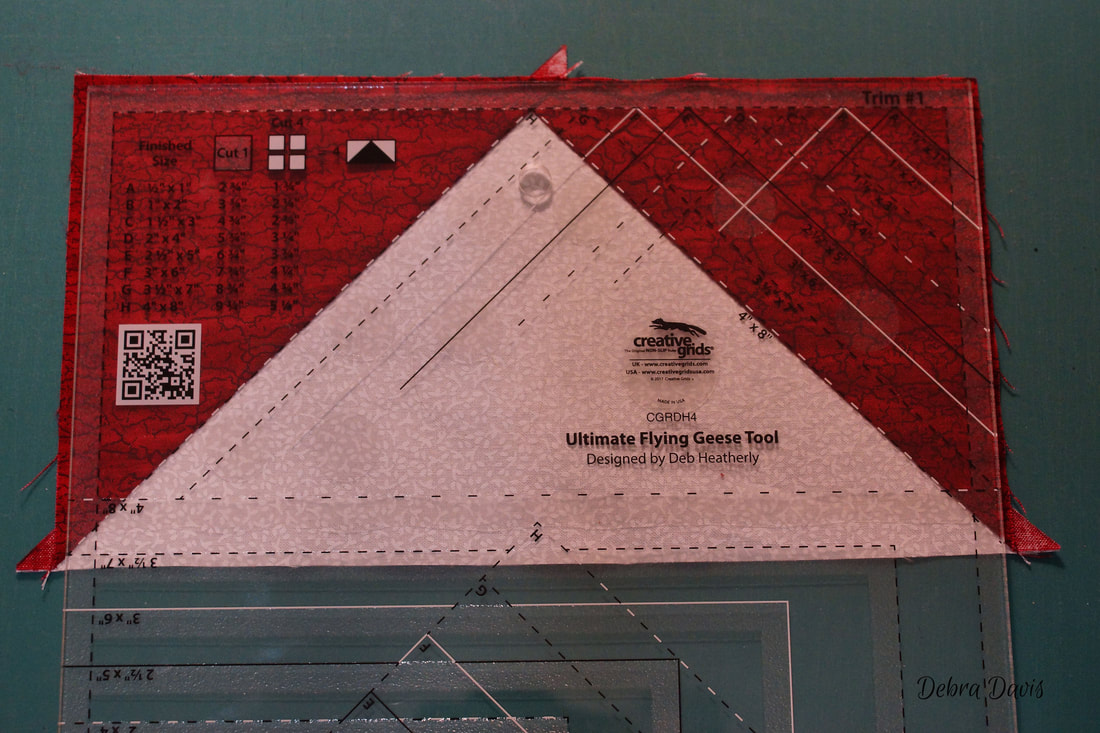 Trim the first two sides, rotate the block and turn the ruler to the side that says "Trim #2" Line everything up again and trim the last two sides. The ruler even has the size you need to cut the squares for making the Flying Geese using my favorite method-this has fast become a new staple in my quilting supplies. 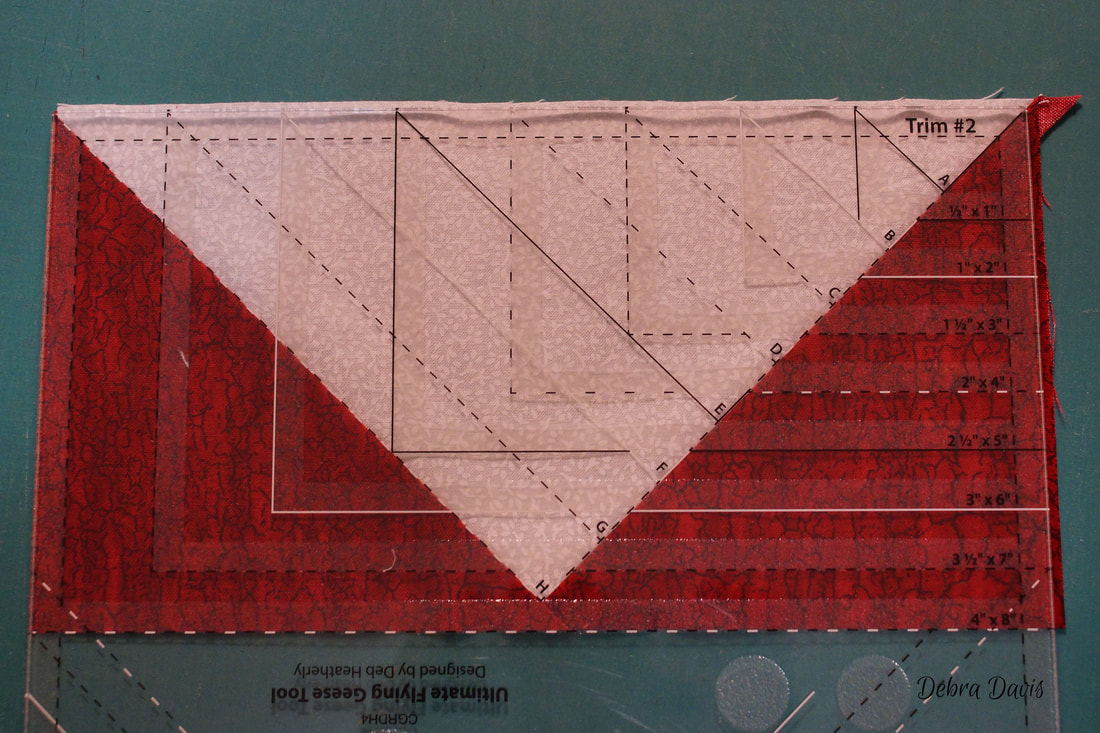 For the small Flying Geese units I am just going to repeat the whole process again this time using the F and G squares. Draw a line down the middle... 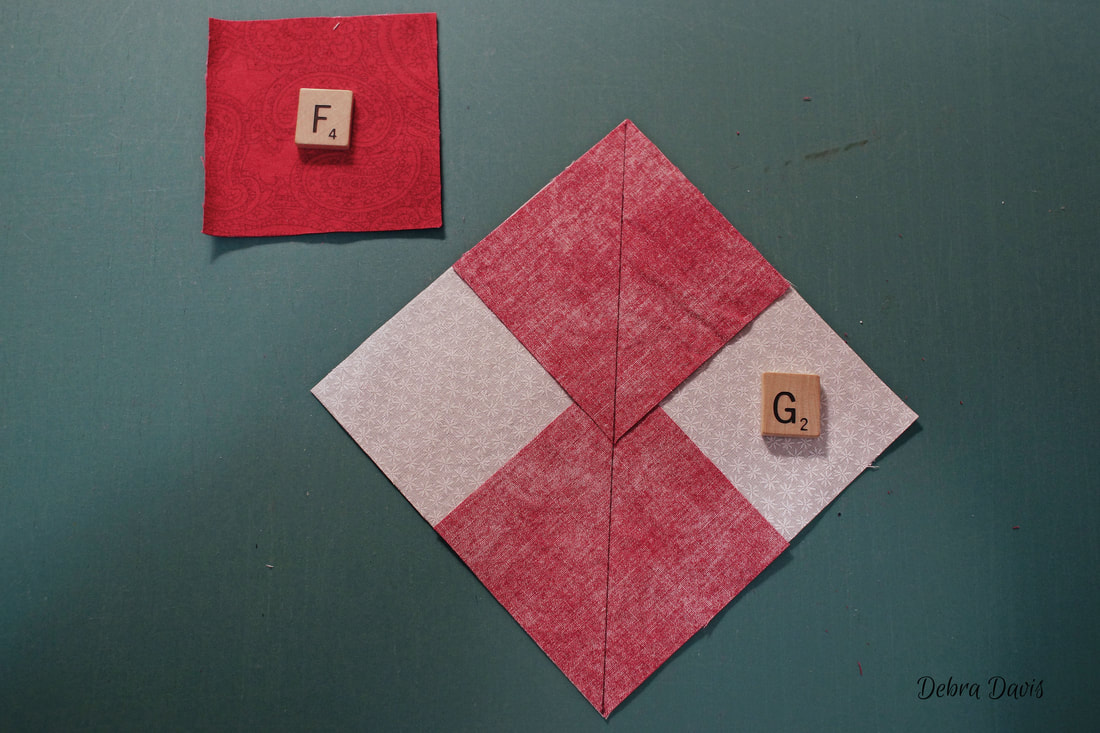 Sew 1/4 inch from each side of the drawn line. Cut apart and press towards the smaller triangles. Add another F square on top and draw a line down the middle...
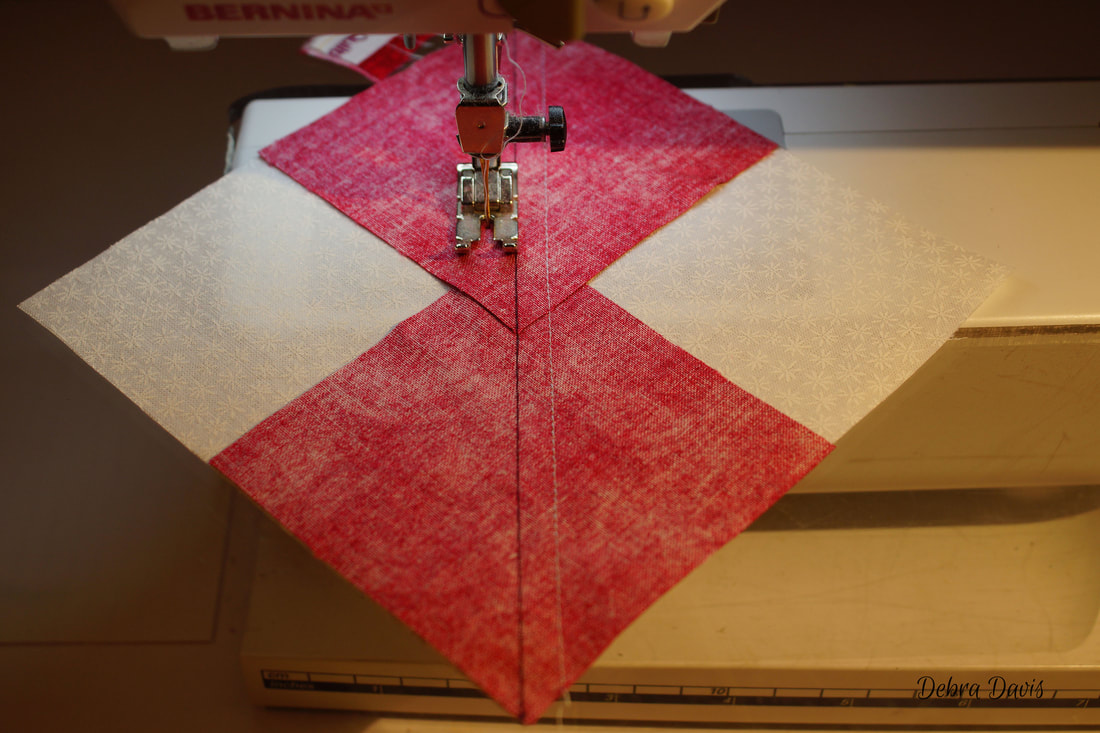
Sew 1/4 inch from each drawn line, cut apart and press towards the small triangles. 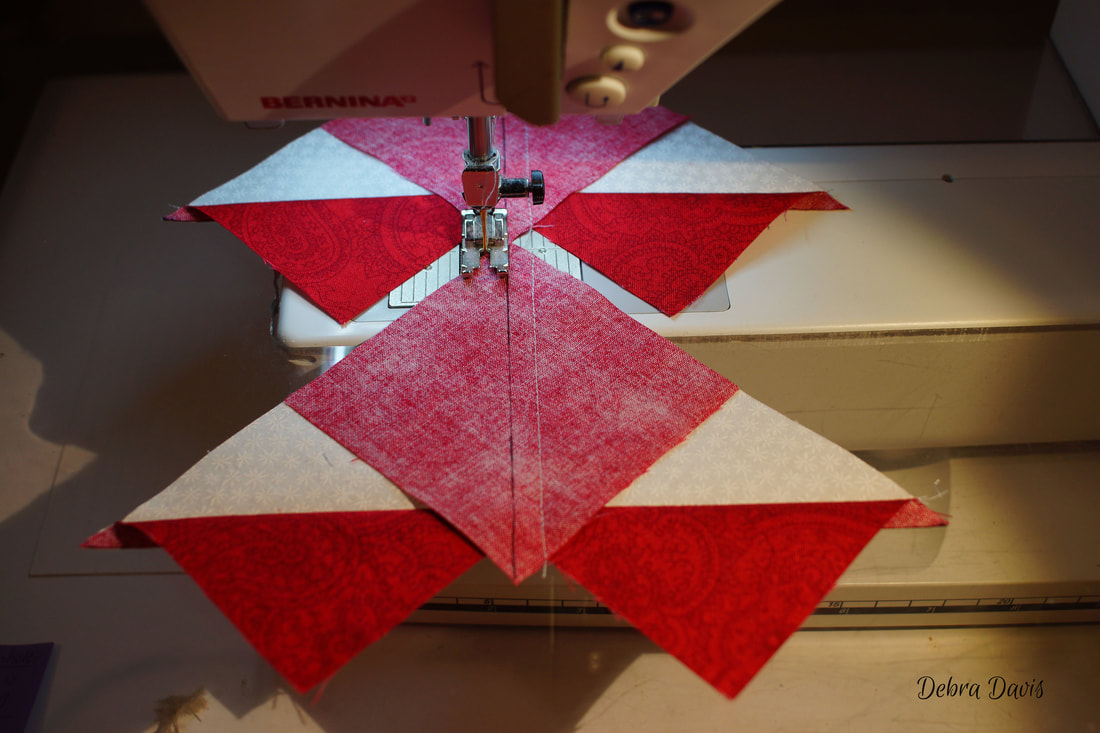 Now I can just use the 2" x 4" lines on the Creative Grids ruler (That is the finished size not the trimmed size. 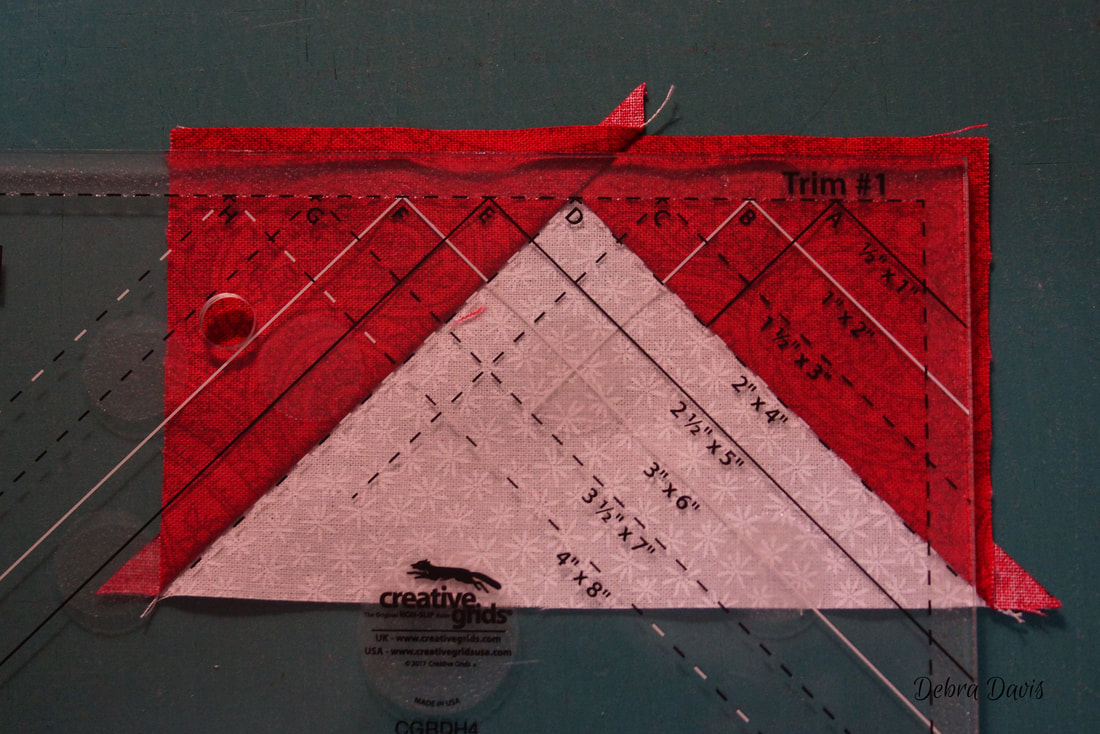 To trim with a regular ruler the 2 1/4" mark goes at the tip of the large triangle and I want to line up the 4 1/2" line with the 2 1/2" line at the bottom intersections 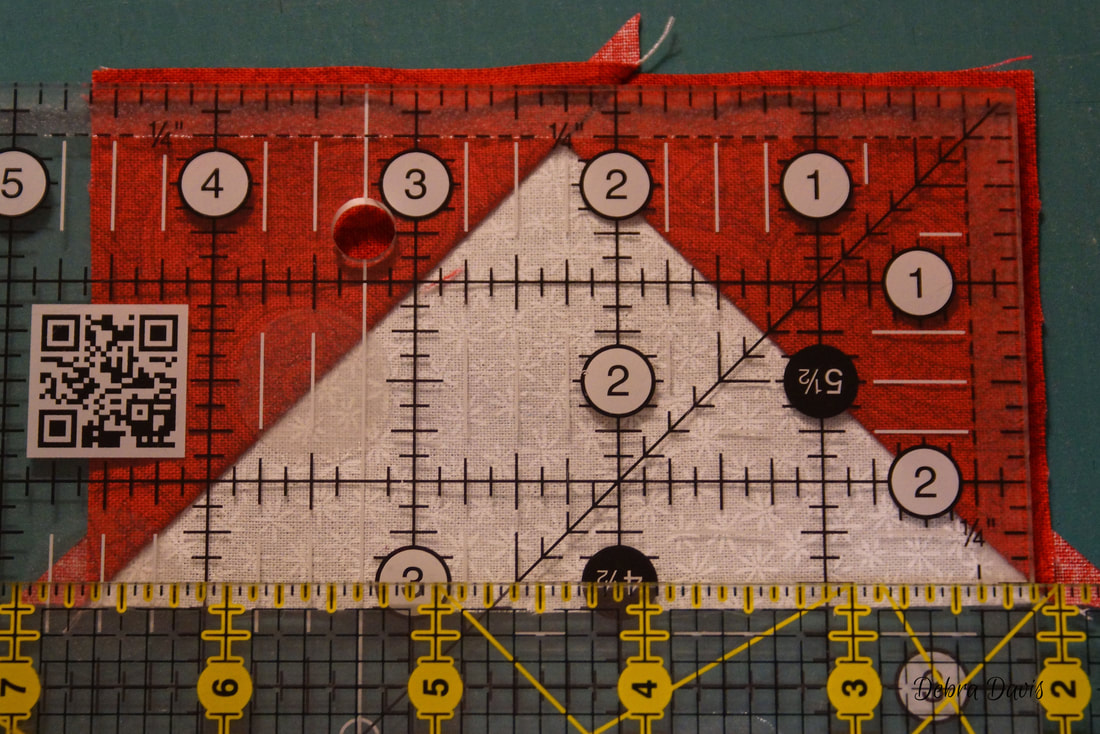 After trimming the first two sides I line up the diagonal line on the ruler with the seam line, place that 2 1/4" midpoint measurement at the tip of the large triangle leaving a 1/4 inch seam allowance, line up the trimmed edges with the 4 1/2" and 2 1/2" lines on my ruler and make the final trims. Trimmed size: 2 1/2" x 4 1/2" 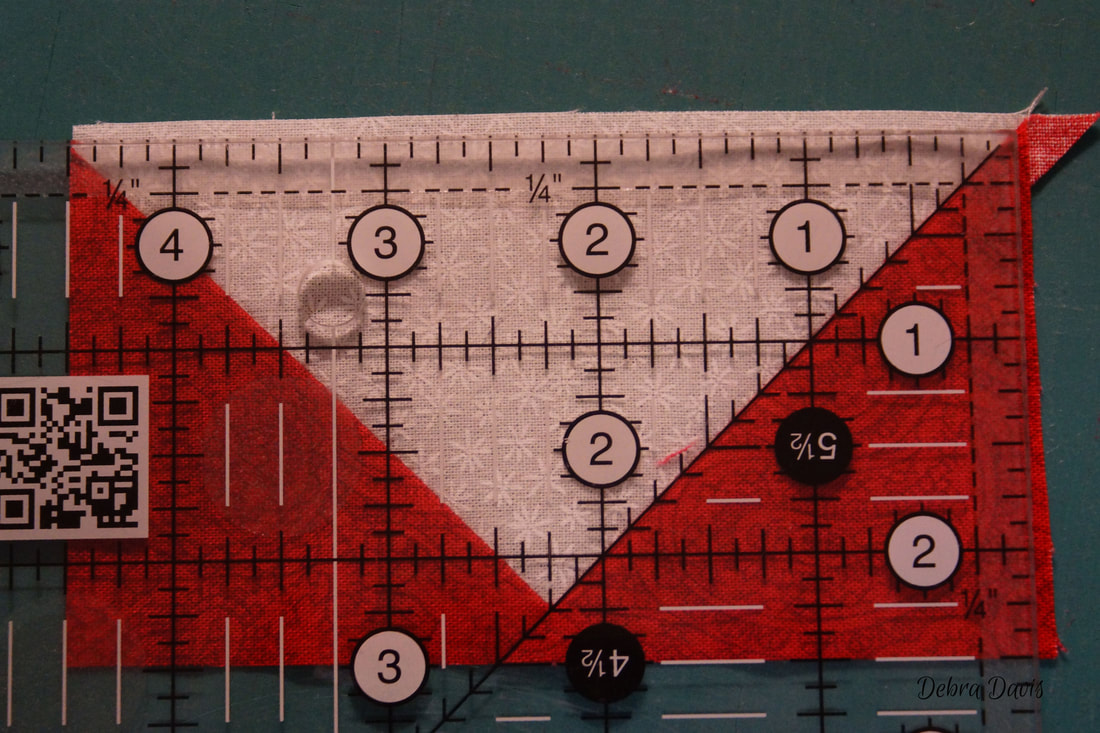 Here is where the fun happens. The center part of the block is basically a nine-patch unit. Lay out the E and H squares with the small Flying Geese units as shown. 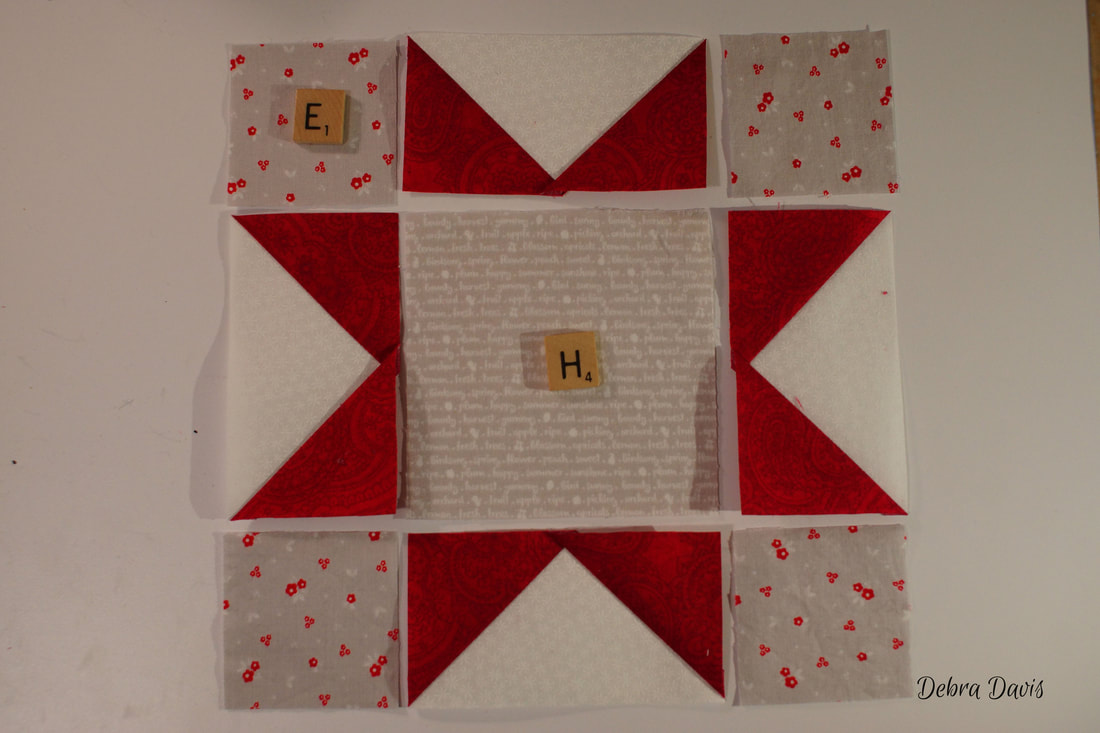 Start by sewing together into rows. I sew with the Flying Geese units on top so that I can watch the intersection in the middle. The "X" that is made by those seams is where I need to play close attention as I sew. 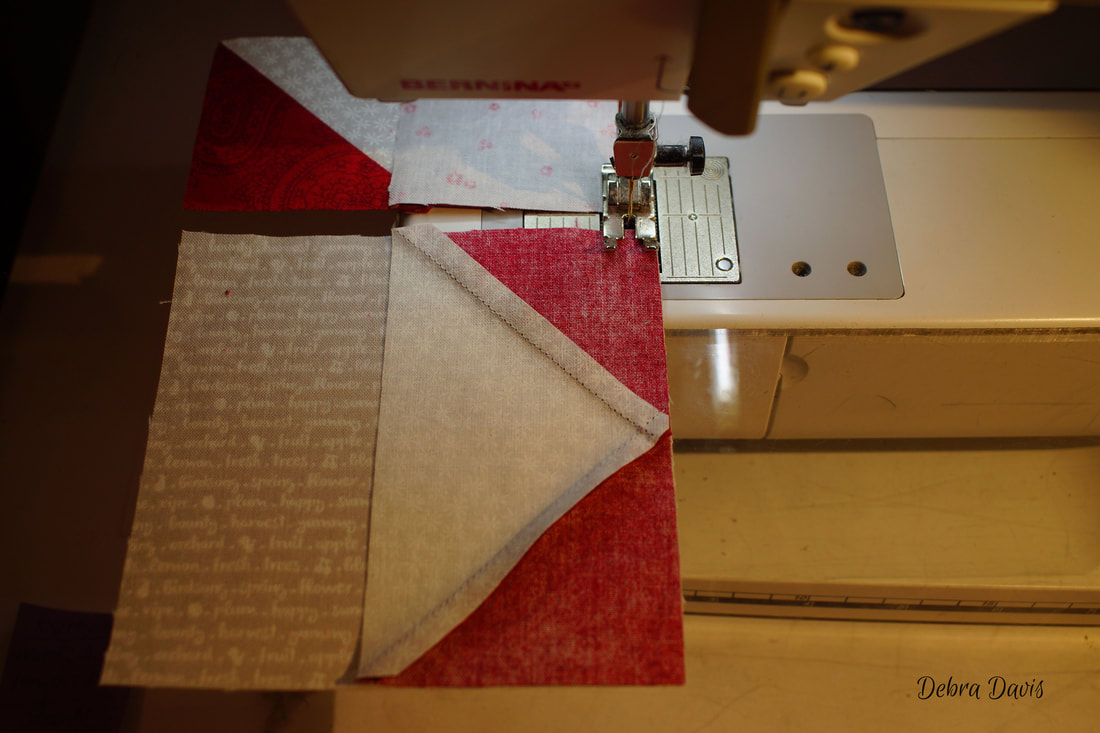 I slow down as I come to them and aim my needle for the center of the "X" When all is right in my quilting universe I will have a perfect 1/4 seam allowance that makes that happen naturally. With bulky seams like this it can sometimes shift position as I am sewing which is one of the reasons I slow way down so I can manipulate things if needed. 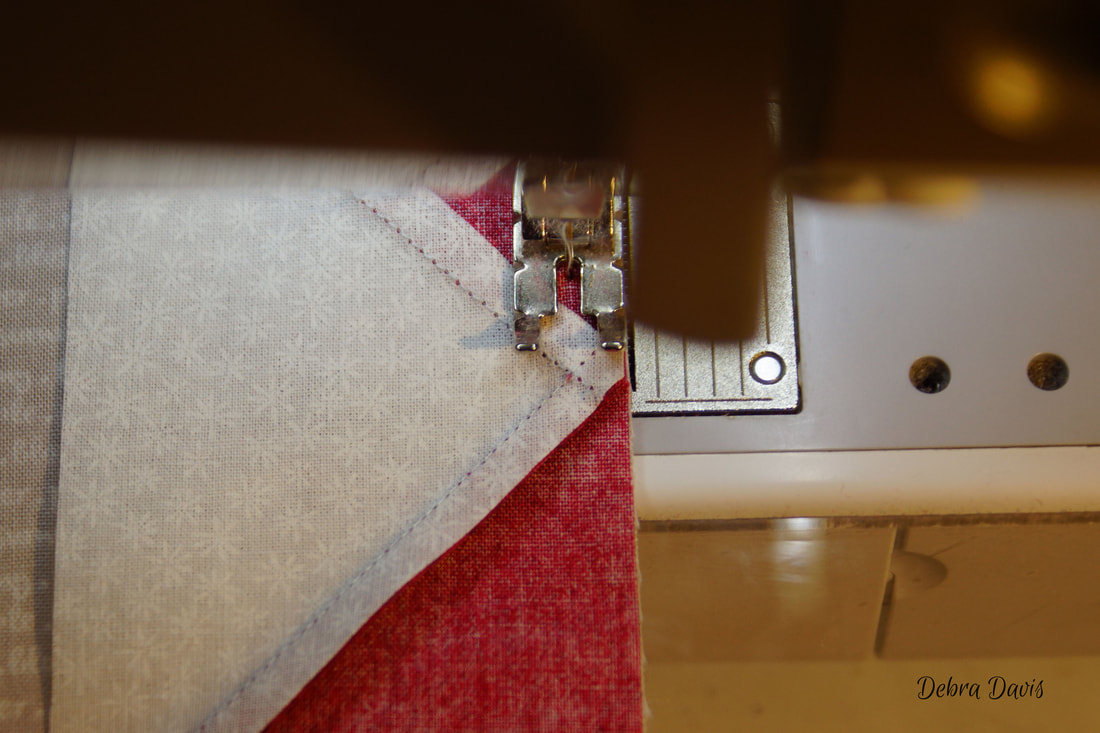 Another tip that can help is the use of a stiletto to guide those seams under the presser foot. 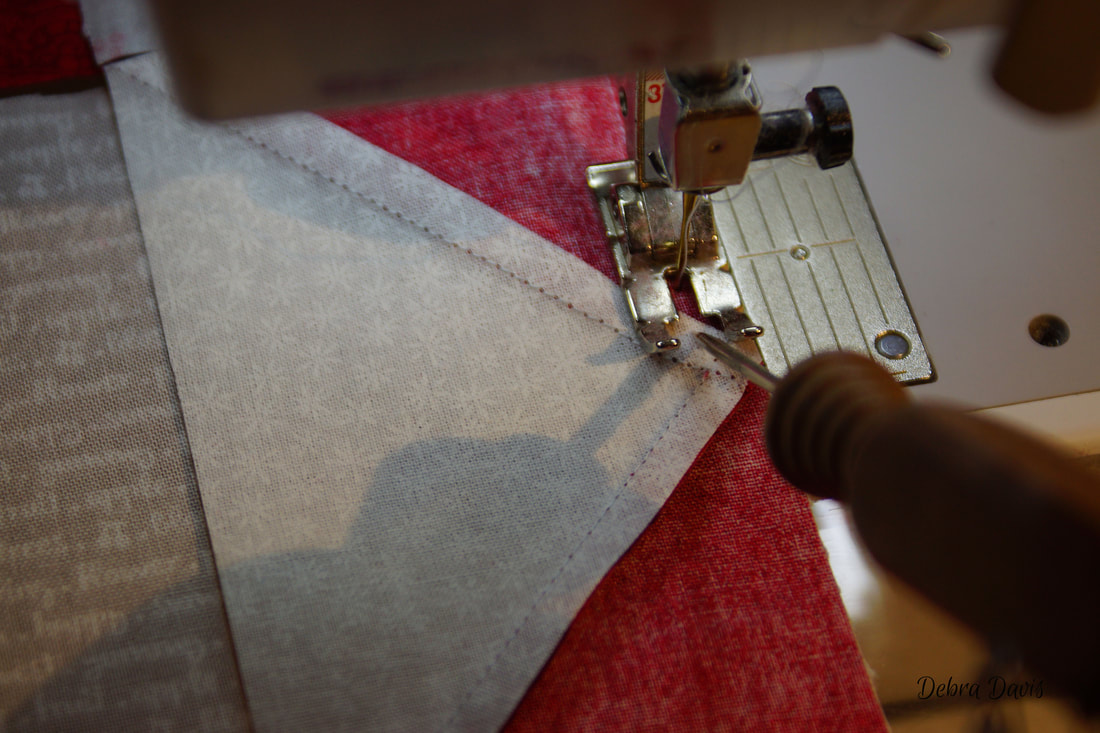 Press the top and bottom rows towards the E squares and the middle row towards the H square. 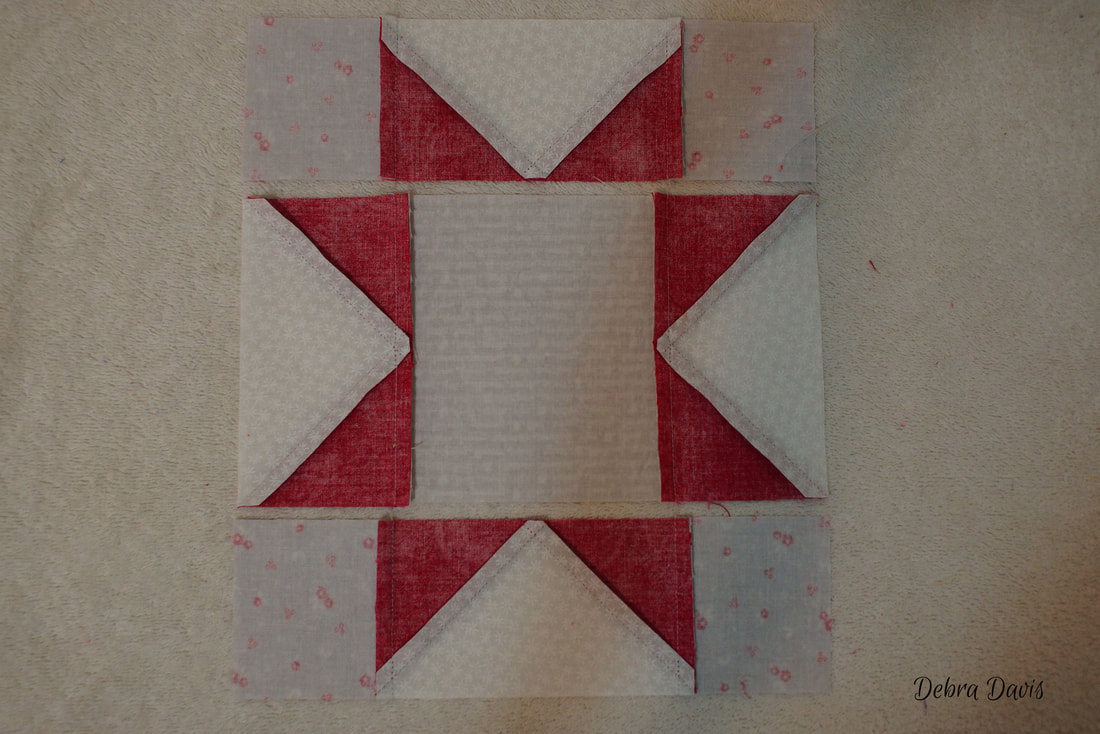 I like to check my 1/4 i nch seam allowance at this point, The middle section of each row needs to measure 4" across for the next step to be accurate.
In joining the rows together, the seams will nest together with the one on top going in one direction and the one on the bottom going in the opposite direction. 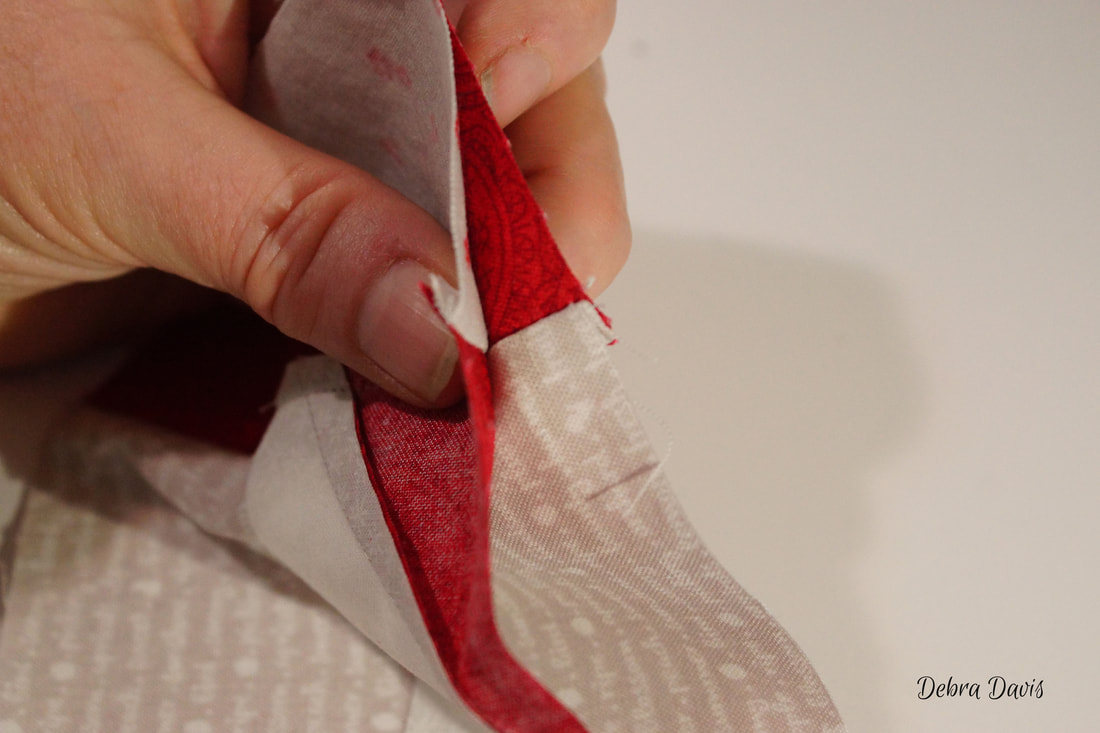 Placing a pin at where the seams join helps hold them together as they are being sewn. 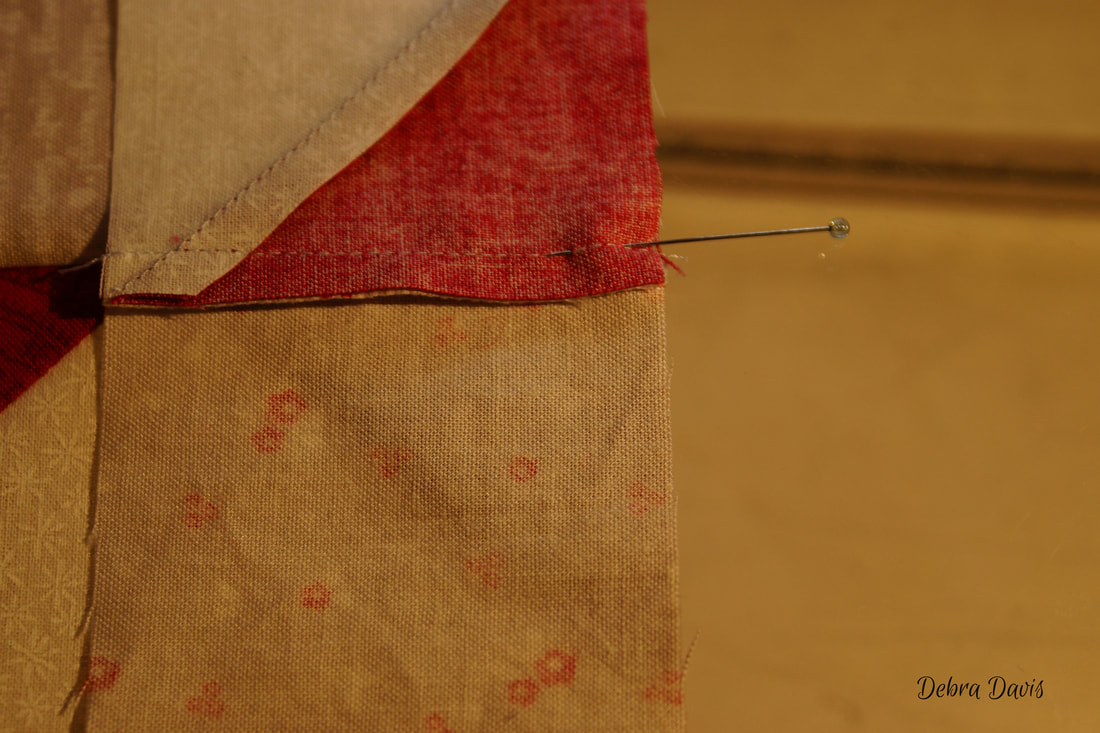 I sew with the Flying Geese units on top again. 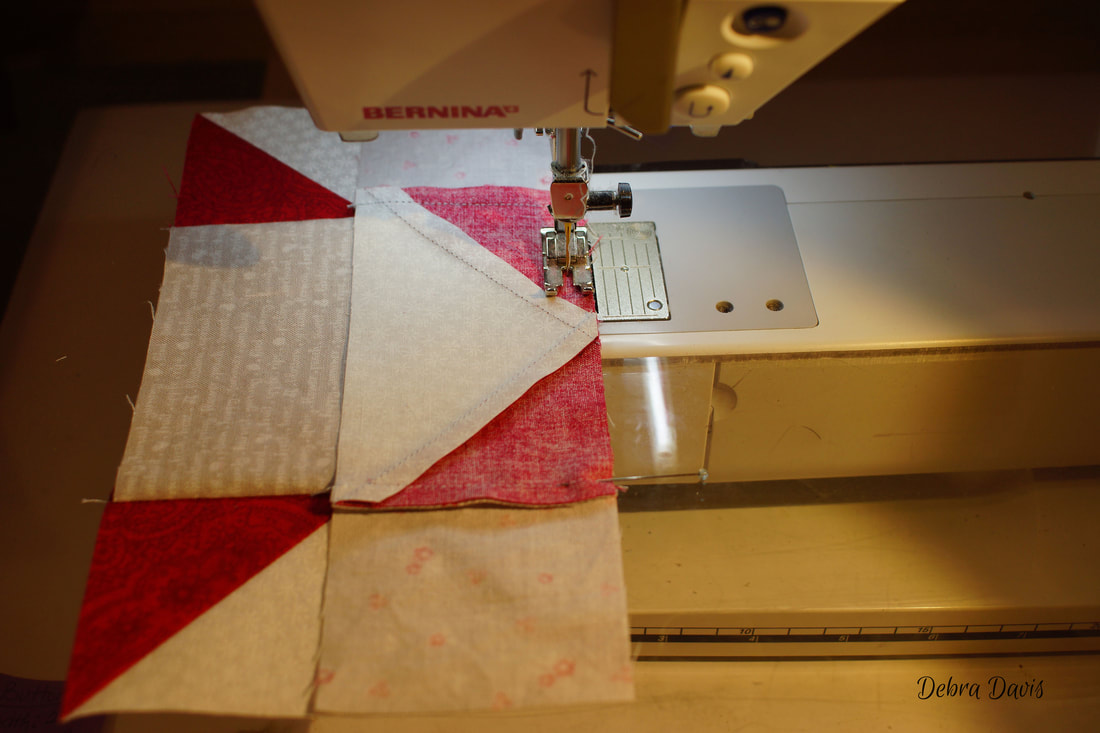 When I come to a pin I stop right as I come to it, rather than sewing over it, carefully remove the pin and continue sewing-always going slow over these interesections. 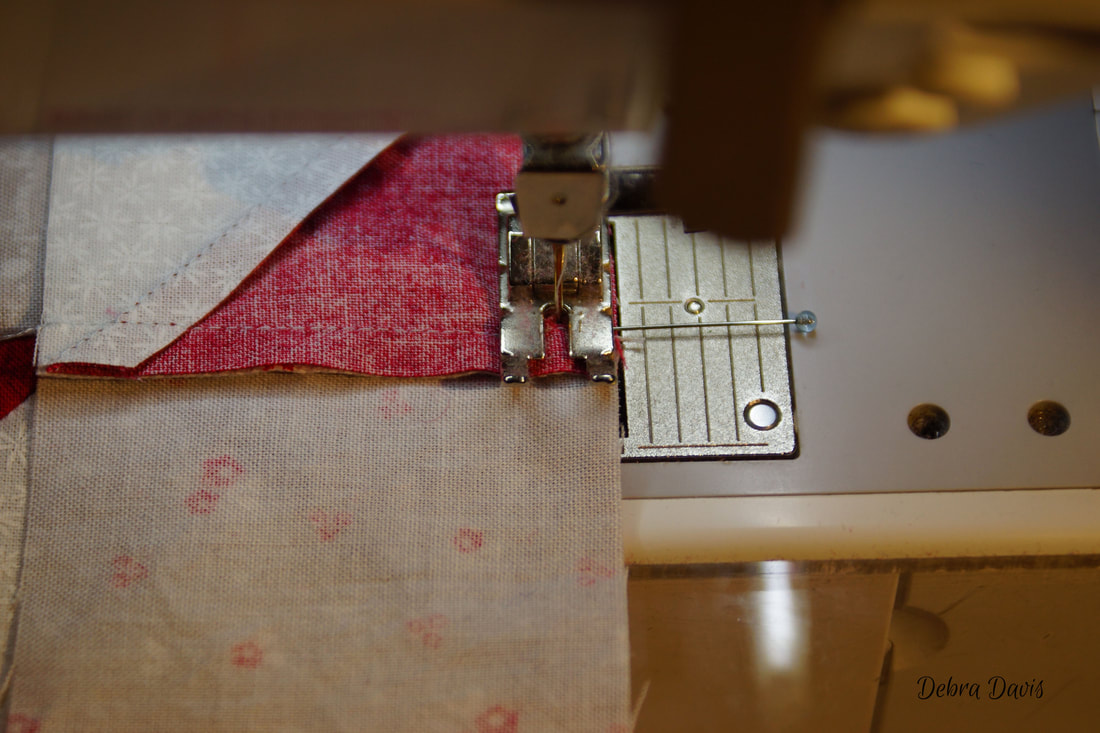 I pressed away form the H square this time when putting this center section together and then checked to make sure the H square measures 4" x 4" The whole block will be 8 1/2" x 8 1/2" at this point.
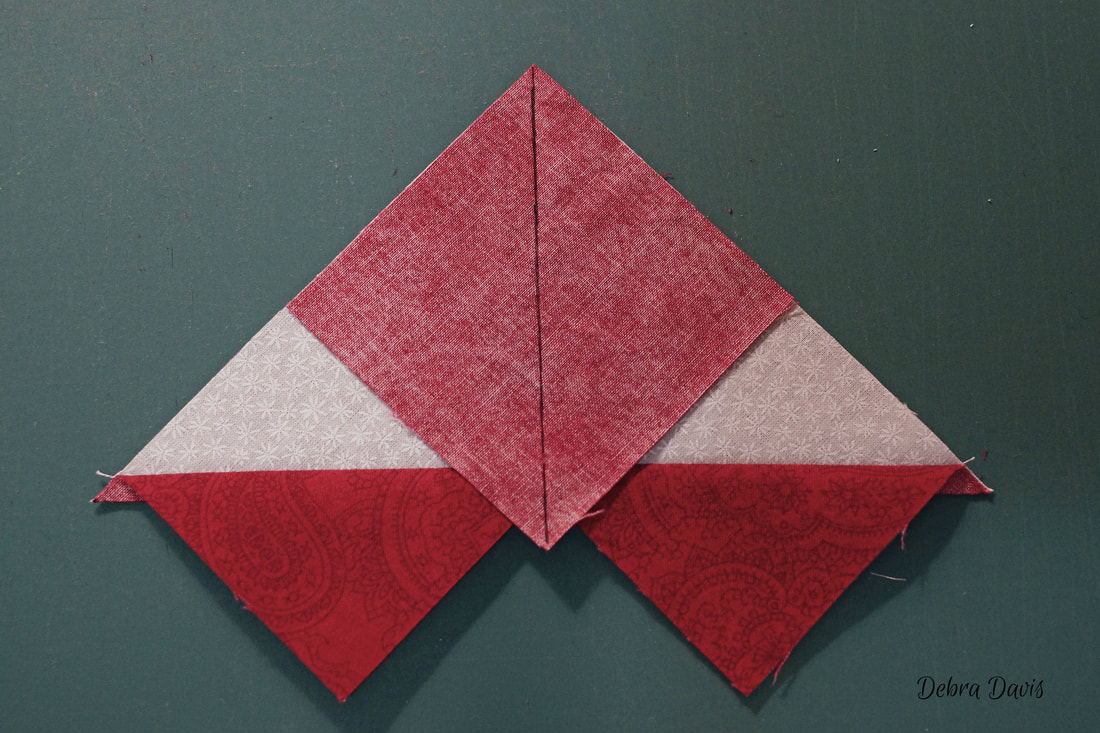
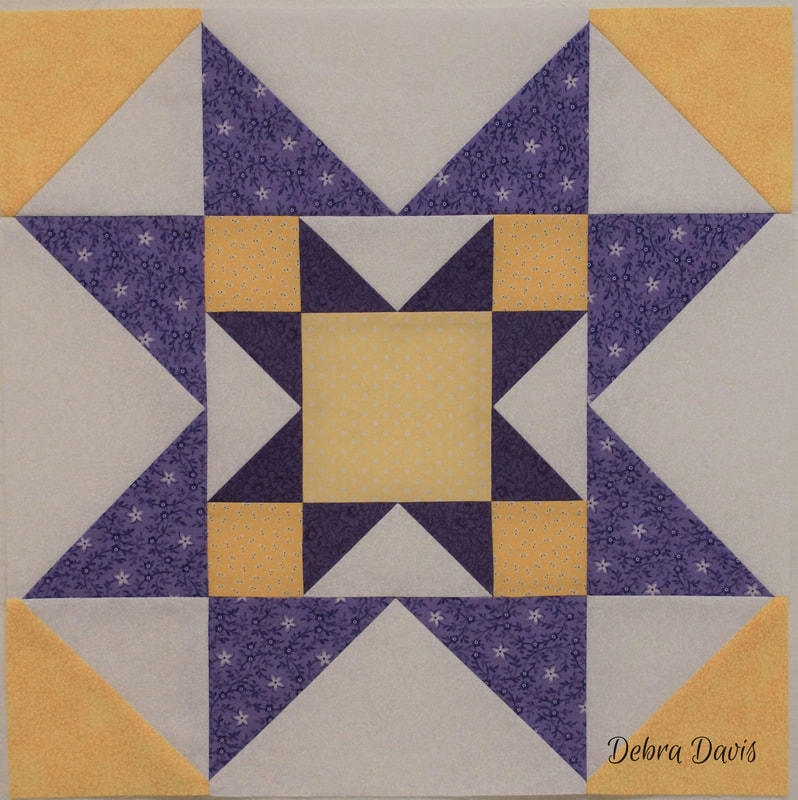
Our little block now becomes the center of the Block 1, just add in the Half-square triangles and large Flying Geese units. First sew the sections together into rows. I pressed towards the large Flying Geese units on all of the rows. 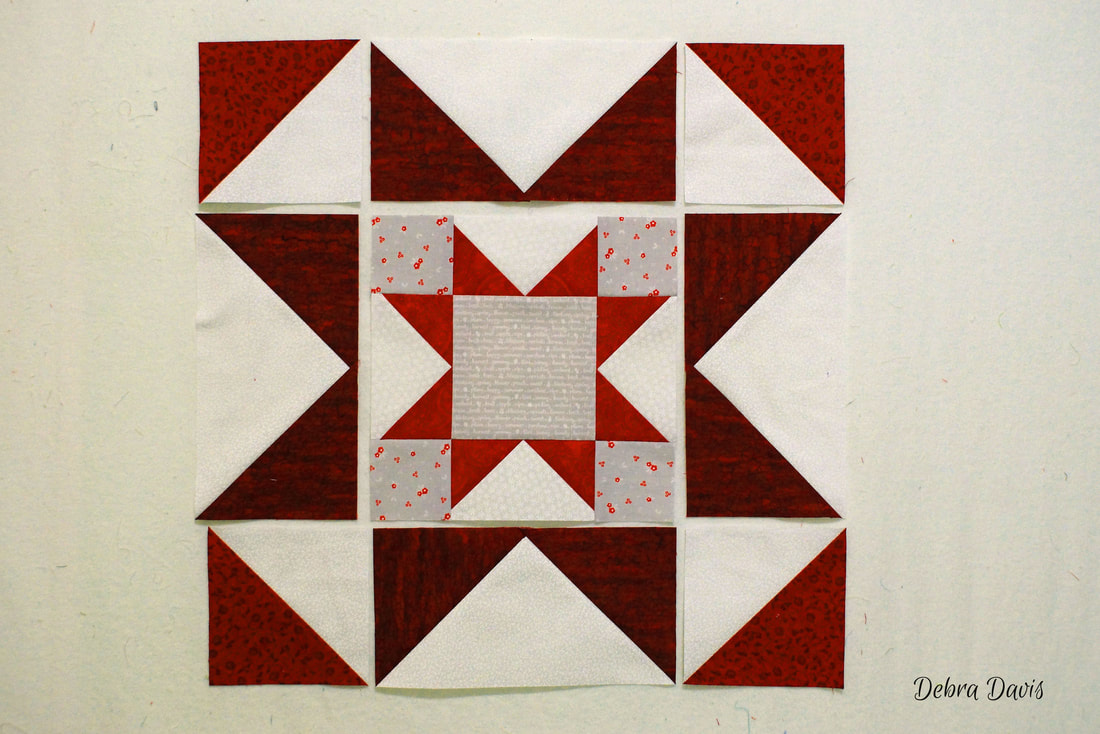 There will be some diagonal seams that meet. There are a couple of ways I handle them. 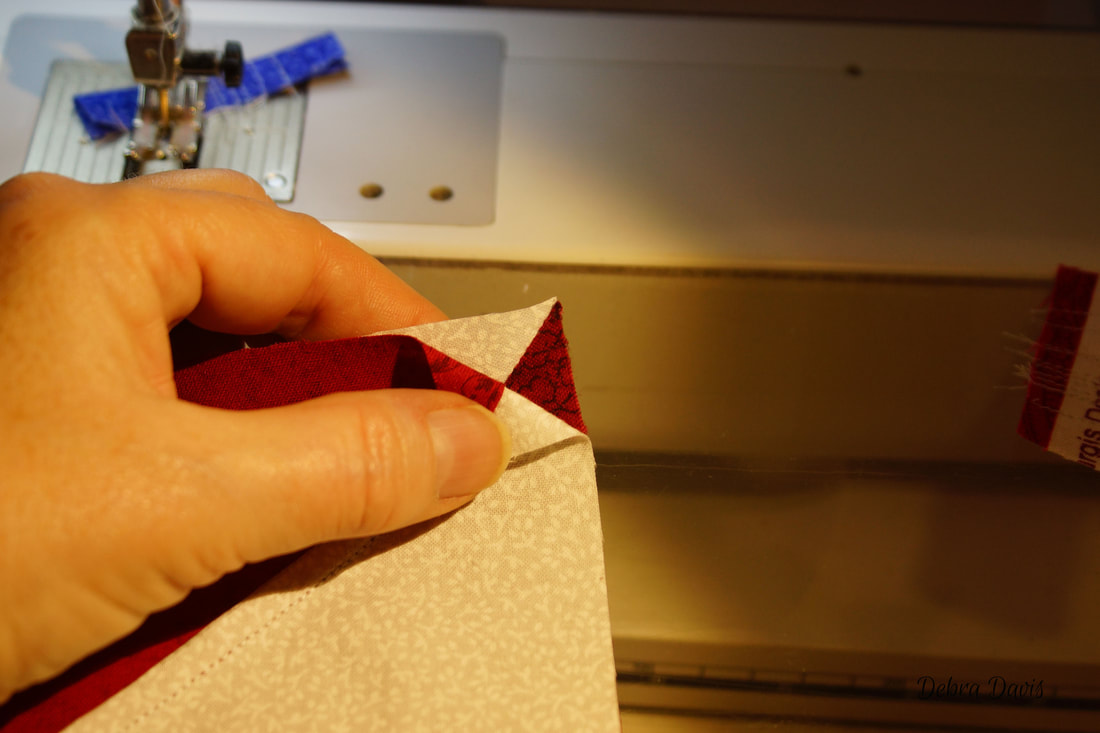 When the top seam is facing towards the needle as pictured here-it will be pushed against the seam underneath and usually results in a good match. 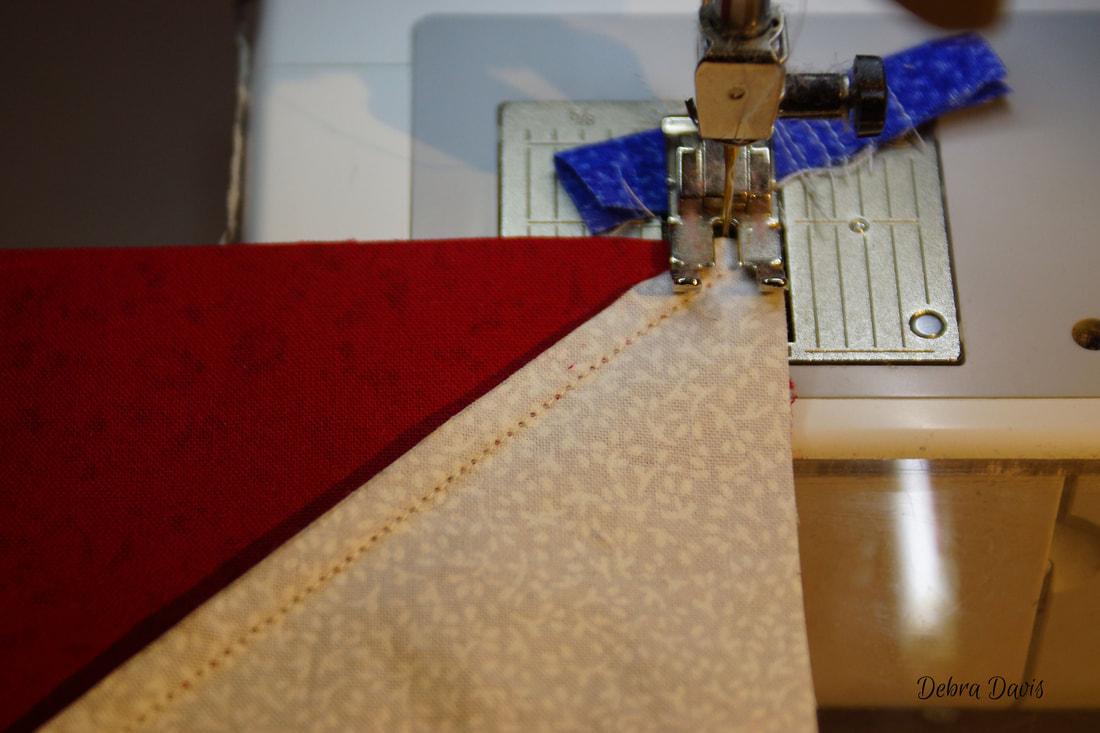 When the top seam is facing away from the needle I find a pin placed about 1/4" in will keep them aligned. When you hold the two pieces in your hand and line up the seams you can feel them between your fingers as they fall into place with one another. 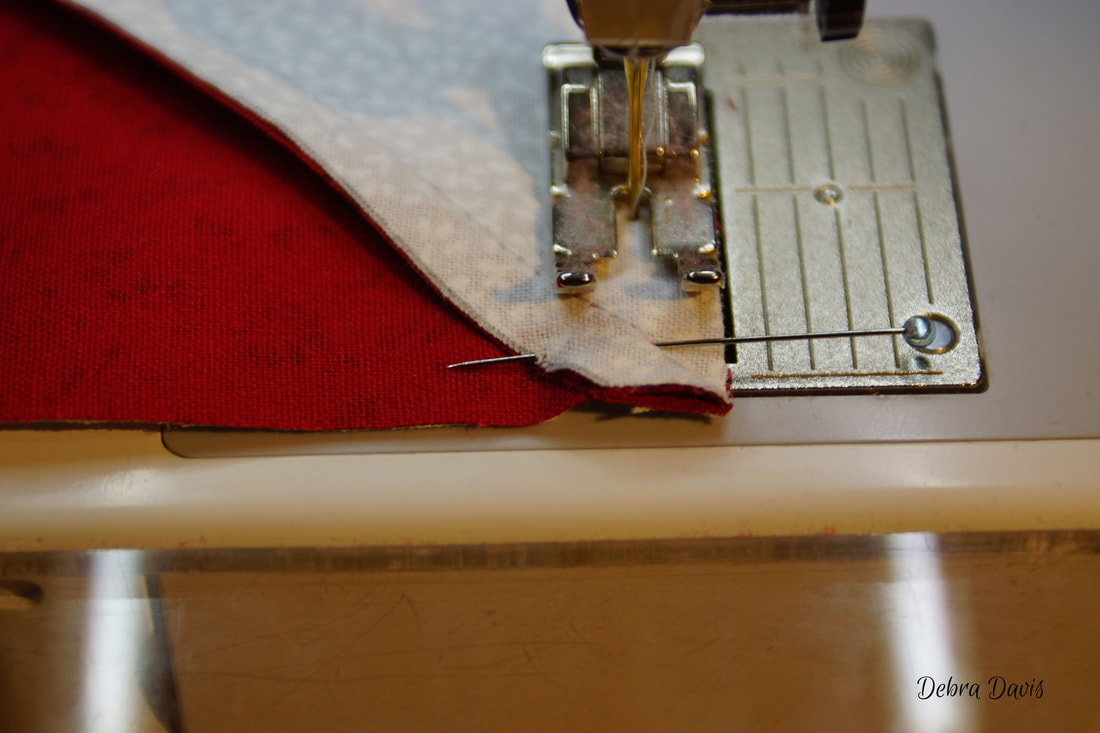 With the rows complete I begin sewing them together-making sure all of my points are facing the right direction. If you look at my bottom row you will see how easy it is to place things the wrong way-always stand back and take a look before proceeding to sew. The bottom row had to be flipped before I sewed it in place. (See your pattern for correct placement.) 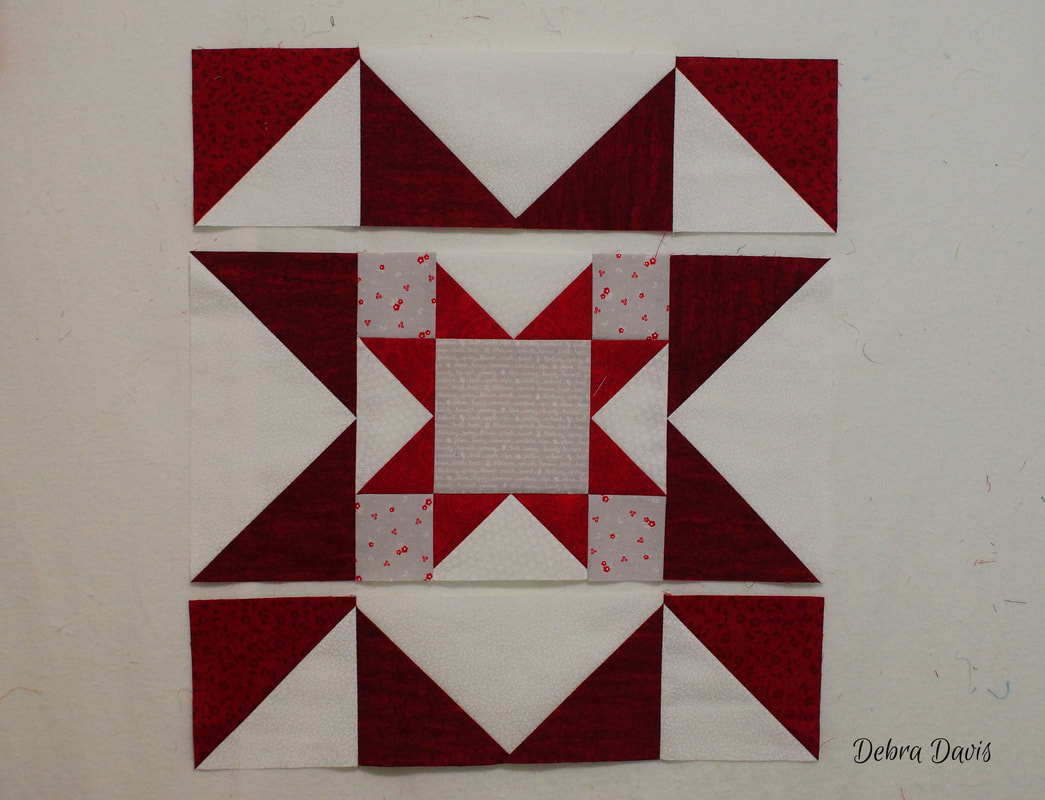 To join the rows I placed pins at the intersections and continued to sew with my Flying Geese on the top. 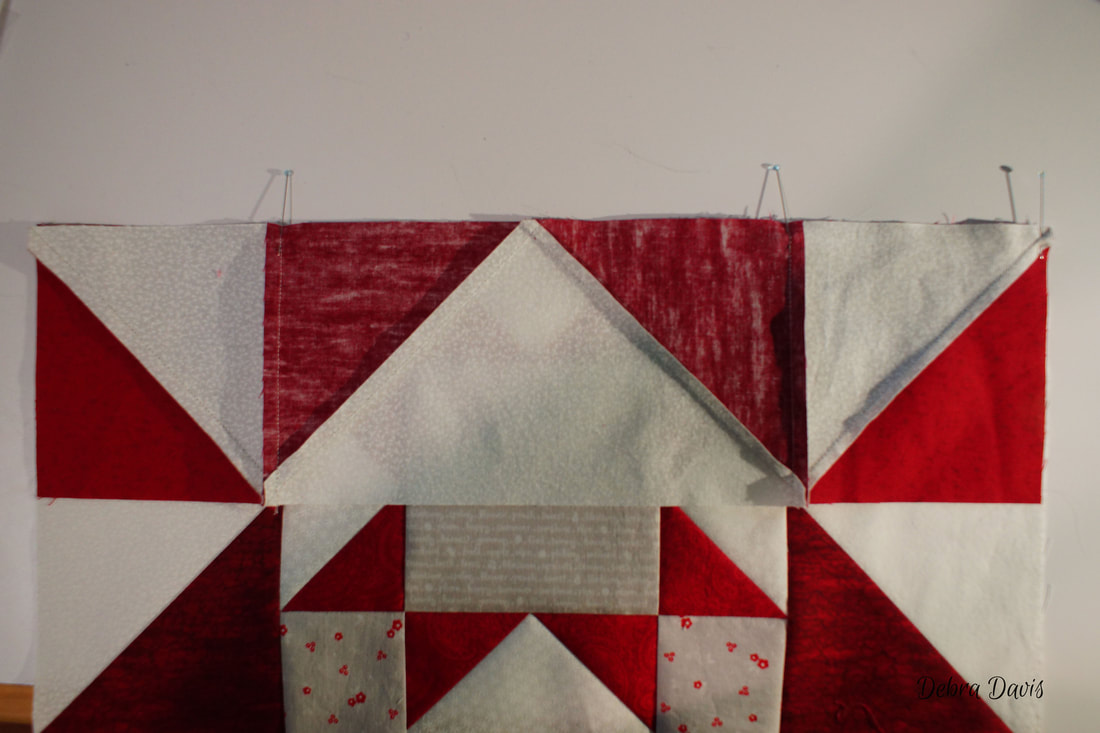 I press after adding each row-and with those bulky intersections decided to press the seams open. 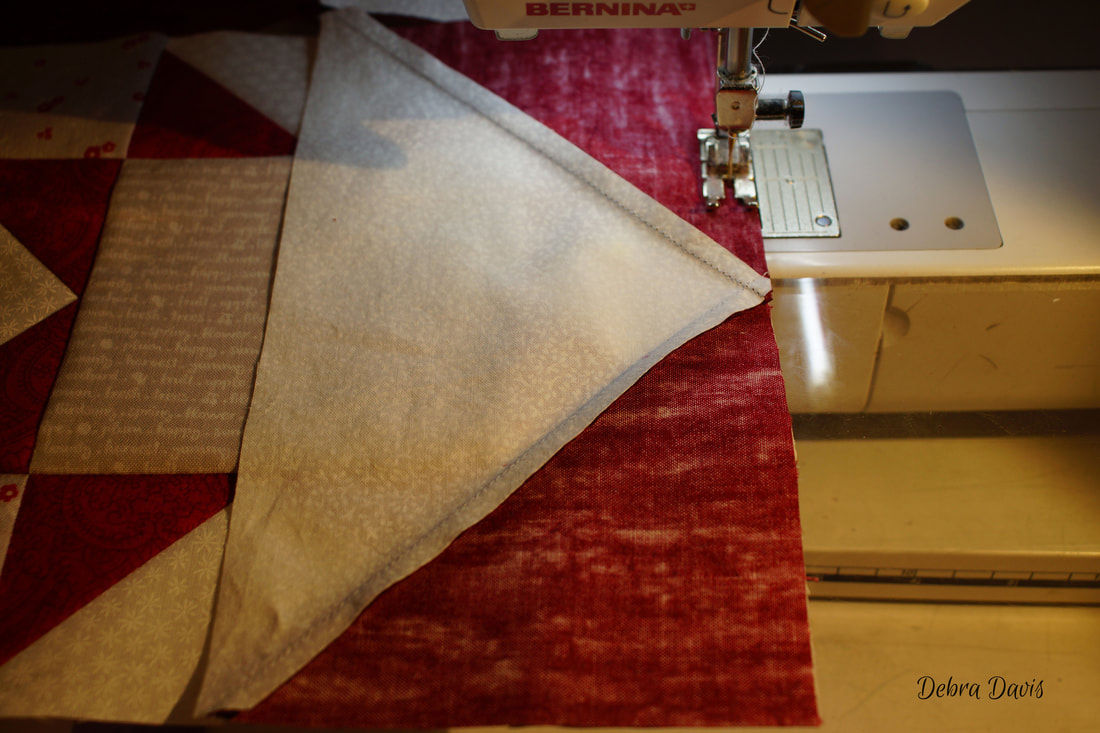 My first block is done-in both colorways. You can see how I played with the placement of light, medium and dark tones in each. I hope you have fun with your block!
I seem to recall saying something about a fun surprise at the end of this post... In celebration of my very first sew along with you I am giving away one Creative Grids Flying Geese Ruler just like the one I demonstrated here. All you have to do is tell me in the comments what country and/or state you are from for a chance to win. To double your chances hop on over to my Facebook Page: Tuning My Heart and let me know how long you have been quilting in the comments for the link to this post. The winner will be chosen by a random number generator on Monday, February 12th and I will contact them for information about where to ship their ruler. So until then... Happy Quilting!! 
Kay Williams
2/5/2018 07:16:59 am
I live in Illinois. I hope to get to this soon. I have to put some sashing on one of my Blockheads quilts first. Maybe today. Looking forward to this adventure.
Linda Phillips
2/5/2018 07:59:04 am
Santa Rosa, Ca
Diane McCandless
2/5/2018 10:39:21 am
Leesburg, VA
Monna Shaner
2/5/2018 11:19:10 am
Can't wait to get started. Wonderful directions. Everyone's blocks will be beautiful. From Saltsburg, Pennsylvania, USA
Helen Murray
2/5/2018 11:54:00 am
Melbourne Australia
Romagene Henry
2/5/2018 12:57:04 pm
Dry Ridge, Kentucky USA
Gail Lane
2/5/2018 03:40:58 pm
Minnesota, USA
Debra Revay
2/5/2018 03:43:28 pm
I'm from Brownwood, Tx. Great tutorial and pictures. I sure am excited about this BOW. Thank you for all you do.
Vicki Johnson
2/5/2018 05:39:26 pm
I am from North Carolina! Would love to win! You give great directions that are easy to follow!
Jeannette Ashleigh
2/5/2018 06:12:03 pm
Nehalem, OR
Joan Amling
2/5/2018 06:59:47 pm
Great instructions for this first block. I live in Tallahassee, FL
Vicky Nanneman
2/5/2018 07:20:58 pm
Salisbury, Missouri
Genie
2/5/2018 08:29:36 pm
I,ve been quilting about 10 years and I am not an experienced quilter by a long shot! I have so much to learn yet and your sew along and tutitoials are just what I need to boost my confidence . Thank you for all your work and teachings.
Glenda Snyder
2/5/2018 11:05:01 pm
Pennsylvania. I am anxious to get started with this block. Thanks for walking us through the step-by-step directions
Linda Blodgett
2/6/2018 04:29:33 am
Tucson, Arizona
Teresa Kee
2/6/2018 06:00:28 am
West Virginia! Thank you so much for this opportunity and for your generosity ❤️
melissa latter
2/6/2018 06:05:38 am
Ontario, Canada
Lynn Vogeley
2/6/2018 06:10:30 am
Rancho Cordova, CA!
Louise
2/6/2018 07:05:29 am
I live in Michigan and started quilting 32 years ago. I stopped for many years and started again about 5 years ago.
Skeeter
2/6/2018 07:58:51 am
Fort Collins, CO.
Jane
2/6/2018 08:09:27 am
Virginia
Barbara Laffoley
2/6/2018 08:22:57 am
From Brunswick, Maine
Carol Hofstetter
2/6/2018 08:23:12 am
I'm in Alabama. I started some quilting in the 80's but have really picked it up more over the last few years.
Naureen
2/6/2018 08:35:18 am
Montana. Been quilting for about 15 years. Learn something new with the sew alongs. They are lots of fun. You're directions are fantastic. Thank you.
Sheryll Foye
2/6/2018 08:38:41 am
Alpine, CA
Kim Clark
2/6/2018 02:11:43 pm
Owen Sound, Ontario, Canada
Kathi Kittle
2/7/2018 09:46:49 am
Essex Junction, VT
Chris
2/9/2018 10:17:02 am
I’m from Wichita, Ks. Thank you for your detailed instructions.
Gail
2/9/2018 01:55:29 pm
Macomb, Michigan Comments are closed.
|

Welcome to the site of Debra Davis-a woman who loves the Lord and loves to quilt.
My other blog where I share about my walk of faith:
Sitting at His Feet 
|


 RSS Feed