|
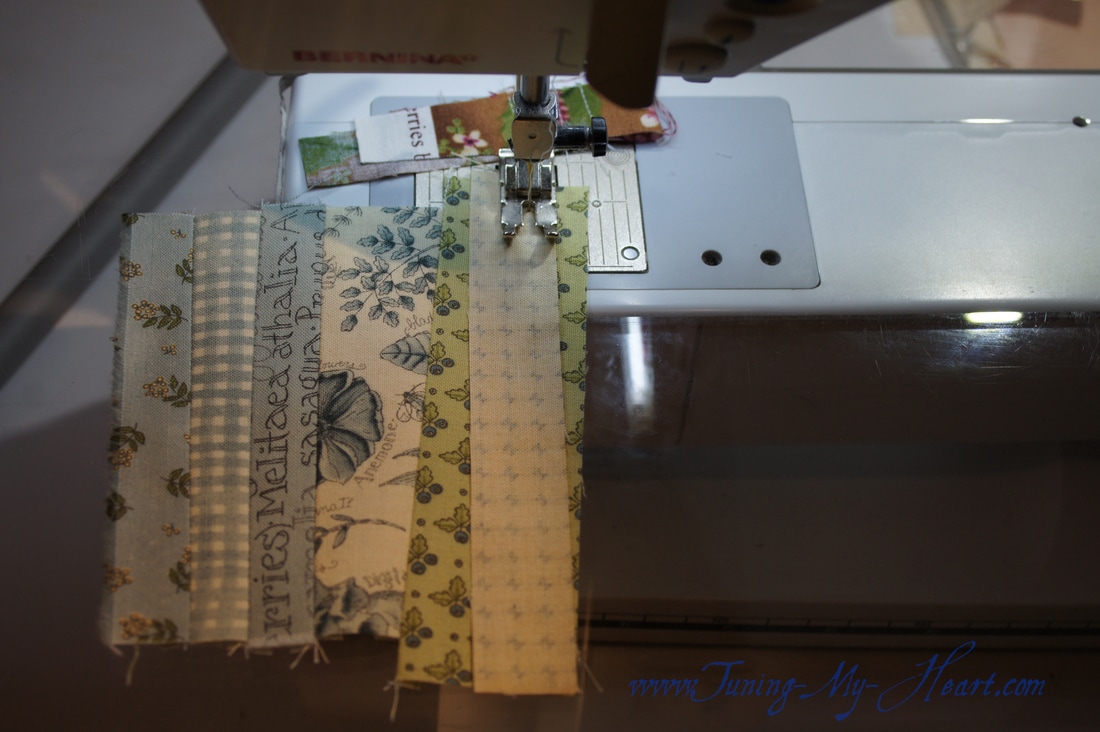
Ooh, an applique block for week 4! I began making pieced quilts a few decades ago, but not until about 8 years ago did I delve into applique, and once I did there was just no turning back. This block was designed by Jan Patek and is called Bee Skep. You can learn about Bee Skeps and get the pattern for the block by visiting Jan's blog linked here: http://janpatek.blogspot.com/2017/03/getting-ready-for-april-and-moda.html I have decided to make a few changes to this block. My favorite method of applique is fusible so that is how I am approaching this block. Rather than using one piece of material for the Bee Skep I am going to piece together several of my fabrics to use for it. I think I will also split my background to add some green for grass. Of course, you can use the same methods I will describe here even if you do not piece your skep. Let me show you what I did... The first step is to transfer the applique pieces onto my fusible. I happen to like Heat N Bond Lite, but there are many brands out there that work well. With fusible I need to reverse the applique shapes. My light box comes in handy for this, just flip the pattern over and I can still see the lines to trace them. I need to trace three pieces, the skep, the stand and the door; giving myself some room around each. I then cut them out, not on the lines, but about 1/8-1/4 inch away from my drawn lines. 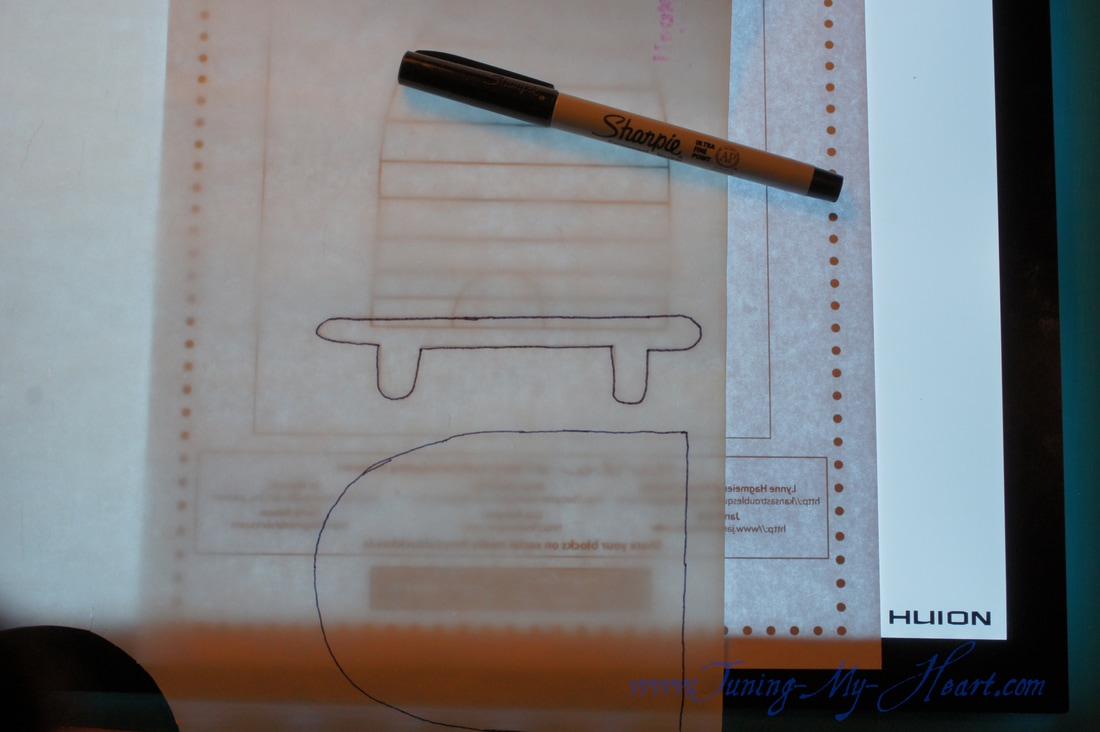 On to piecing my Bee Skep. I cut several strips of fabric varying in width from 3/4" to 1 1/2 inch. One by one I sew them together. The first two I sewed straight along the edge. When I add the third strip I angled it on the sewn unit and stitched along the angle to join the pieces. 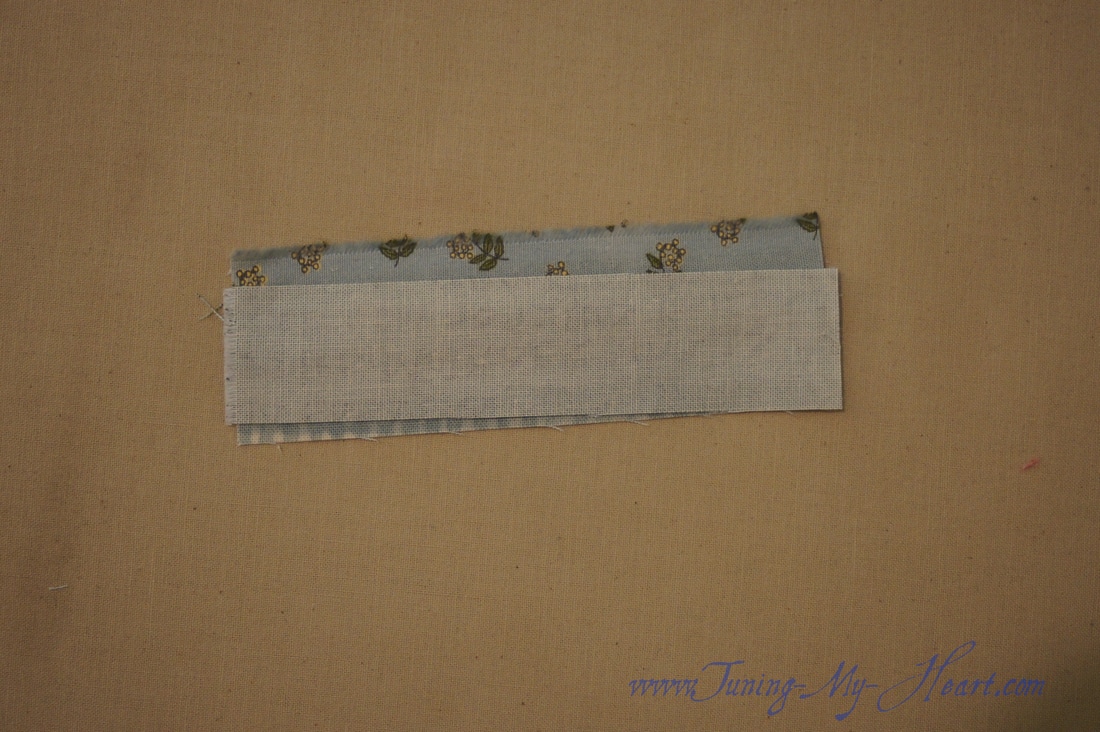 With these narrow pieces I am pressing the seams open as I go. 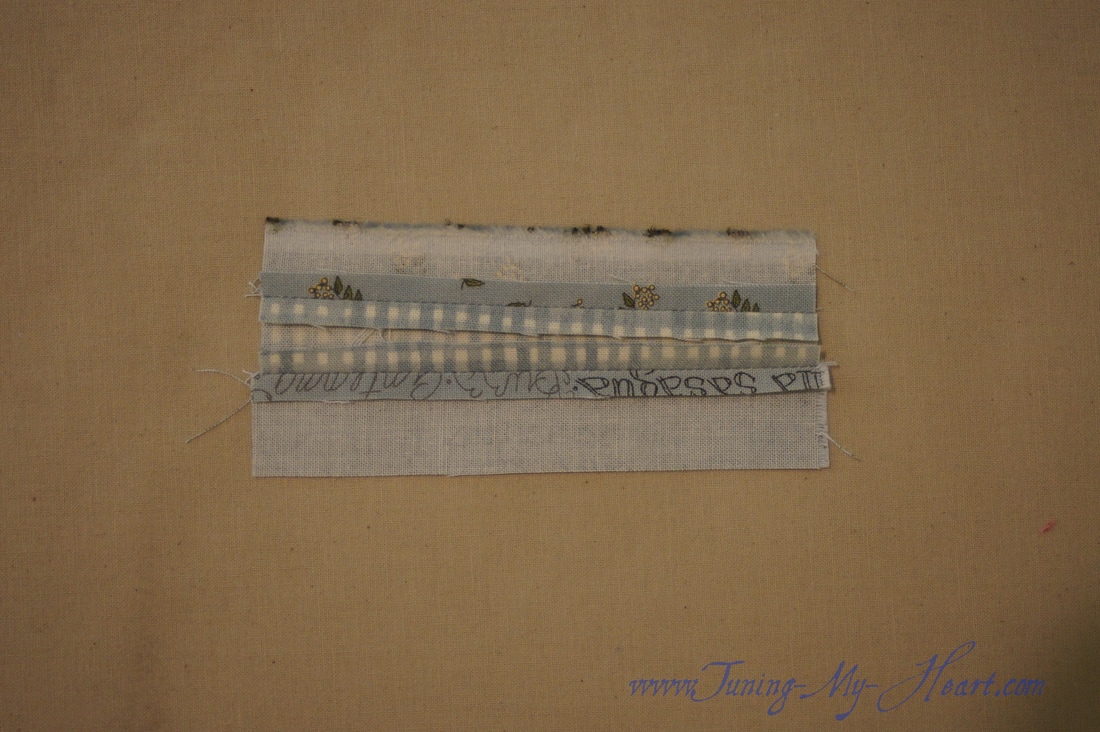 Three strips joined together. 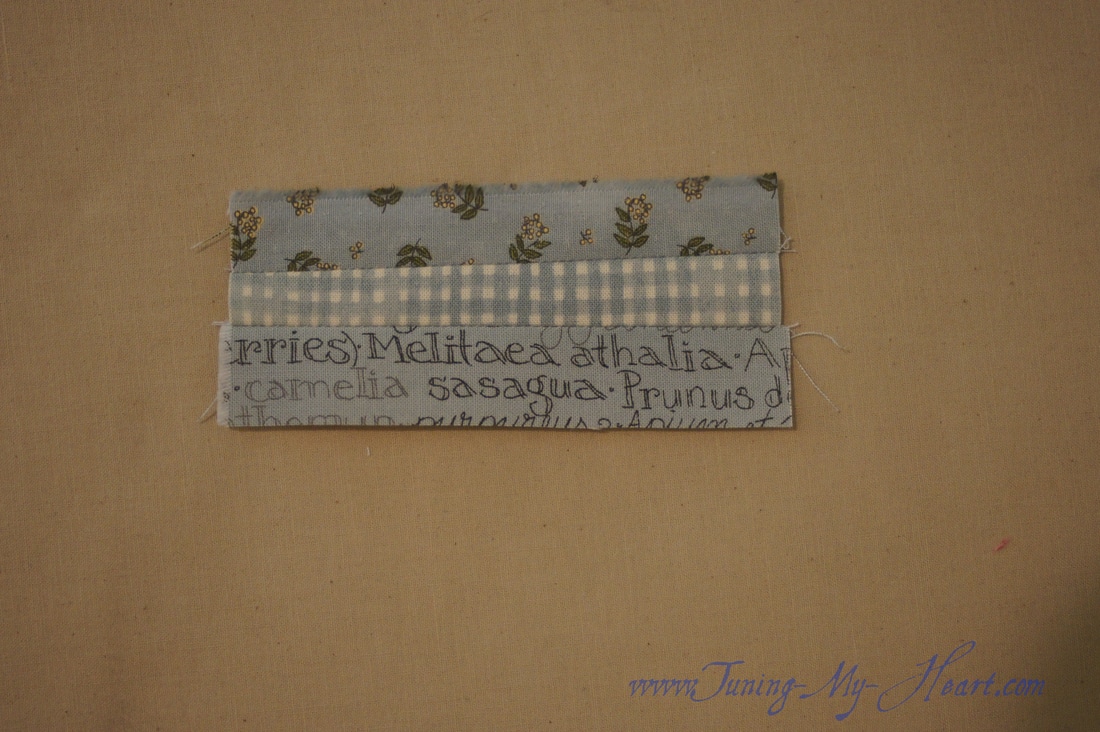 Here you can see how I am following the edge of the angled piece to add this next row. I will trim off that extra bottom bit before pressing.
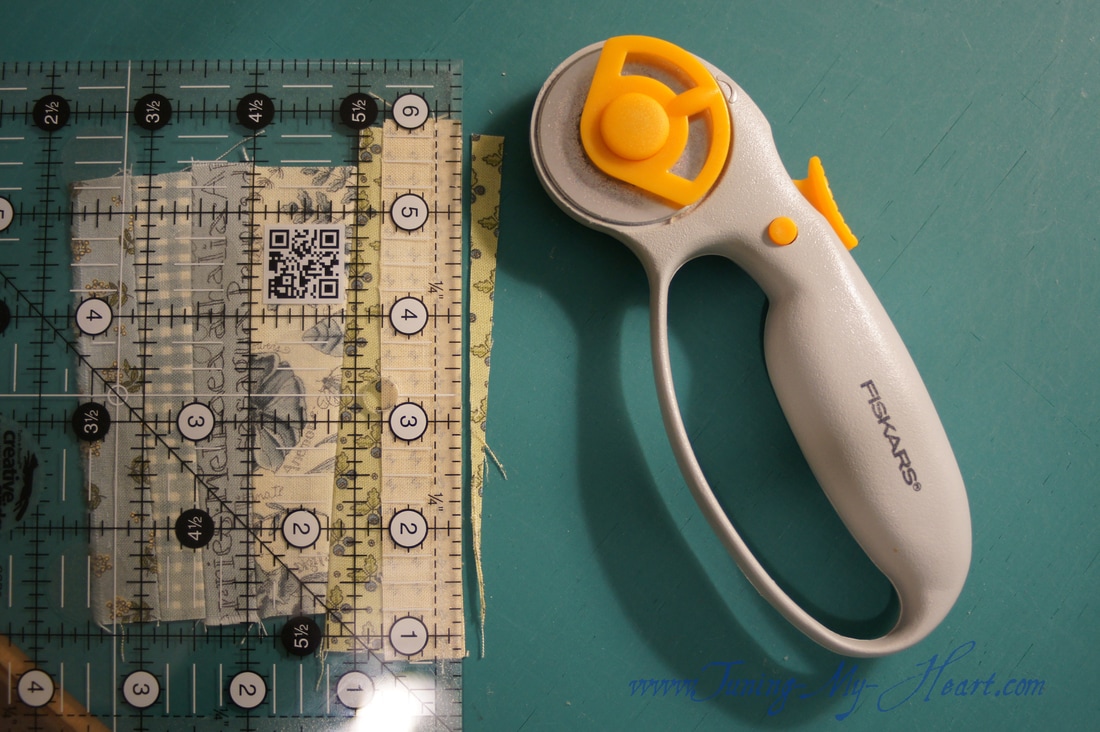
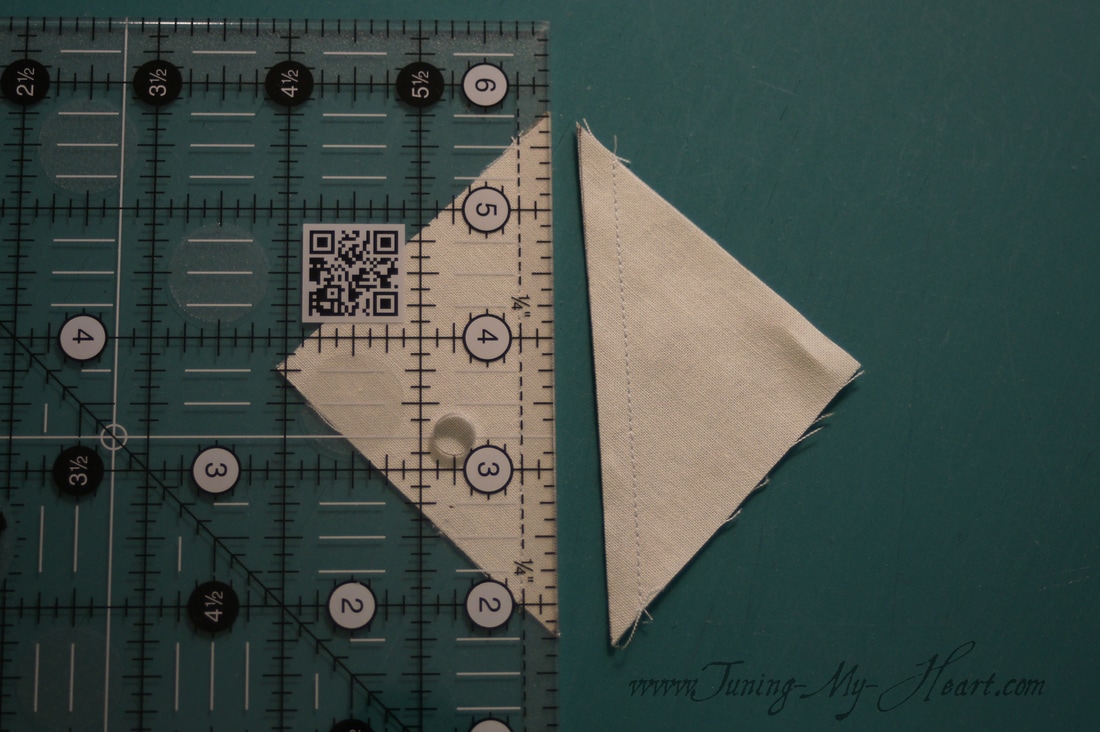
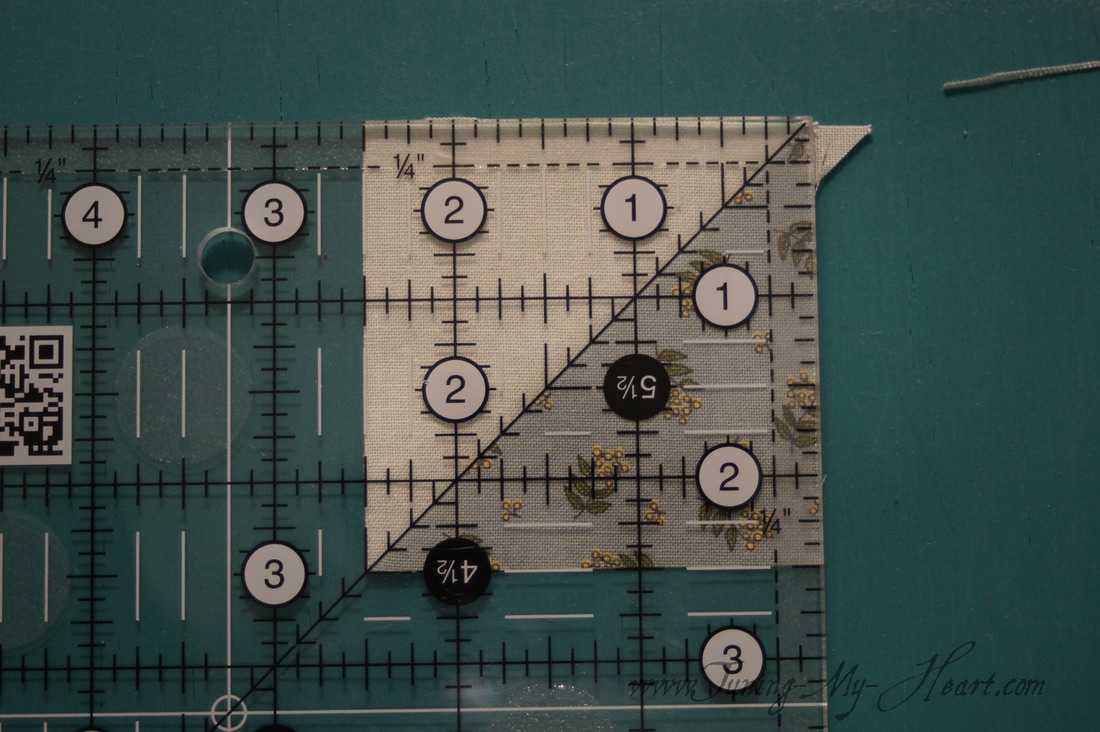
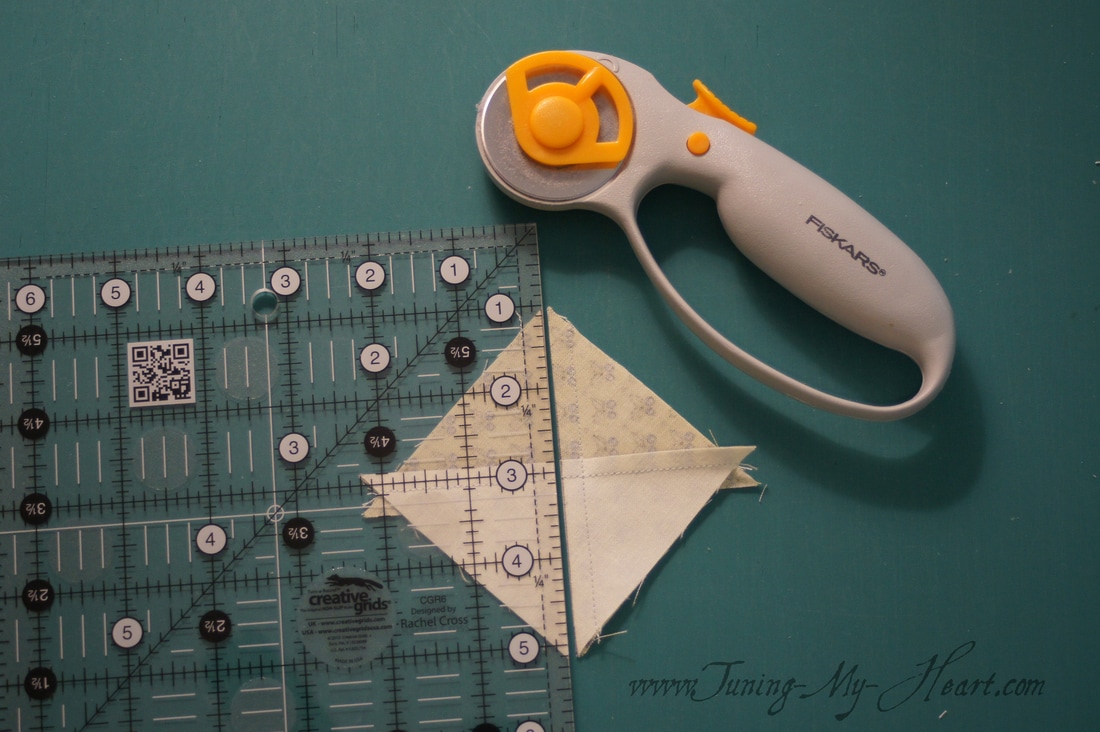
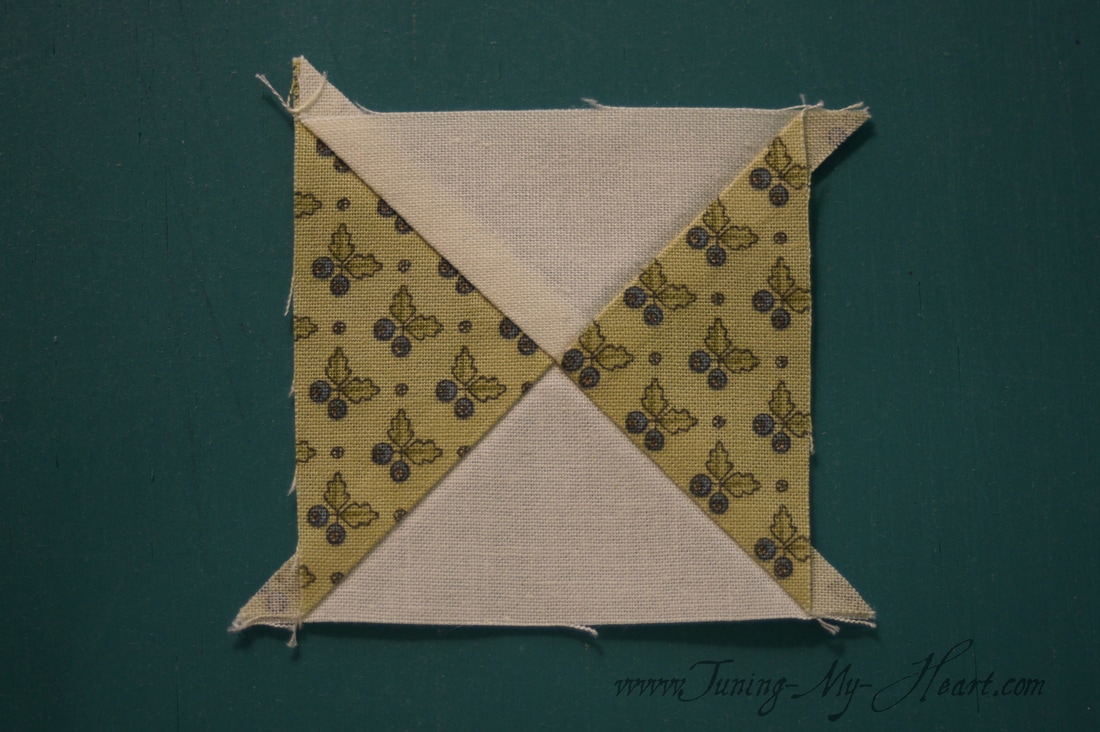
Hmmmm-I guess I forgot to take a photo of the finished piecing for the Bee Skep. Soooo back to preparing the applique pieces. I place my fusible on the wrong side of my fabrics. With the pieced Bee Skep I made sure it was well pressed and lying very flat. At this point you have to follow the manufacturer's directions for your fusible to know the iron temperature and how long to hold the iron on the fusible. 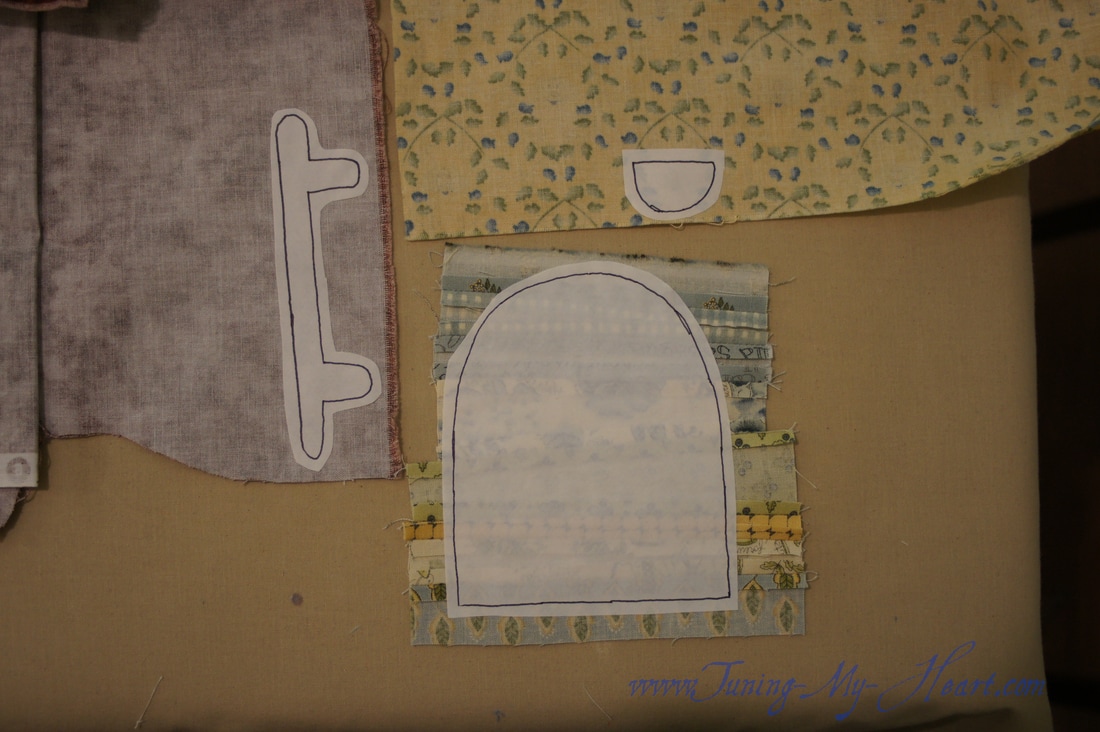 While I am waiting for my applique pieces to cool I can piece together my background. I cut this slightly oversize. The green is 2 1/2 x 7 1/4. The cream is 5 1/4 x 7 1/4. These are stitched using a quarter inch seam and pressed to the dark side. 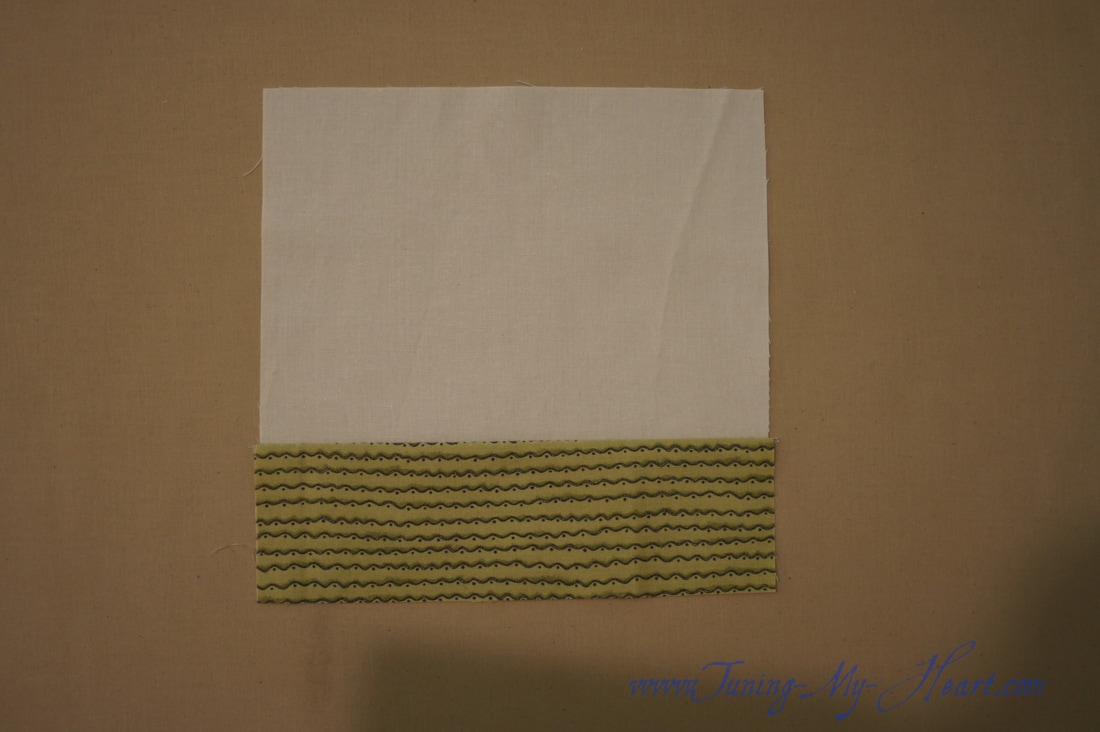 After peeling off the backing paper from the fused applique pieces I arrange them on my background. I had a little lady bug on one of my fabric strips that was going to be covered up by the door so I moved the door to the left. It is okay to arrange pieces to your liking. Once I am happy with my layout I iron in place, again, following the manufacturer's directions. 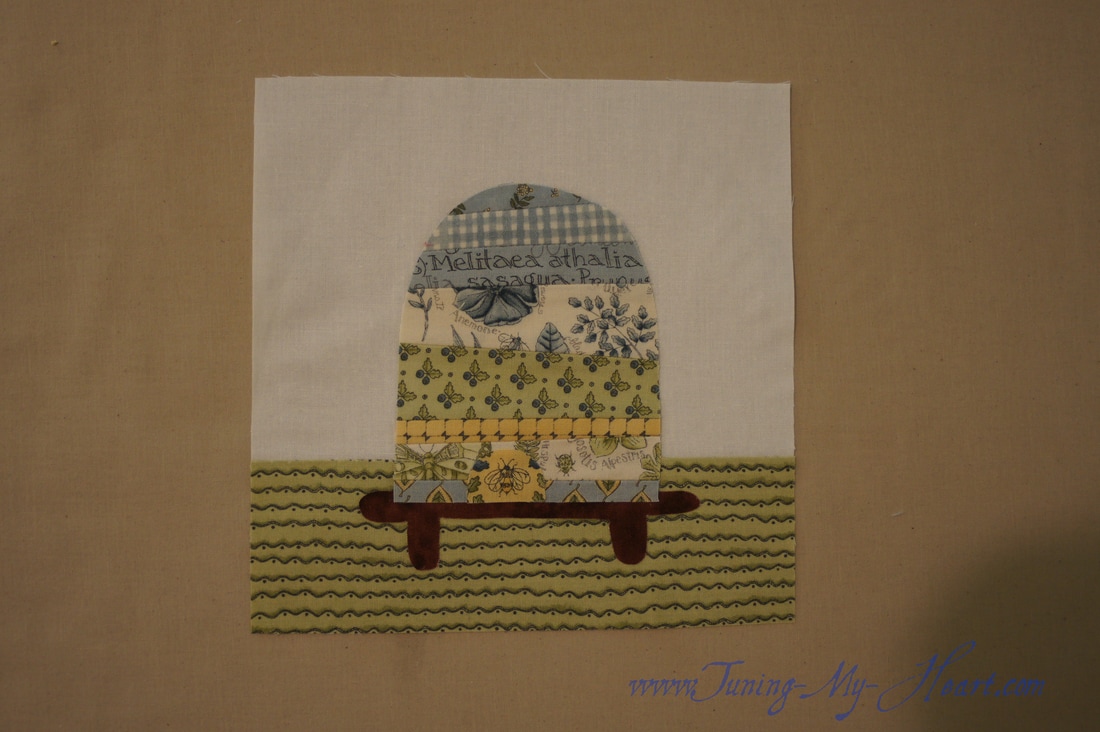 Now I get ready to play with my lovely threads. I have attached a piece of stabilizer to the back of my block. This happens to be one that washes out leaving my piece soft rather than stiff. The machine stitches will come out much nicer with the addition of stabilizer though I have done without in a pinch and just take it slower.  I start and end my applique stitches with a straight stitch. Here I have my machine set to a stitch length of 1.9 and have moved the needle to the right two places. I always have my needle in the down position for machine applique, and piecing for that matter. 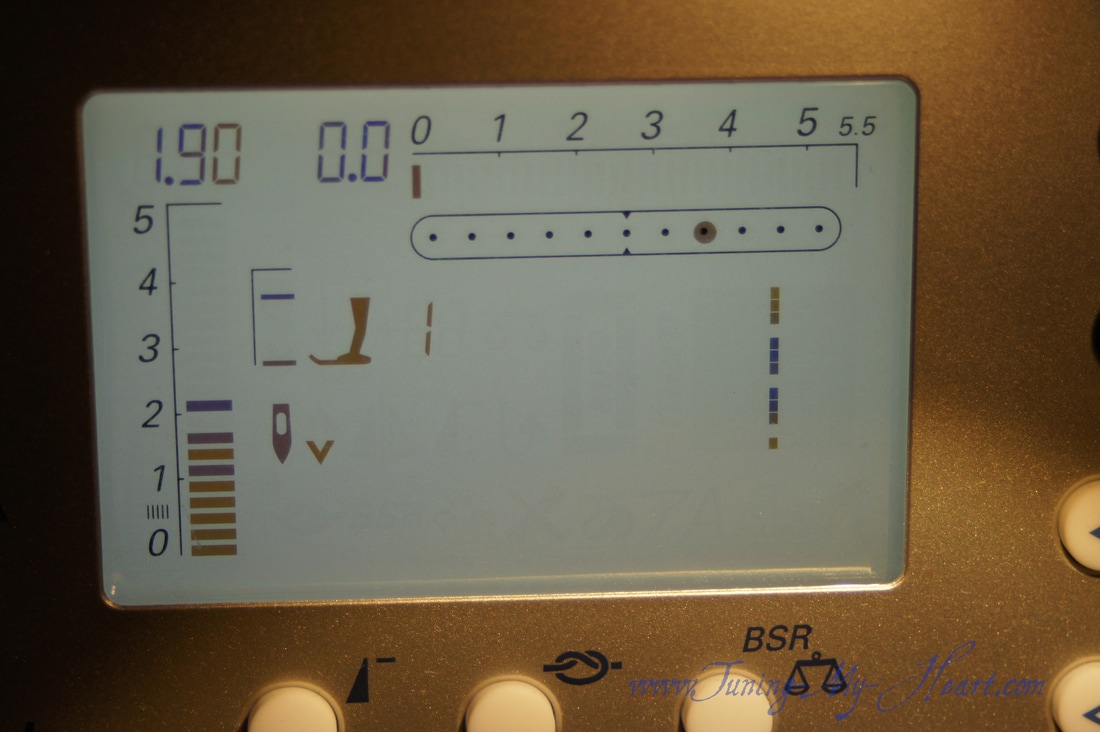 I am going to start with the stand. You can see that I took a few straight stitches that I am now going to come back over with a buttonhole stitch. My machine has a double buttonhole stitch which I really like for applique. My stitches will be locked in because I have sewn over the previous straight stitches. 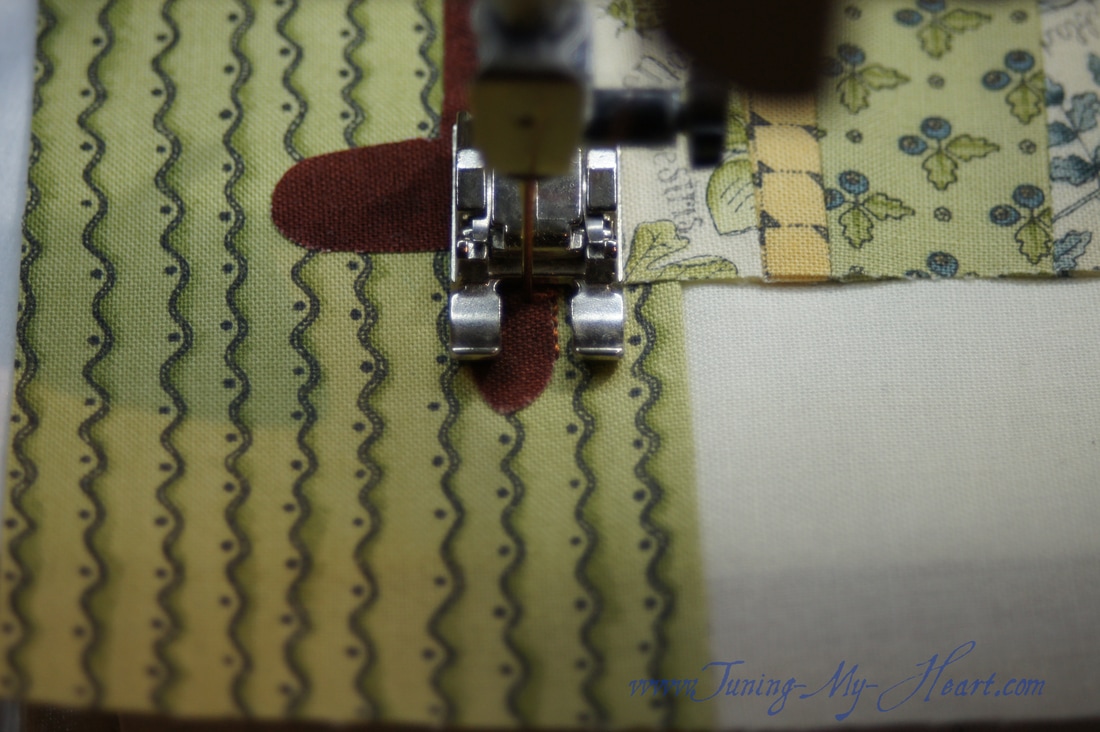 Here are my settings for the buttonhole stitch. My length is still 1.9 and my width is 2.0. The needle is now back to center. Basically just experiment with your length and width to see what look you like. As long as your remember to keep the stitch length the same of the straight and buttonhole stitches it will all be good. 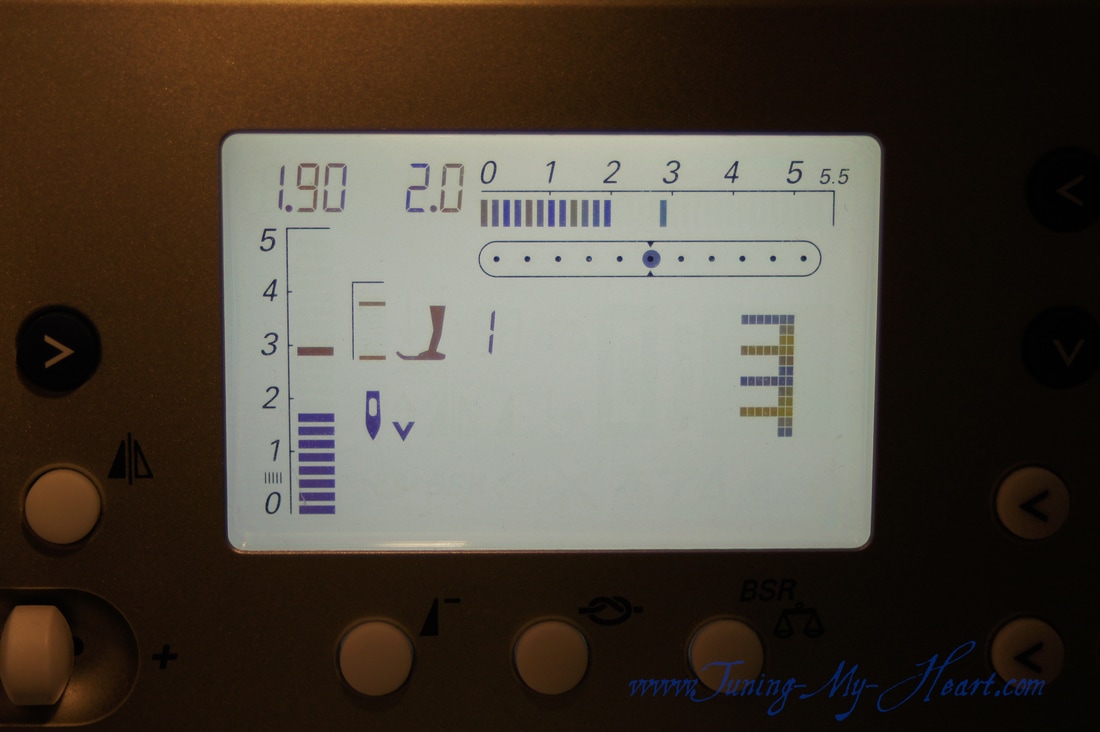 Made it all the way around the stand and come to a stop where the stand meets the Bee Skep. 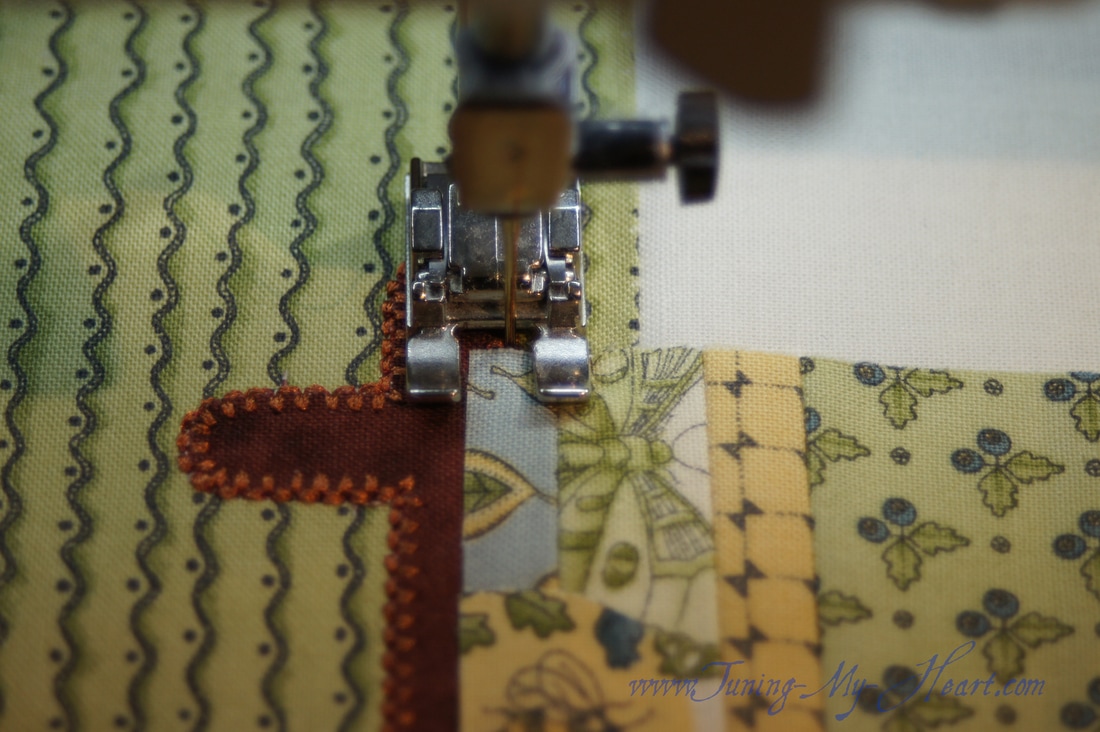 Switching back to the straight stitch, I turn and go back over the buttonhole stitch with a few stitches and then a locking stitch to finish. The straight stitch will land right on the straight part of the buttonhole stitches so they will not show. 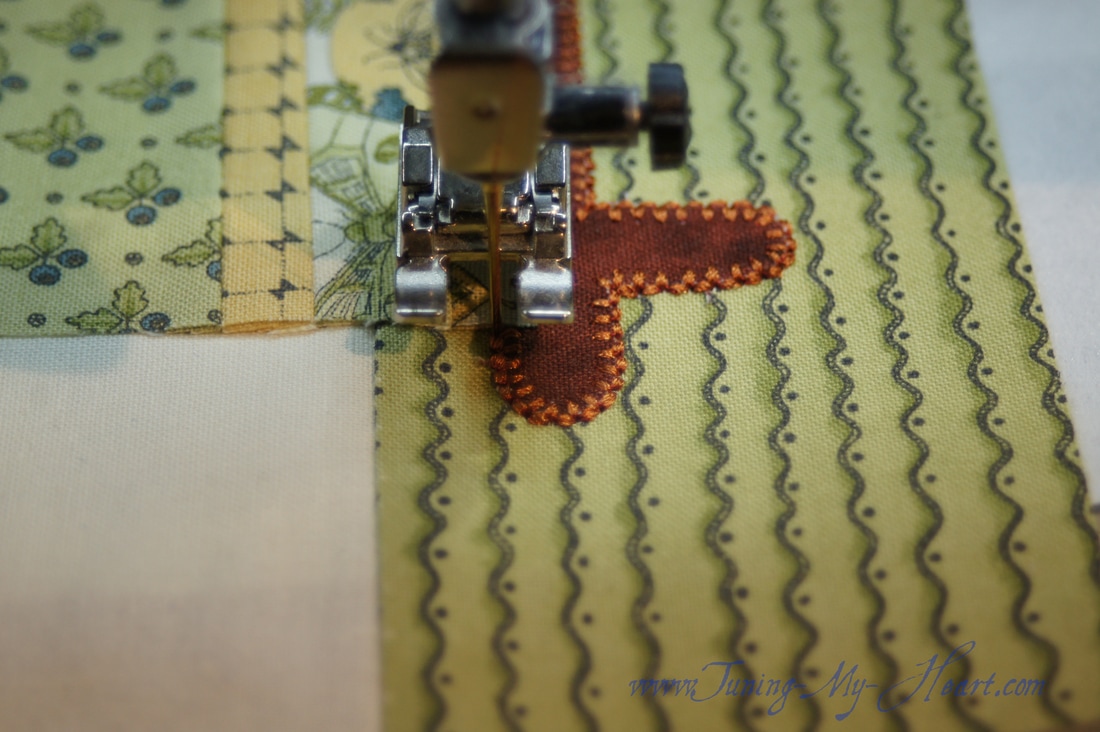 After switching to my lovely blue thread I have come up with a plan for the skep. My goal is to do it without having to start and stop more than once. So with my straight stitch I take a few stitches across the bottom of my door. This photo is a good one to point out where your needle needs to land when doing applique. You want the needle to run right along the edge of your applique piece so that only the stitches that take a bite in will be on your applique. 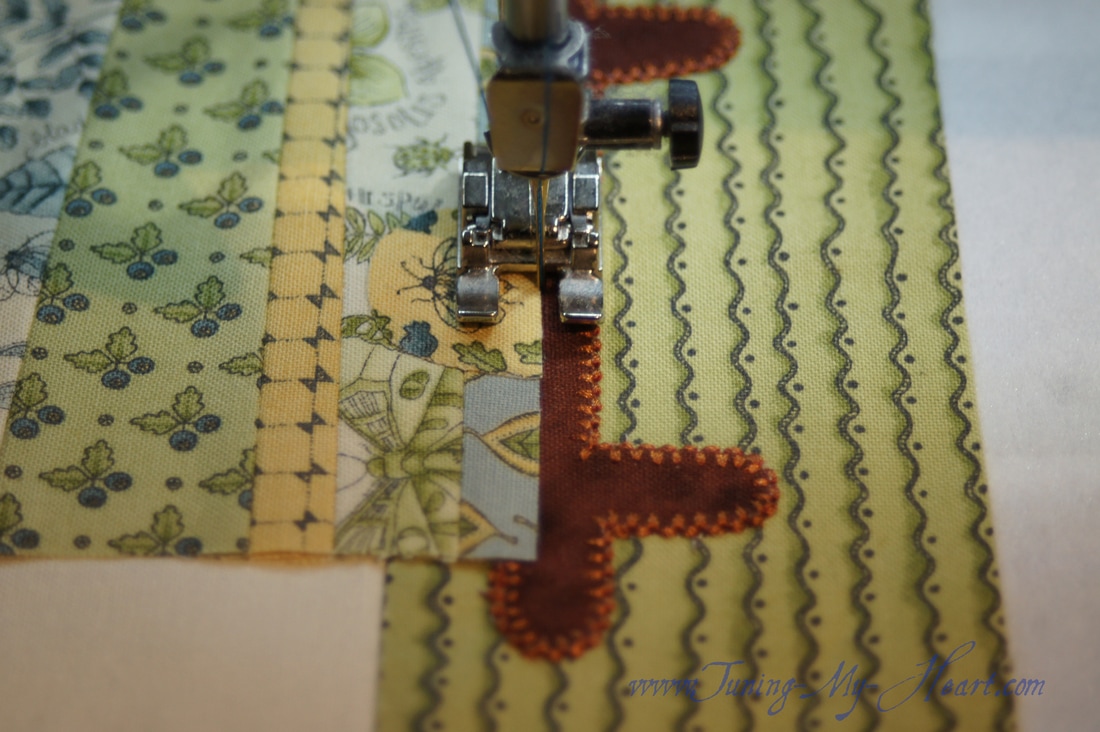 Time to switch to my buttonhole stitch and work my way around the door. Anytime I change direction with my sewing I leave my needle down, lift the presser foot, make my adjustment, and then proceed as before. 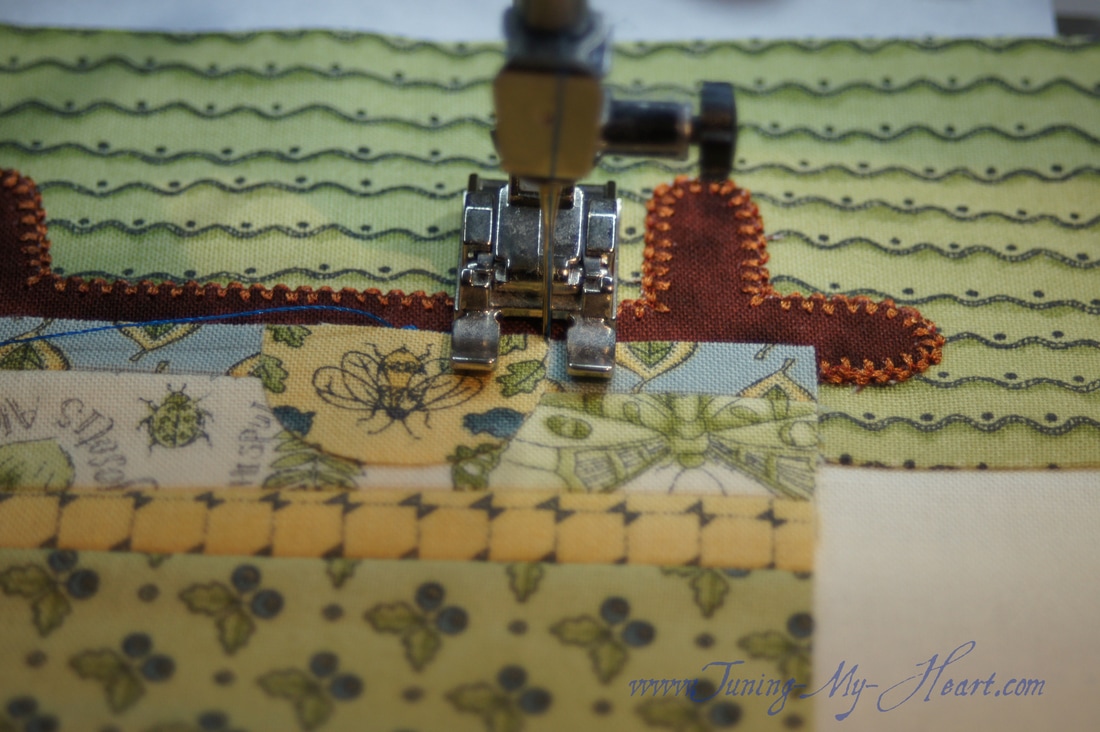 Coming back to those straight stitches and continuing over them with the buttonhole stitch. 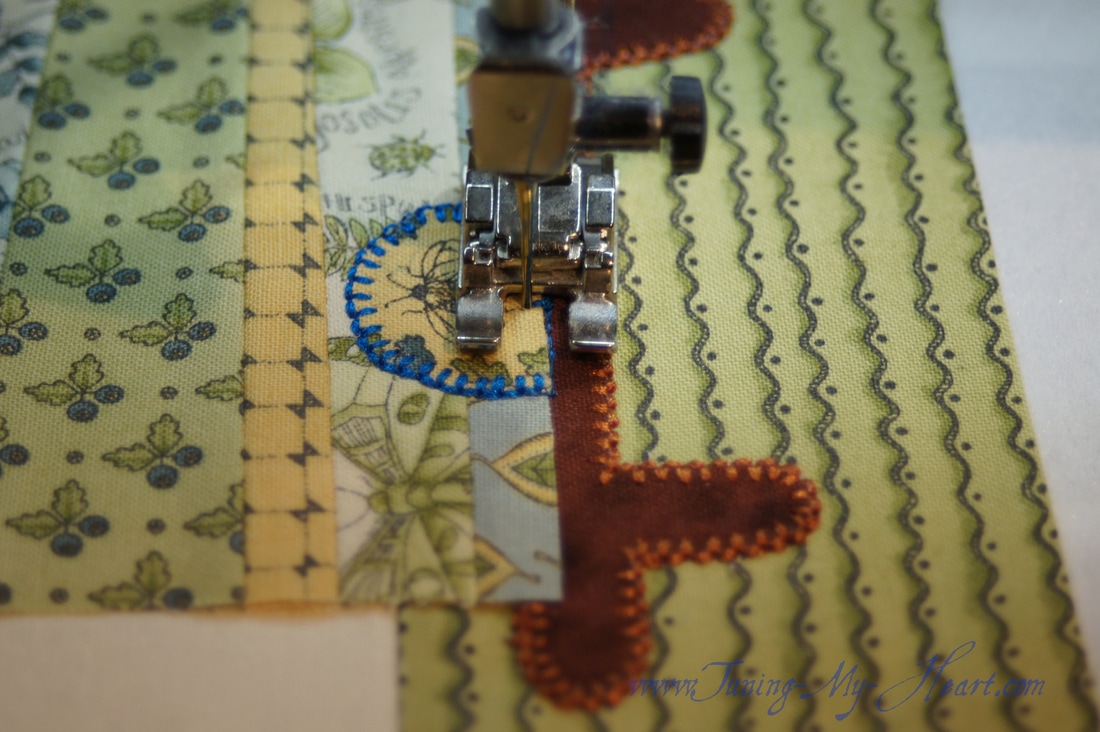 Just keep sewing, just keep sewing. Working my way around the entire skep. 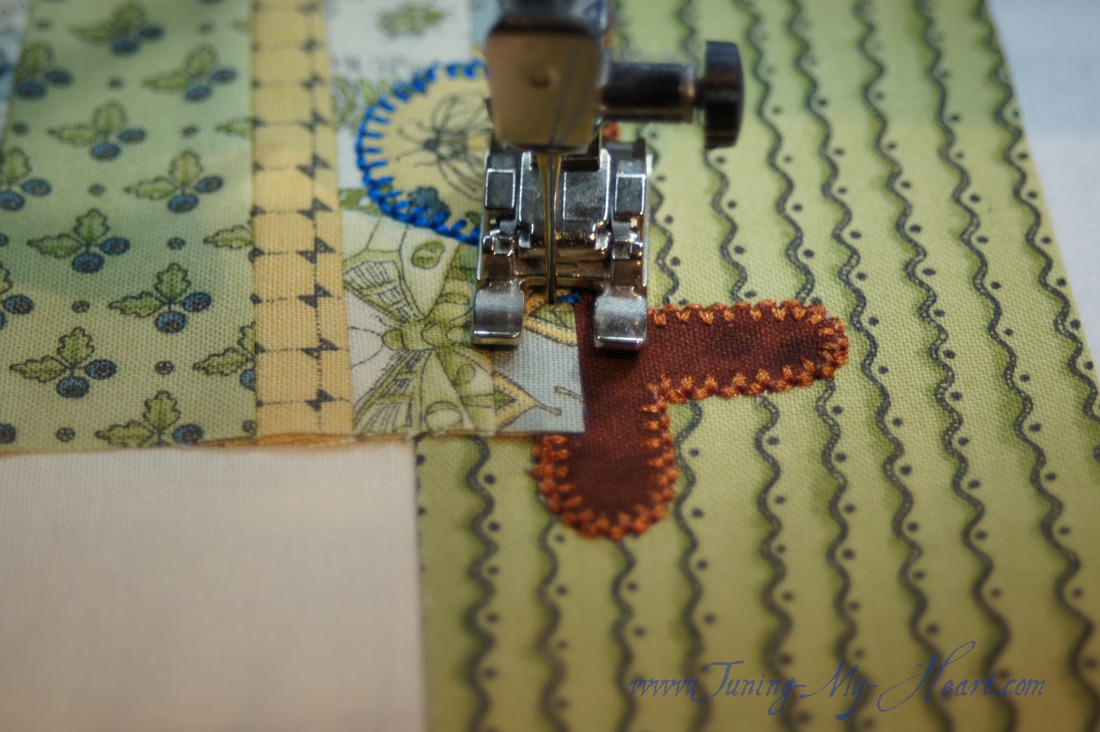 And here I am back at the beginning. Switch back to the straight stitch, take four or five stitches and then a locking stitch and I am finished. 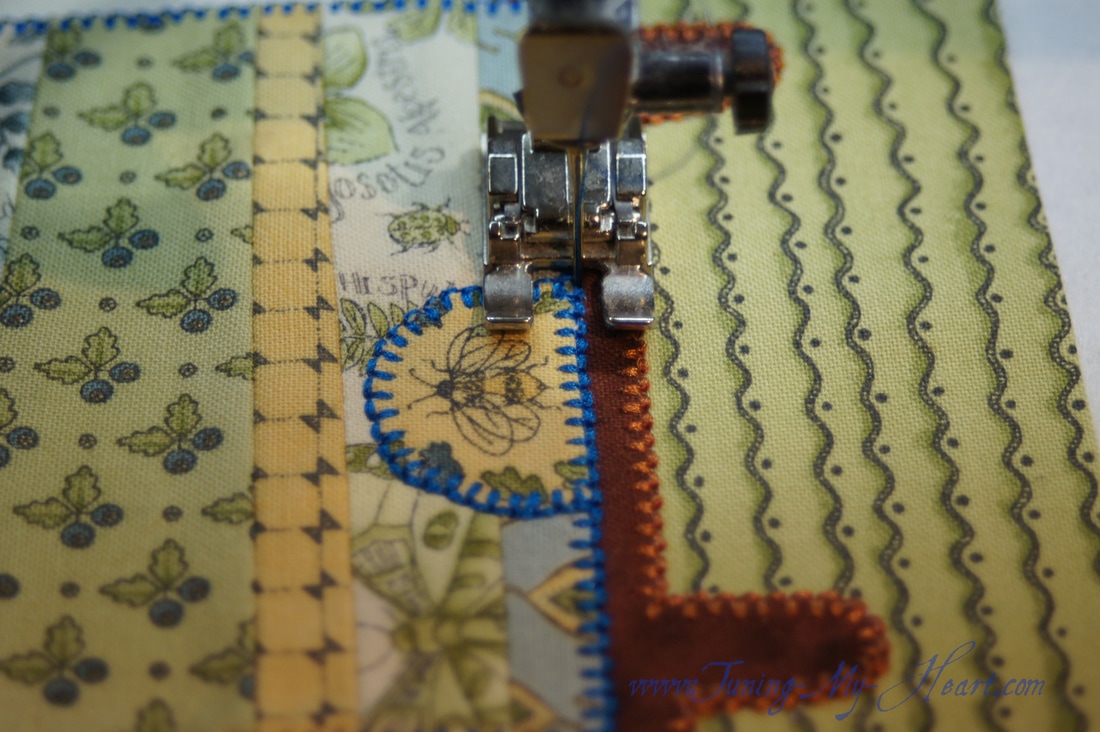 I might end up adding a little embellishment to this, I feel like it needs a buzzing bee or two in the sky. This is such a cute block. 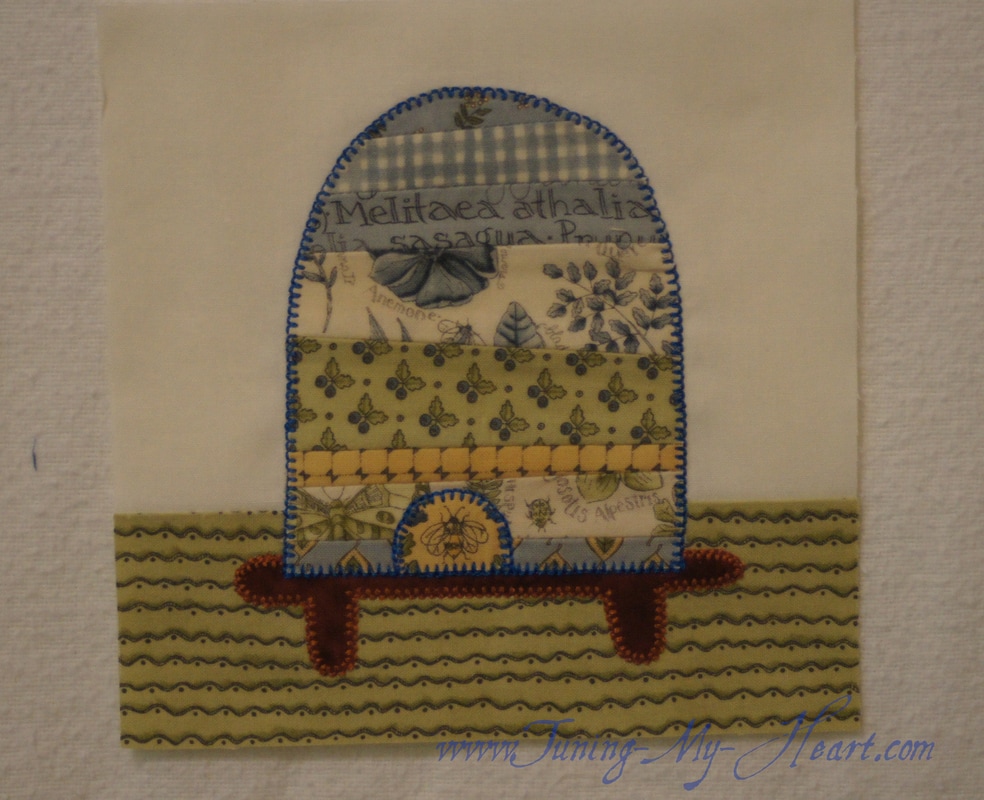 And it goes so well with the others. I wonder what else Jan Patek has in store for us in the coming weeks? More applique I hope. 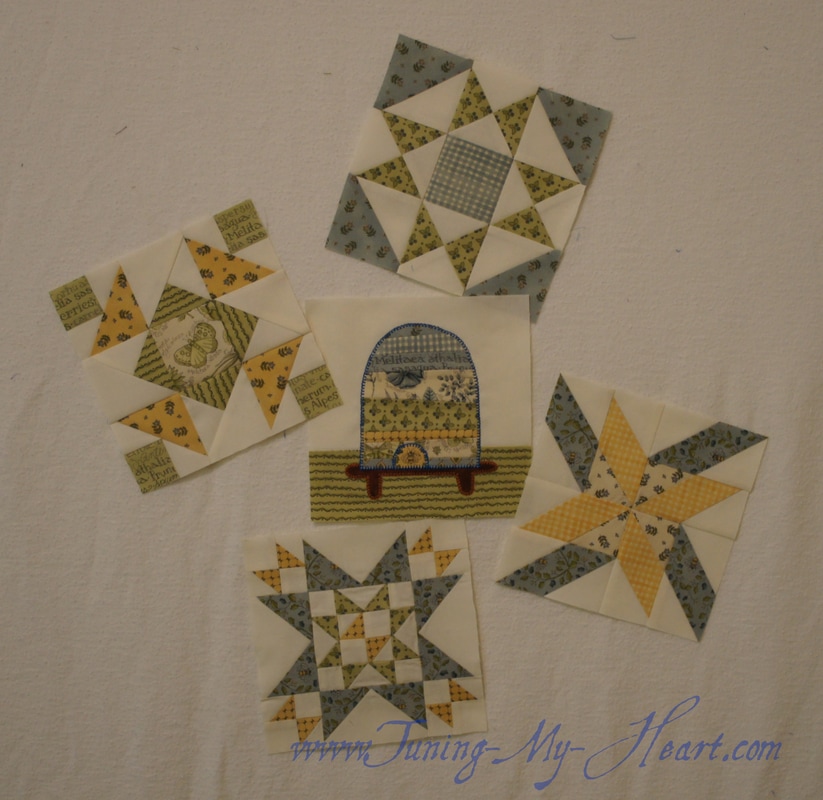 Do you have a favorite form of applique or is it all new to you? I am attempting freezer paper applique on another project this year. I like the idea of having some handwork to do, though arthritis makes that rather tricky at times. Until next time... Happy Quilting!!!  Block 5-Coronation was designed by Lisa Bongean. She has an alternate method of doing this block which you can see on her blog as well as get the directions for the method I am using. https://lisabongean.com/2017/04/05/block-5-blockheads-2/ I confess I went shopping on her website. I absolutely love Creative Grid rulers and she has one with 1/8 inch markings that I just had to have. She links to these on her blog post if you are interested in taking a look. I am slowly replacing all of my rulers with Creative Grids brand as they just do not slip when cutting fabric. I have discovered a nifty solution for slipping rulers though-shelf liner, the rubber like kind- a little square of that under my ruler makes a huge difference. It also works well under my foot pedal, no more chasing it across the room. Wow-I am glad I took up the challenge with Block 1 and made a couple of mini's. These 1 1/4 inch squares do not seem quite as intimidating now. I find the key to success with this block is heavy starch and sewing slowly. More than ever you want to have an accurate scant quarter inch seam. If you are off by a little it will make a noticeable difference with these tiny pieces. I made my A and B pieces slightly larger than what is called for in the pattern. Mine are cut 1 7/8 x 1 7/8 inches which will allow me to trim them down to the correct size. 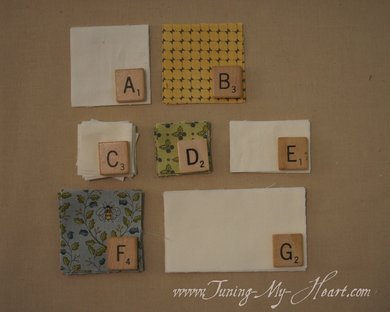 Pulling out my trusty sandpaper clipboard and Sharpie I draw a diagonal line on all of my A pieces. I like the sharp point on these fine line Sharpies and since I am going to be cutting on the line I do not have to worry about it showing in my quilt. 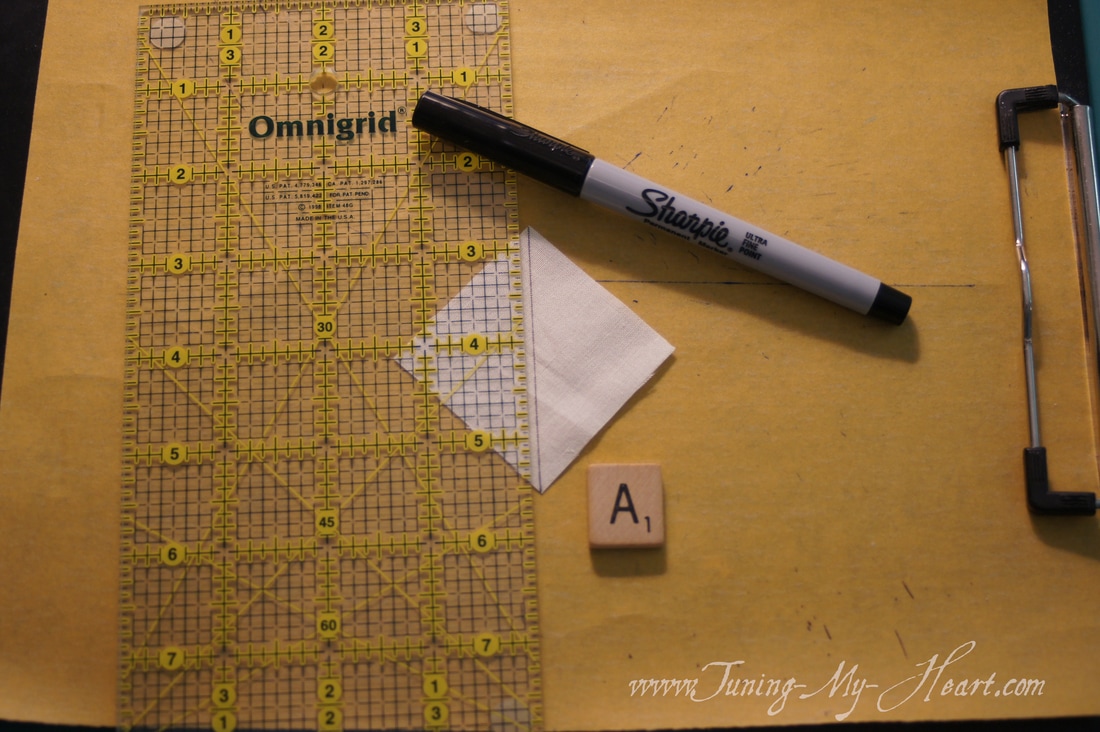 With right sides together I place an A on top of a B. I have skewed these slightly just to show you, when I sew them they will be stacked perfectly on top of one another. 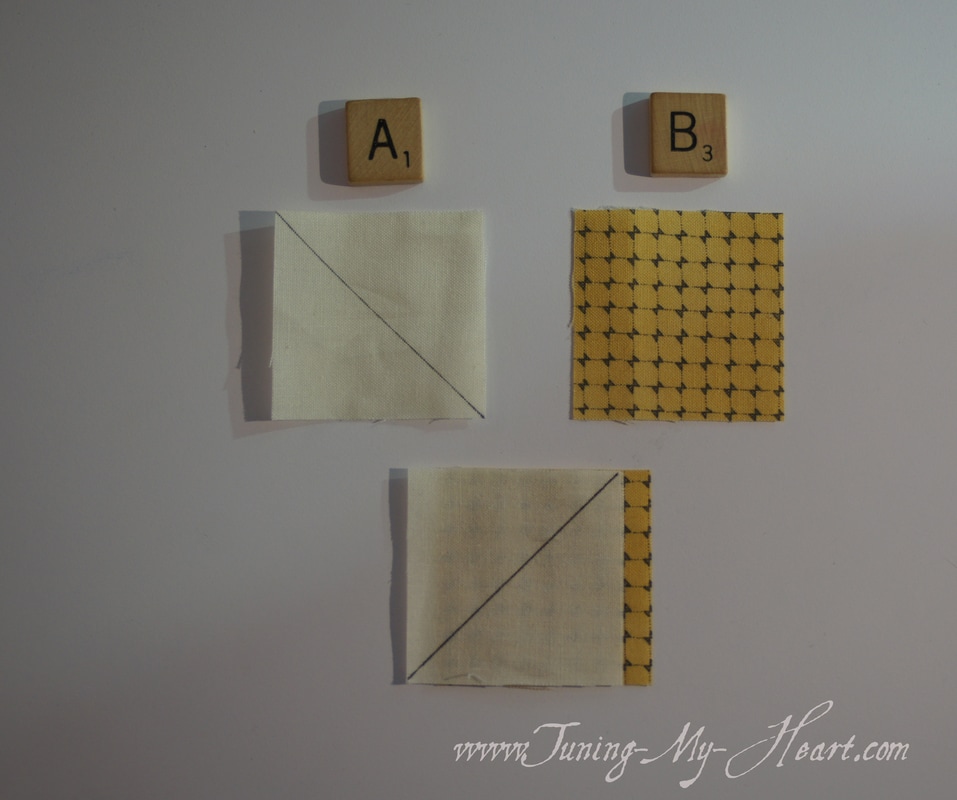 To make these units I sew 1/4 inch from both sides of the drawn line. 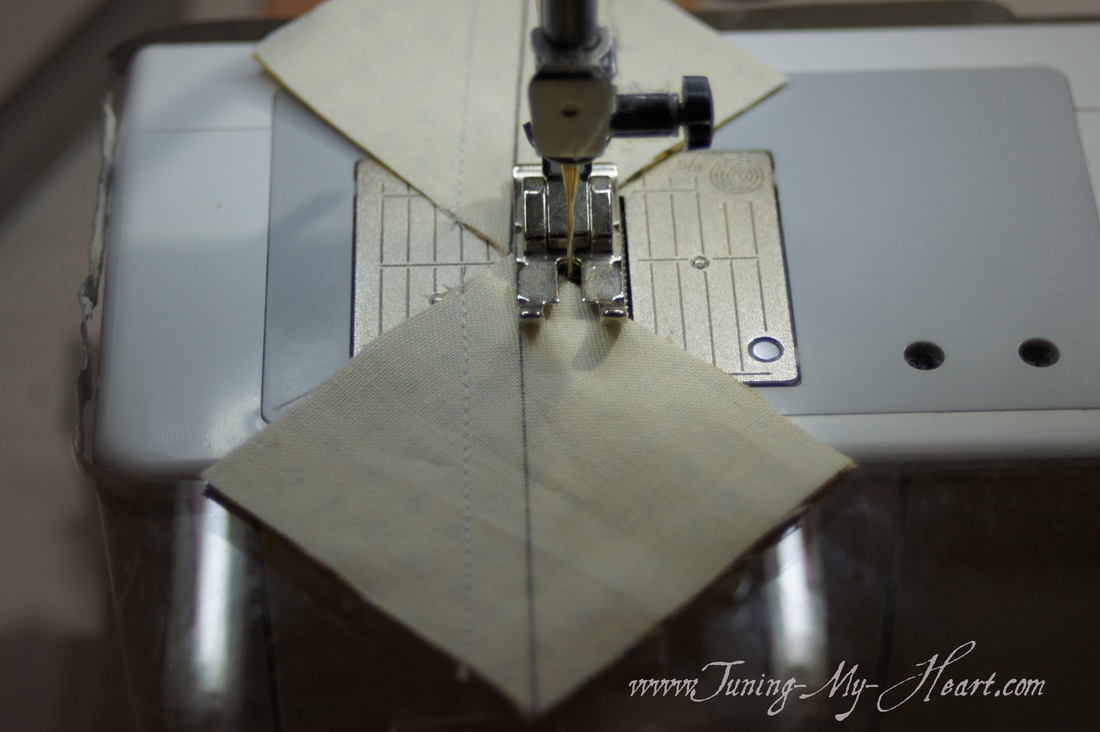 After they are sewn I cut on the diagonal line and press to the dark side. 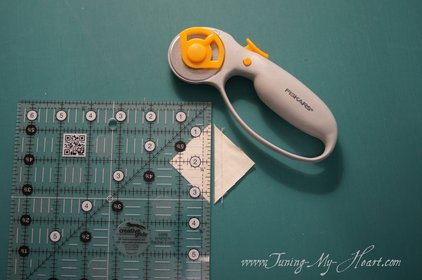 Lining up the diagonal line on my ruler with the seam on these units I trim them to the required 1 1/4 inch. First trimming off two sides. then I rotating the unit to trim the remaining two sides. 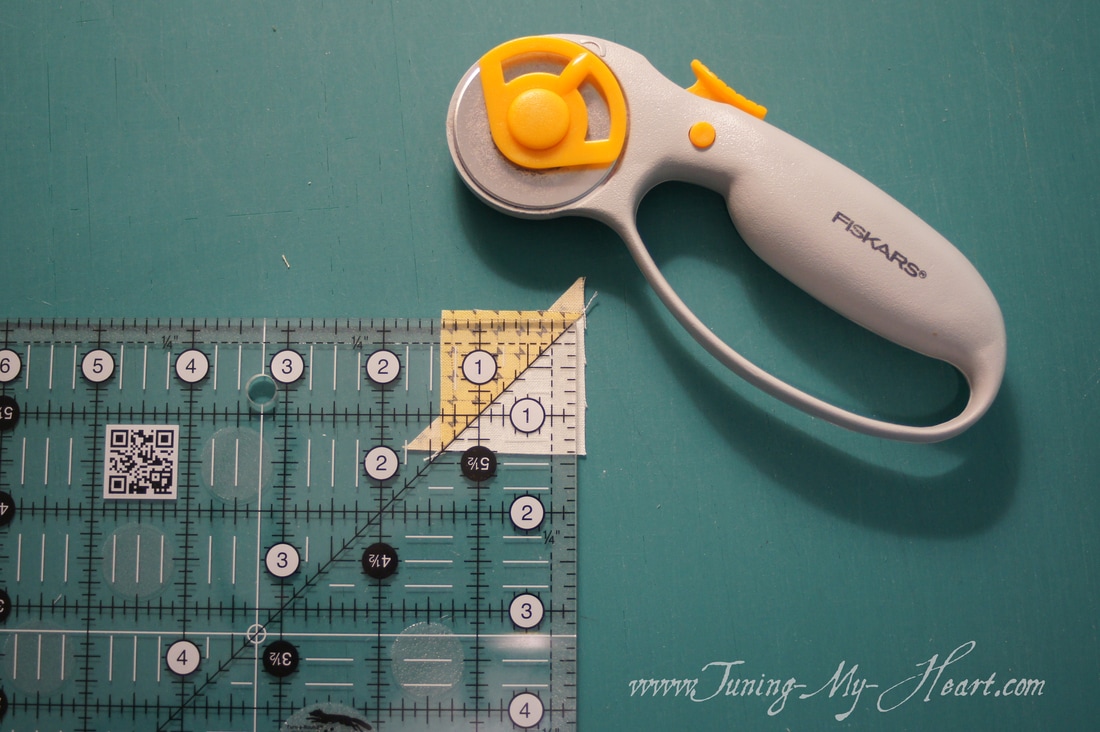 It is important to place the diagonal line of my ruler right on the seam.  Perfect little half square triangles are now the correct size for Block 5. 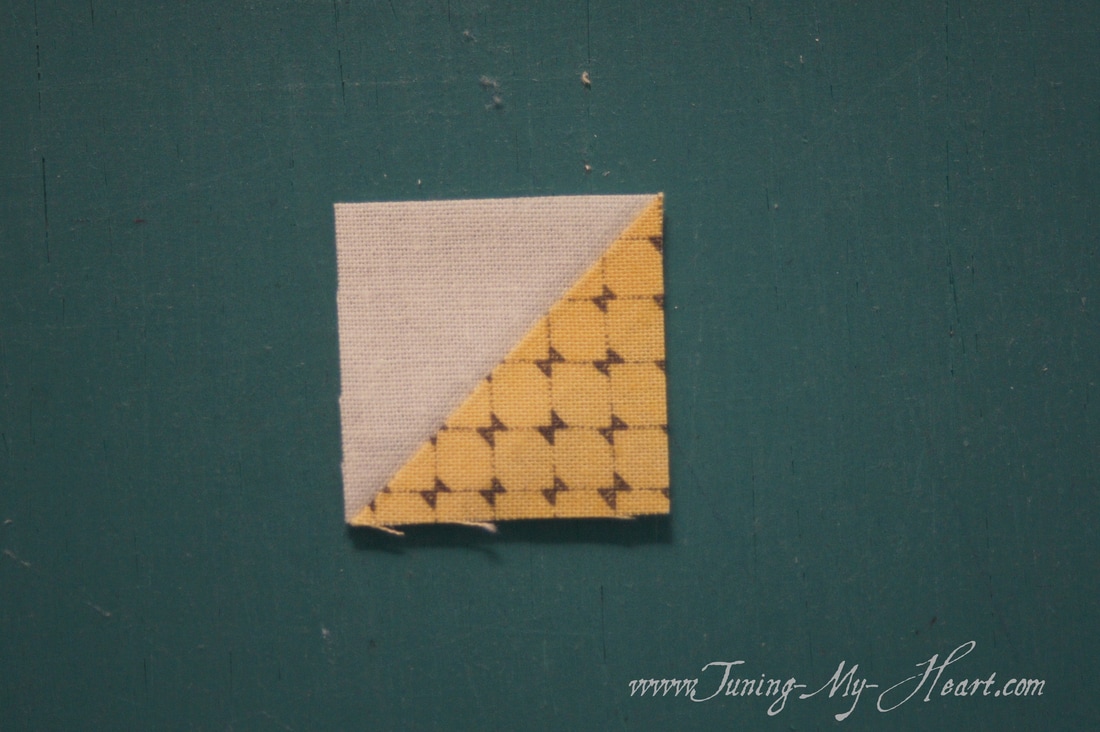 Okay, now I take the units I just made and the C pieces to begin creating the Four-Patch units. (Ever since the Splendid Sampler last year I think of these as little butterflies.) All I need to do to create these Four-Patch units is sew a C to my Half-square Triangles. 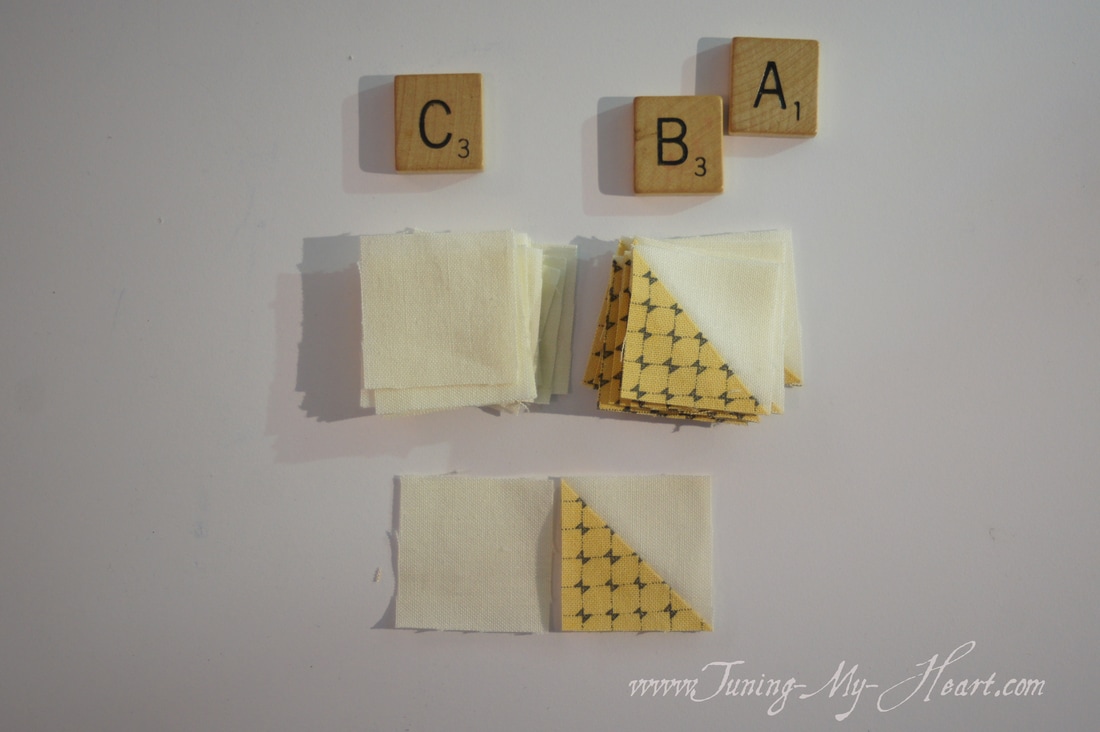 Once that is done I press them open and lay them out to sew together. These should now measure 1 1/4" x 2." 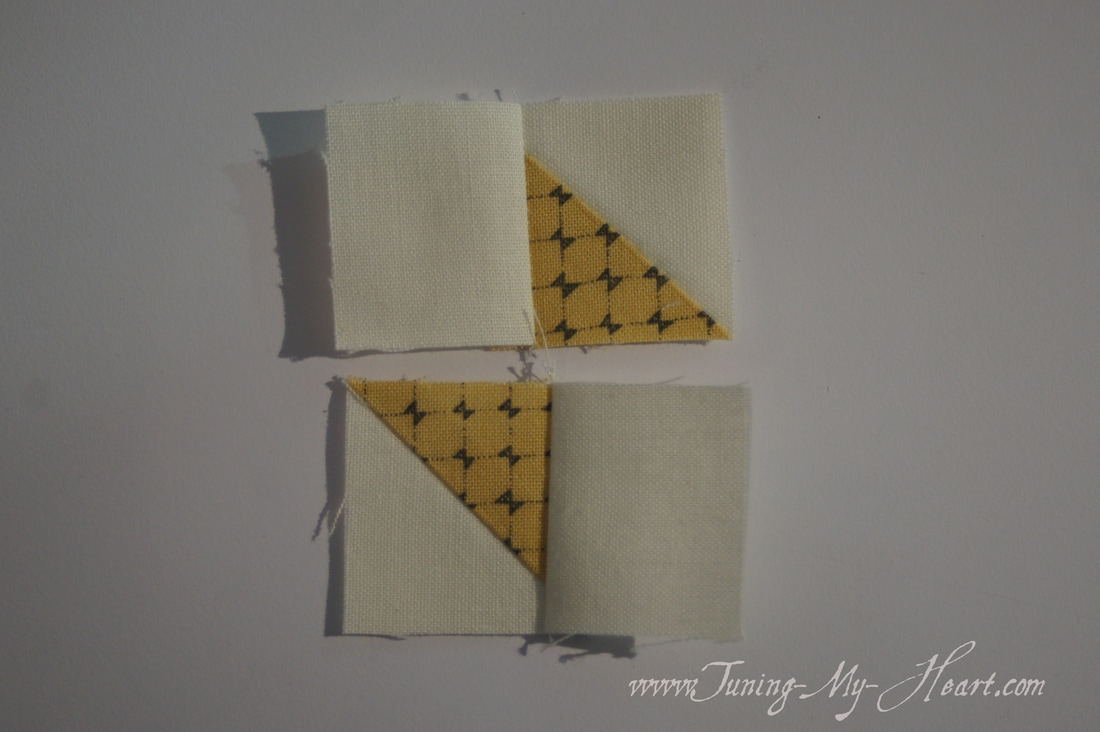 This is where I like having my seams pressed to one side. When I put the units together the seams lock each other in place. I still place a pin just to make sure though. When I come to these seams I slow my stitching down a good bit until I get over the "hump." 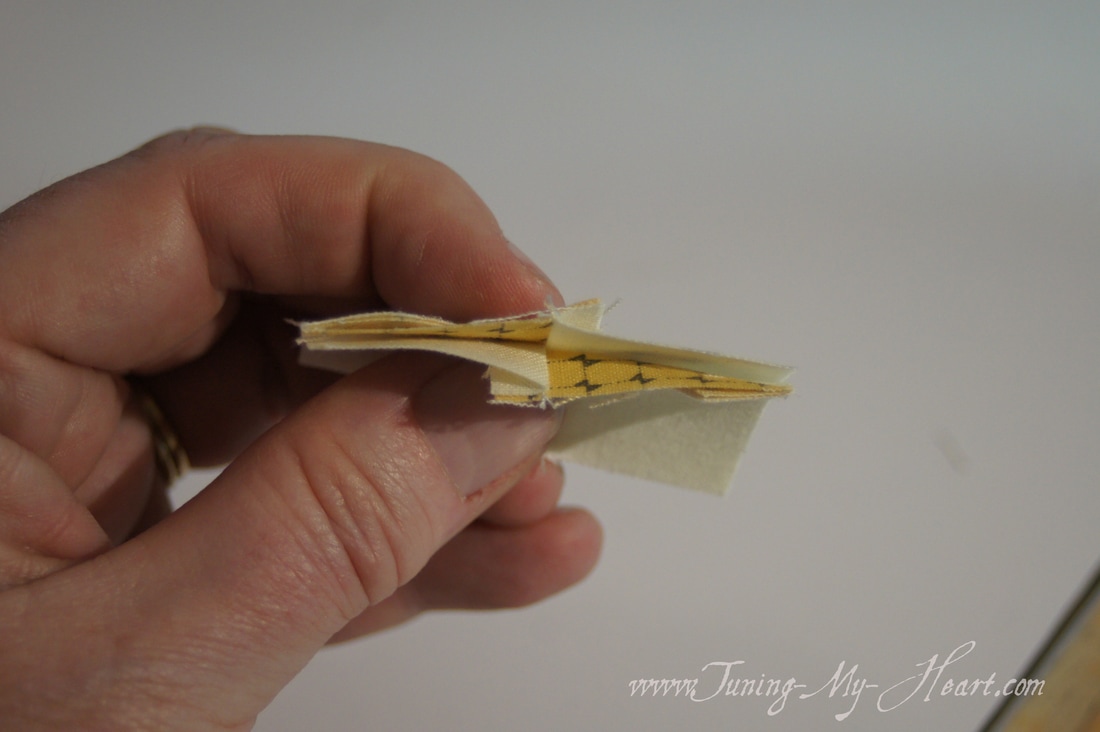 I have pressed the Four-Patch units open and check to see if they are 2" x 2." Give them a little trim if needed. I will use a unit that is just a hair off, but if it is too small I would pull out my seam ripper and move my seam over about a needle's width depending on how off the unit is. 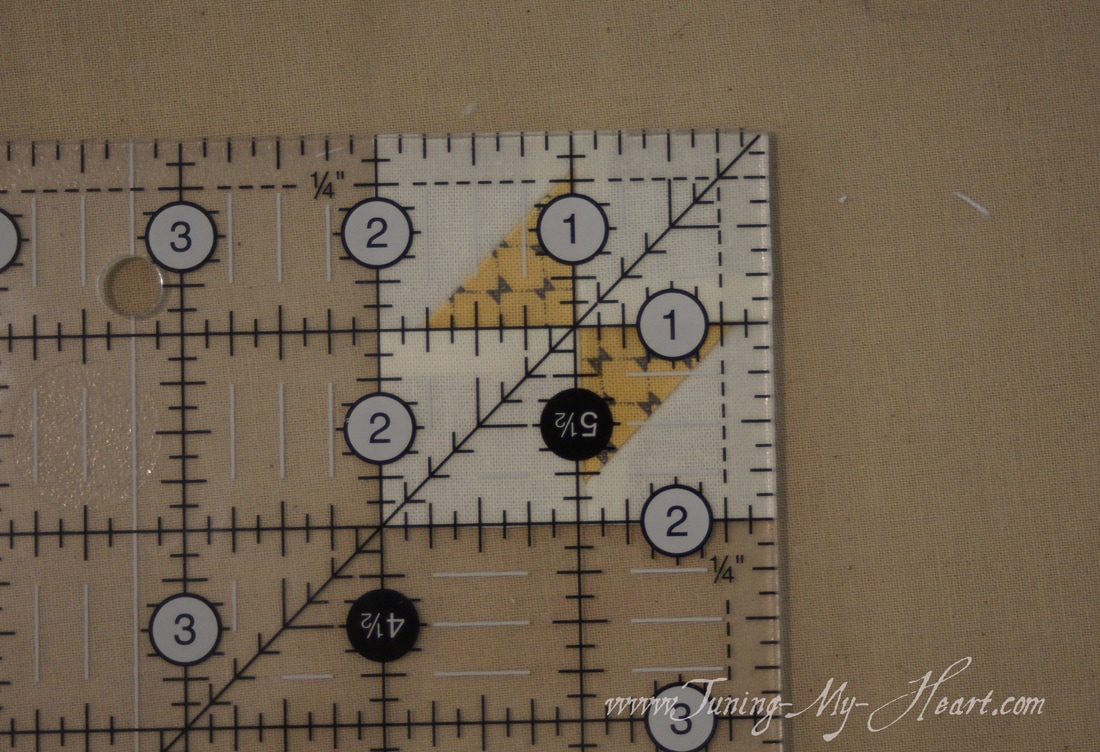 Cute little butterflies playing on my design wall. 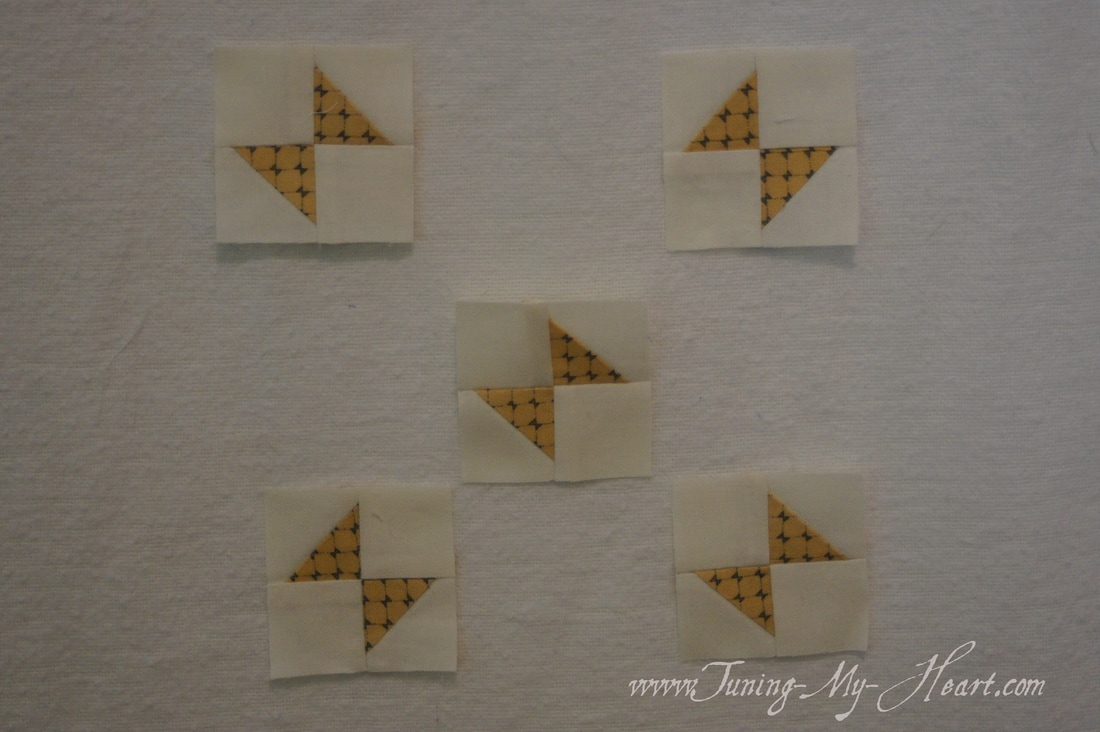 Step 3 in the directions has us making Flying Geese units. 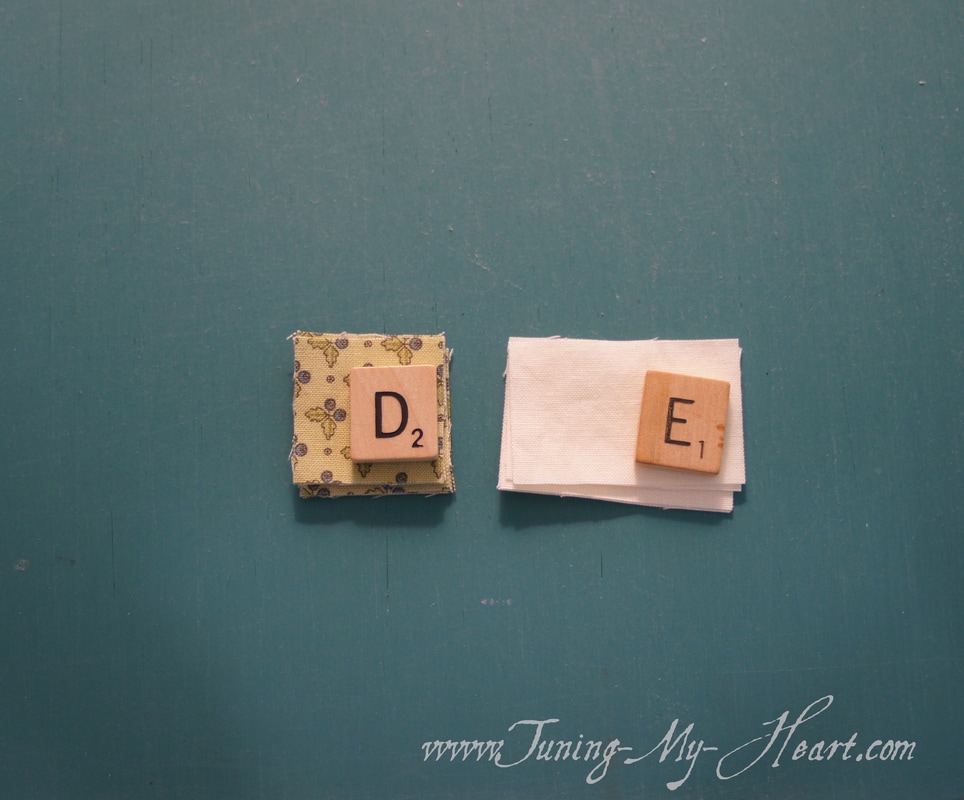 Marking a diagonal line on the D squares using a pencil this time. This is a line that could show through on the quilt so no Sharpie here. The pencil tends to want to grab the fabric as I make the line which is where the very fine sandpaper comes in-it helps to keep the fabric from moving. 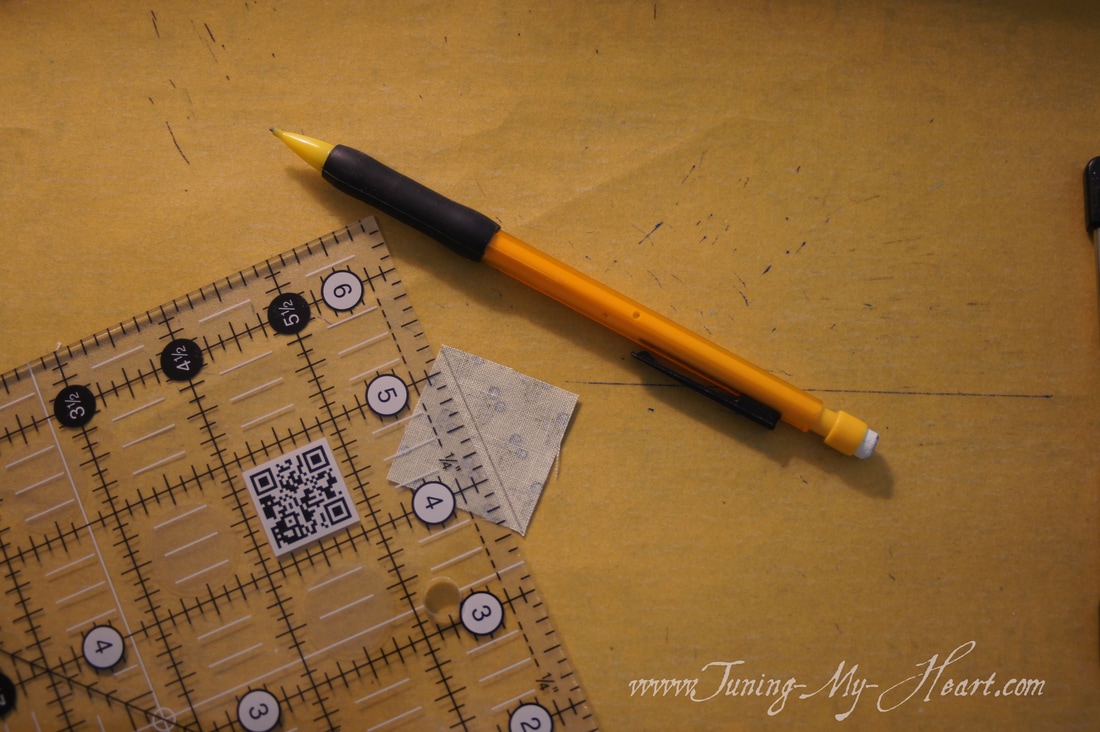 To make the Flying Geese units I start by placing one D square on the E rectangle. 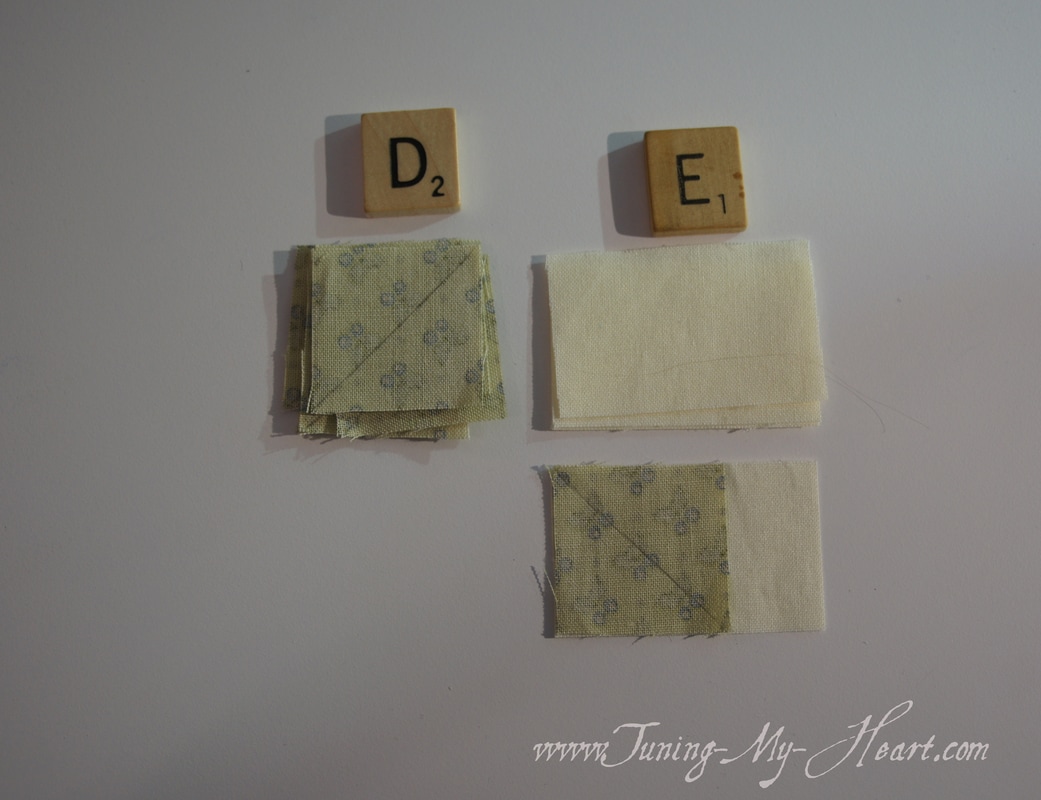 I am going to sew with my needle landing just to the outside of the drawn line. 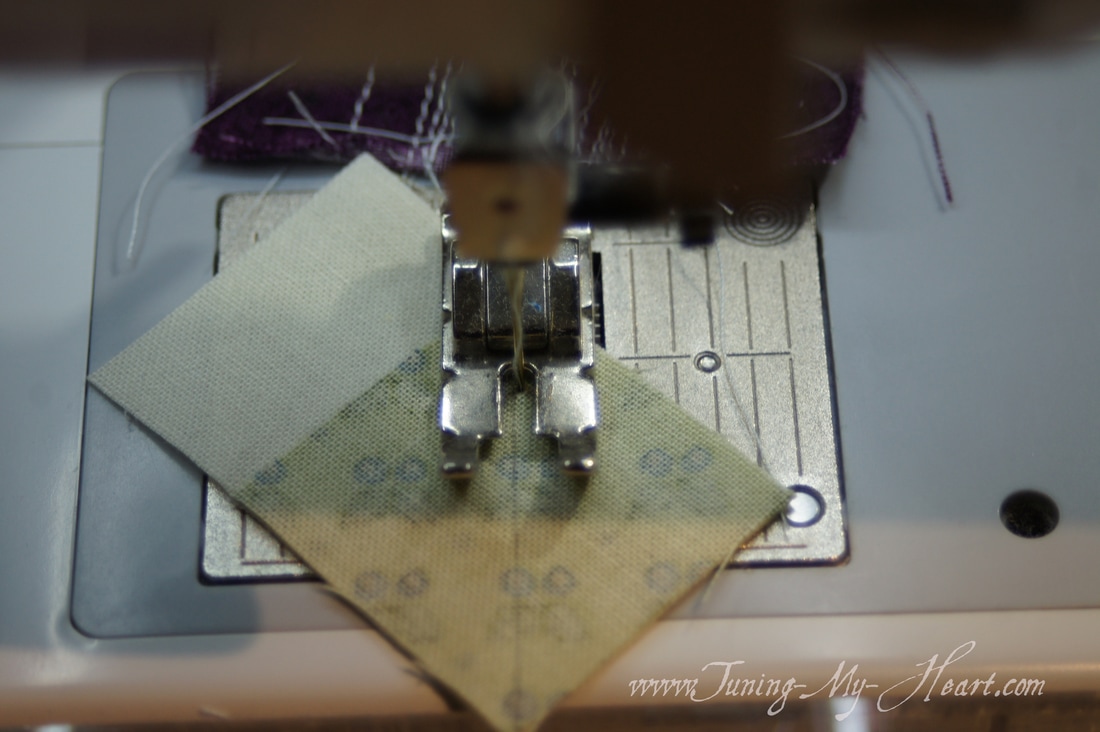 Before I trim away the extra I flip the resulting triangle over to make sure that it covers the B rectangle. These all do so I can trim away the extra by placing my ruler on the stitching line and cutting 1/4" away from those stitches. 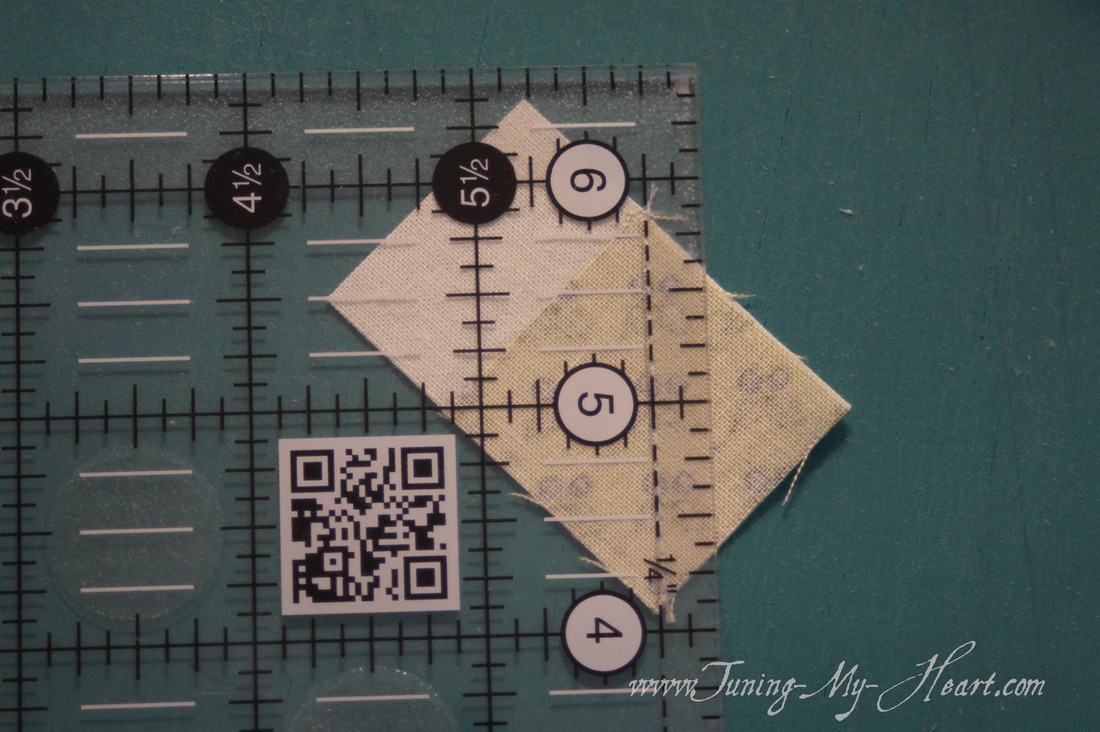 Press towards the dark side. 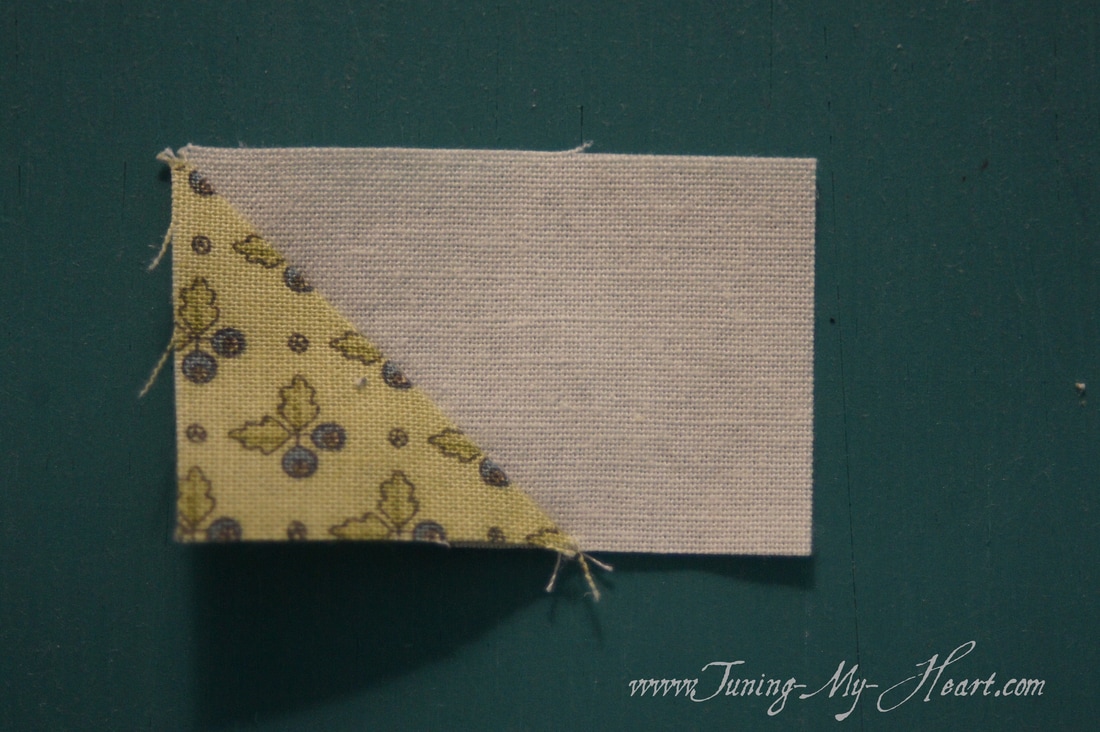 Being careful to make sure the diagonal line is going in the right direction I lay the next A square on my rectangle. 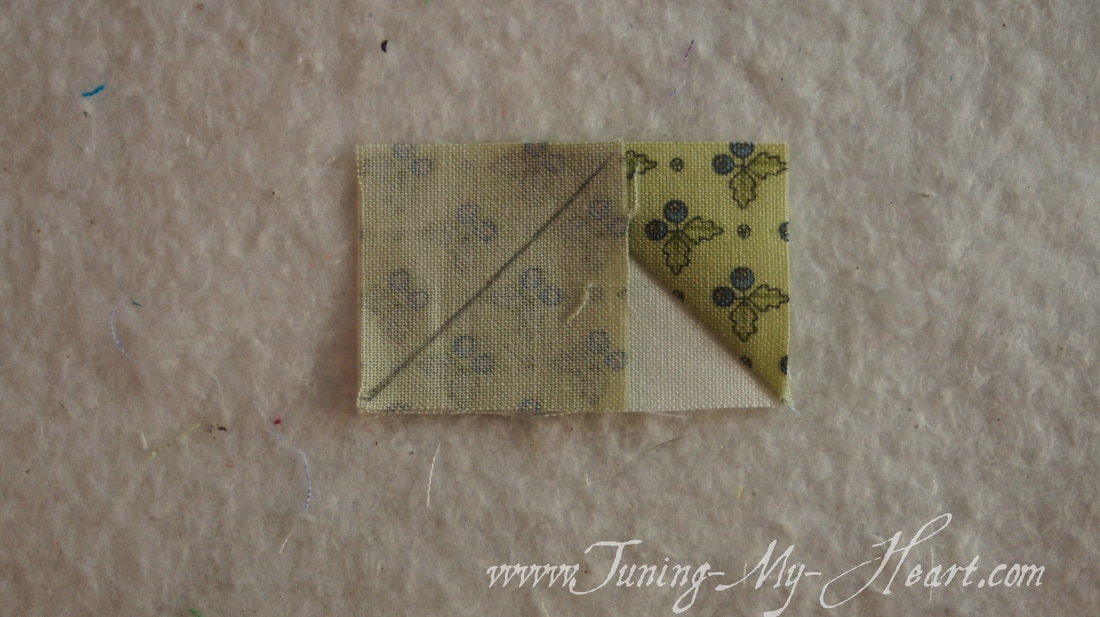 Once again I stitch right beside the diagonal line all the way to the end of the square. 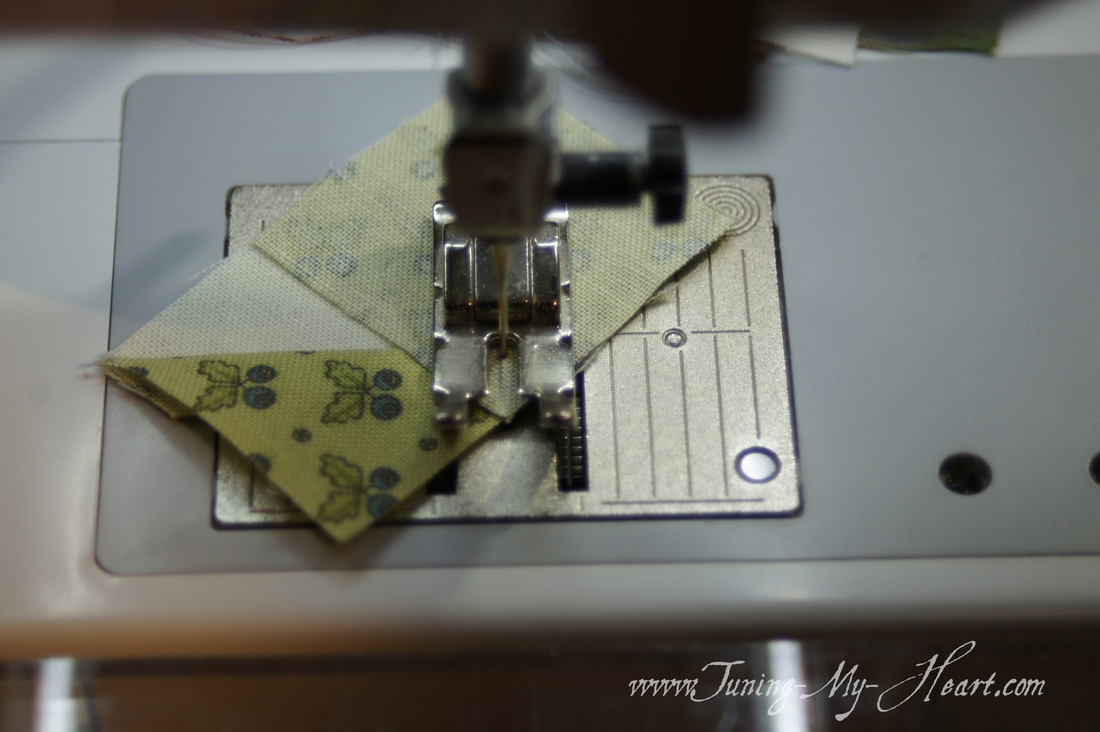 Trim and press and I now have my Flying Geese units measuring 1 1/4" x 2." Yay! 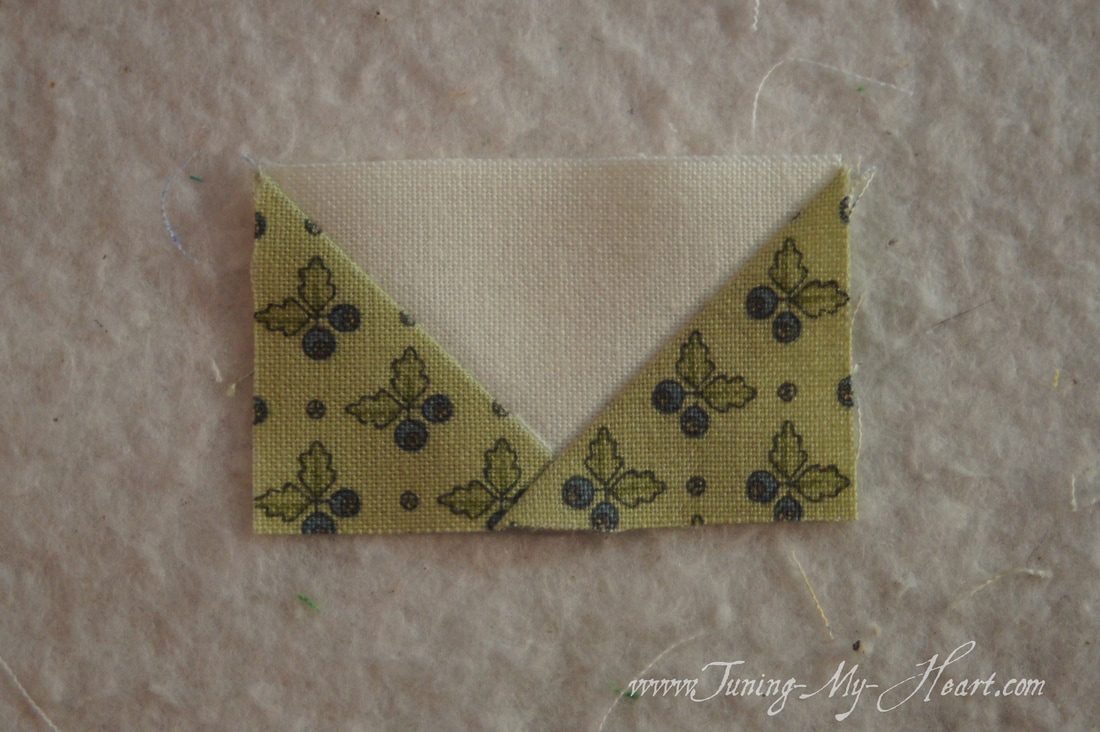 Now to repeat that process with the F and G pieces. 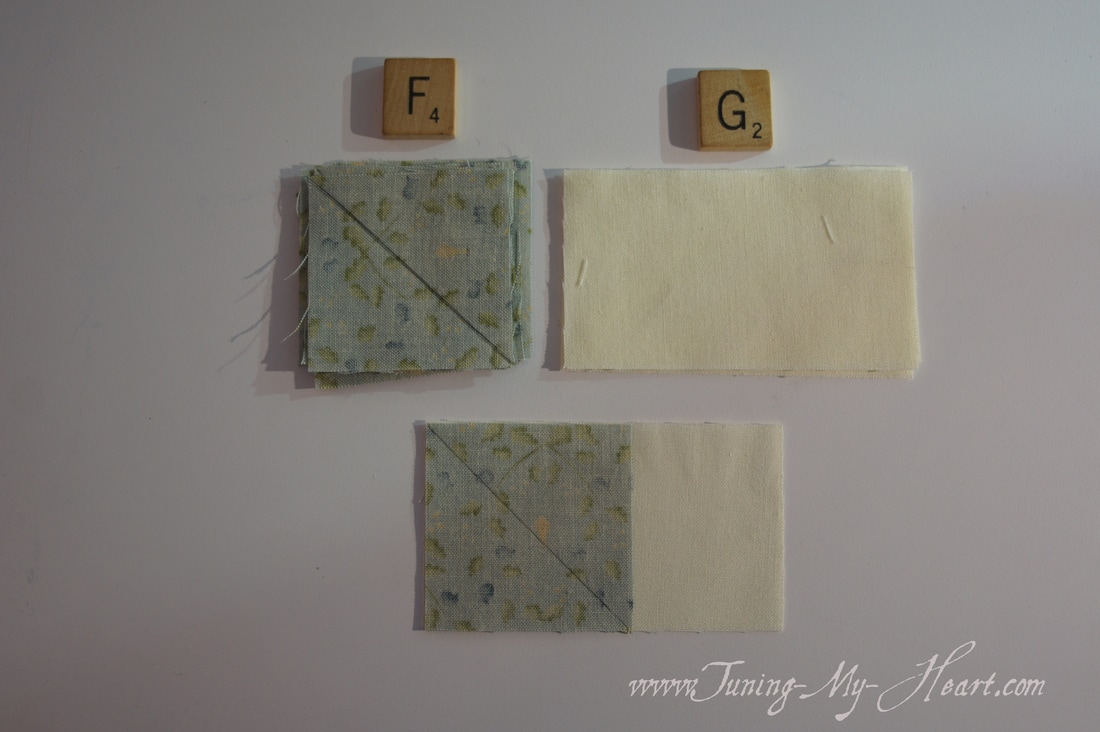 These will measure 2" x 3 1/2" when done. 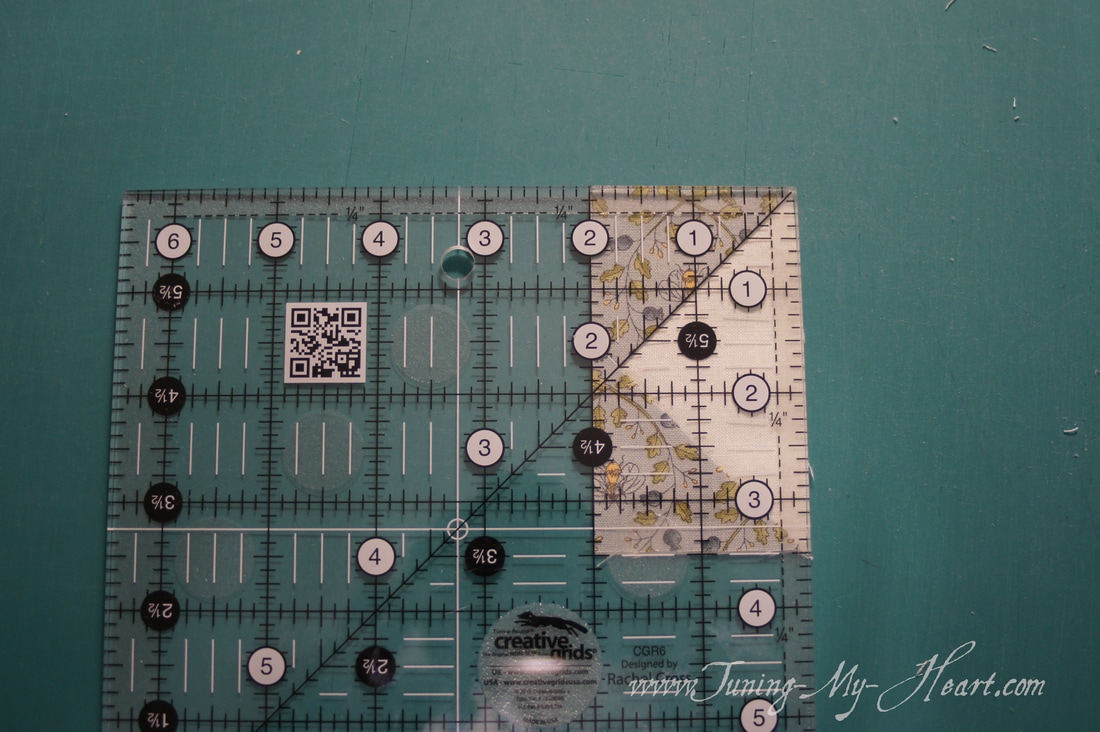 Back to the tiny pieces to make the center section of this block. Here the leftover C squares get added. 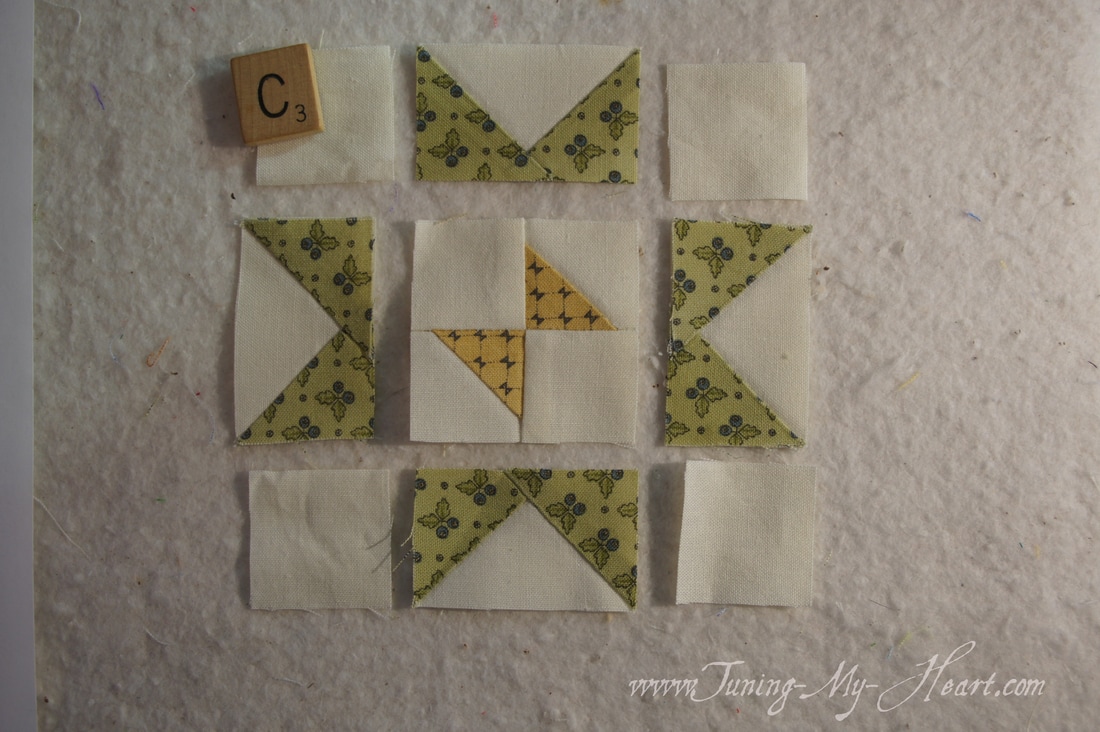 I am sewing slowly today for accuracy sake. I sew the rows together first, pressing the seams on the top and bottom rows towards the center and the middle row towards the outside. 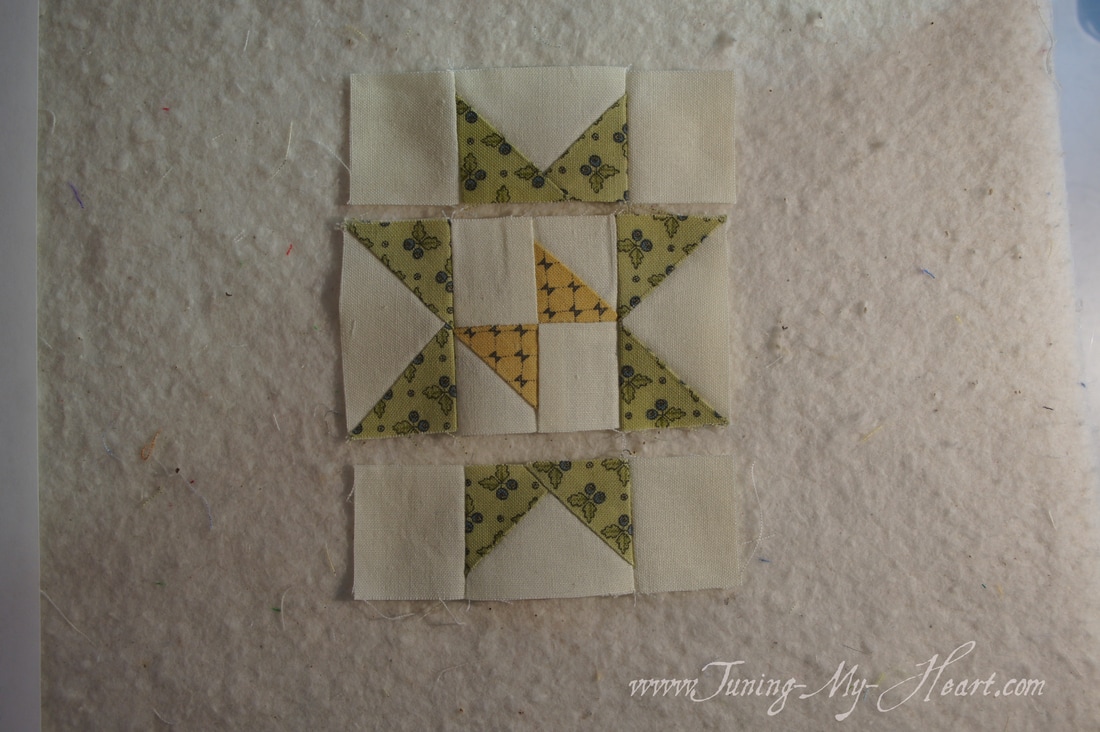 Pinning at the seams I slowly stitch the rows together and am pressing these seams open. 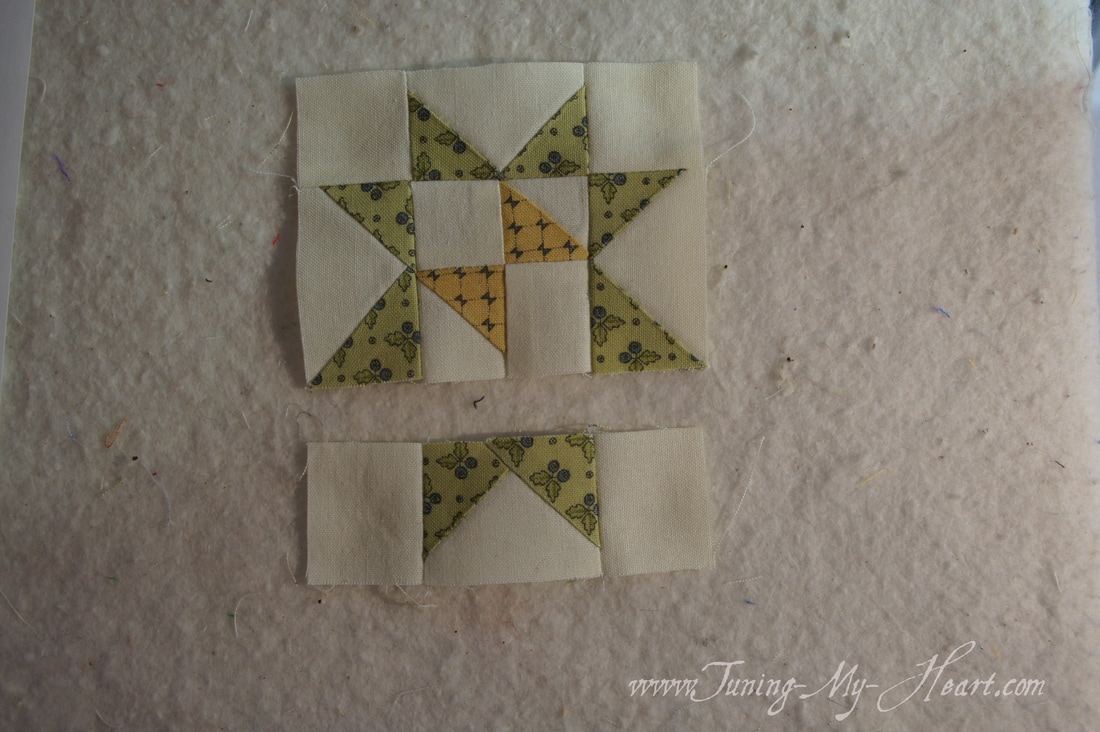 I had to trim just a bit to get my center block to measure 3 1/2" x 3 1/2." 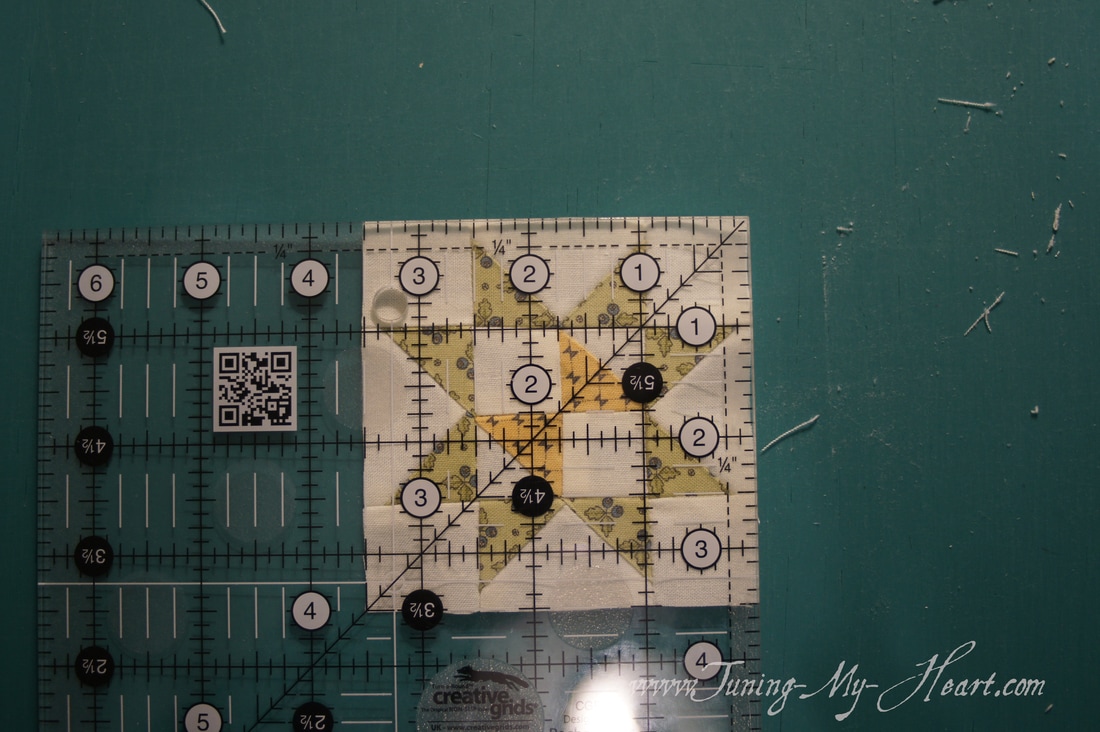 Time to put this baby all together. It is so easy to place one of the butterflies in the wrong direction. I caught this one before I sewed the rows together. Oh, how I wish that happened every time! (Bottom left) 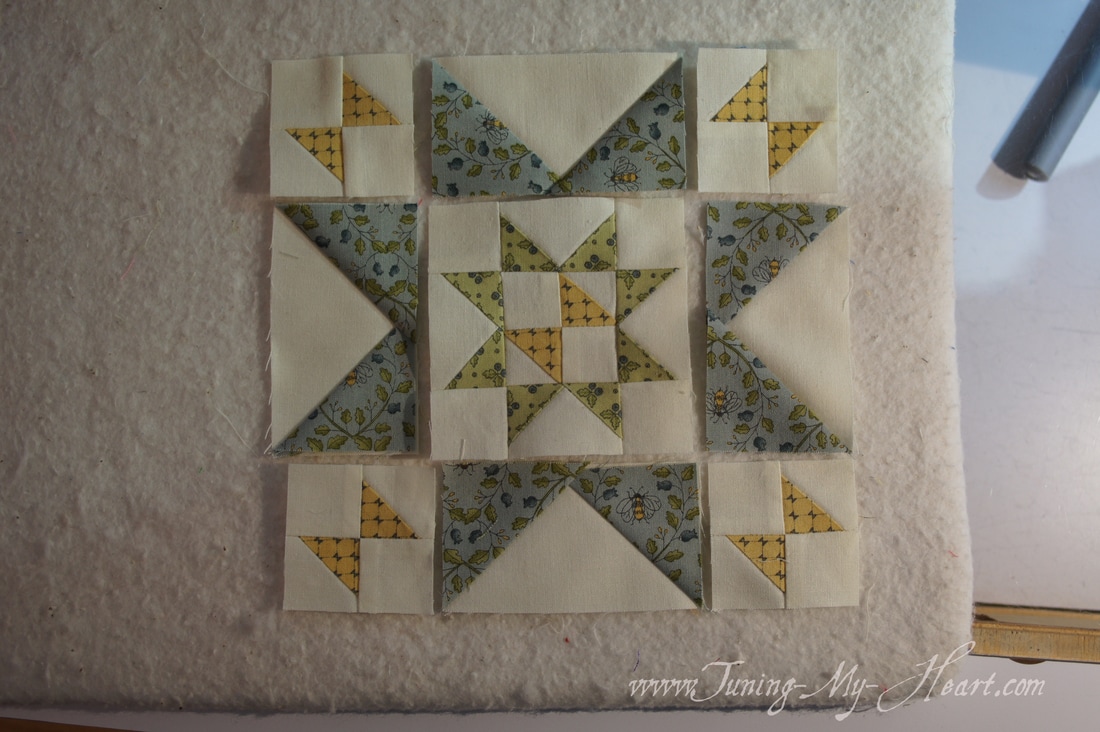 Once again I pressed my top and bottom row towards the center and the middle row towards the outside. The pieces just seemed to lay better that way. I was having a discussion the other day about dealing with bulky seams and learned that some quilters take a hammer to them. I might have to give that a try one of these days and see how it goes. I can just see myself knocking them into submission. Lol.  Blocks 1, 2, 3, and 5 are done and I am feeling very accomplished. 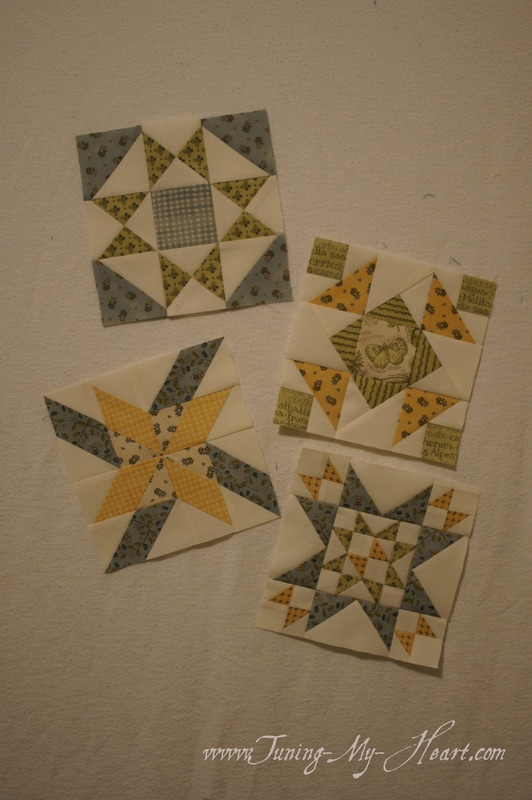 Block 5 is a bit challenging but taking it slowly one step at a time sure helps. Now I can take a break and enjoy looking at all the finished blocks on the Moda Blockheads Facebook page until next Wednesday. Whew. Until then... Happy Quilting!!  Block 3 is brought to us by Jo Morton. Her directions for this block are linked here: http://jomortonquilts.com/2017/03/22/moda-blockheads-week-3-block-3/ I fell in love with this block as soon as I saw it-I am a bit partial to stars having worked with an astronomy program for a few years. I was busy with other projects and a little late to get started on these Moda Blockhead blocks. They are a fun 6" finished size which can be a bit challenging at times, but the result is pretty cute. Here are my pieces all cut out and ready to go-and starched using Faultless Heavy Starch. If you have not tried starching your fabrics yet you really should. I use to ignore this step, but it truly has had the biggest impact on improving my piecing. 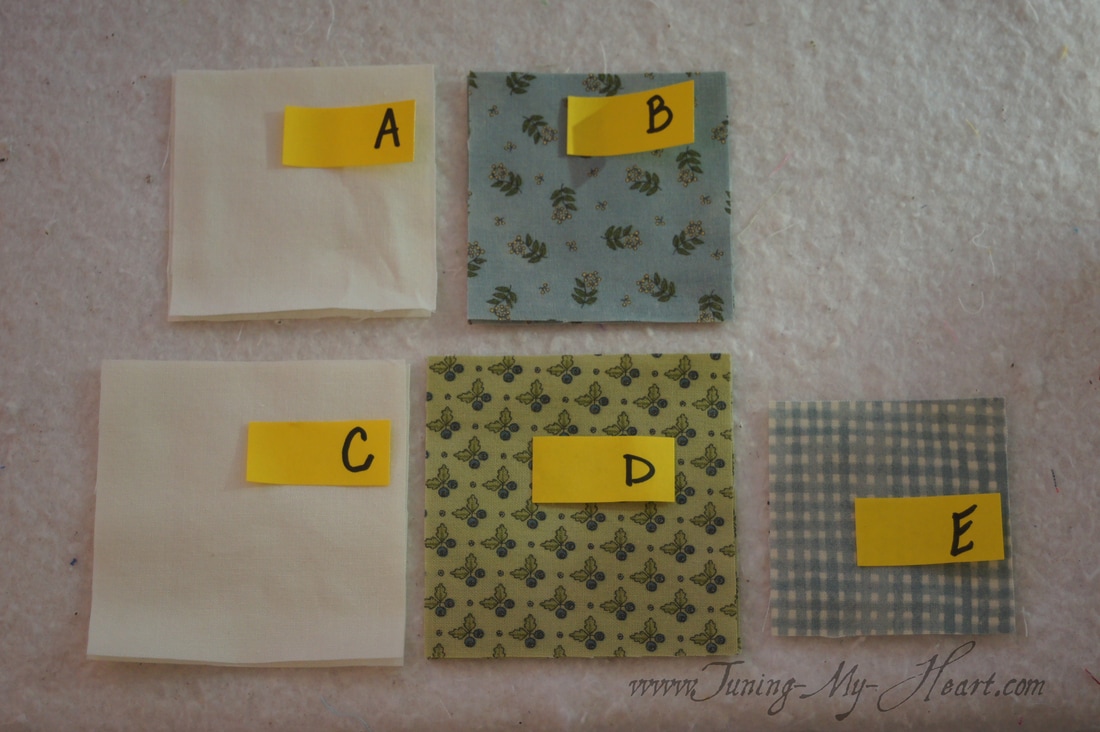 For some reason my photo program chopped off half of this one- those are my B pieces also. I start by drawing a diagonal line on the back of the A squares. 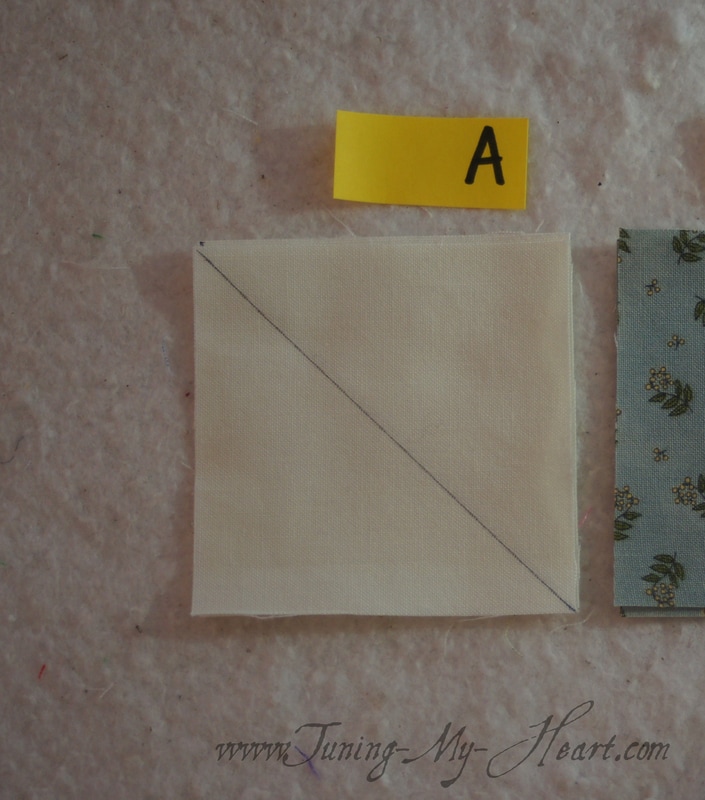 With that diagonal line as a guide and using a quarter inch seam I stitch down both sides of the line. I am using a "scant" quarter inch as I would rather trim a bit than have a block that is too small. 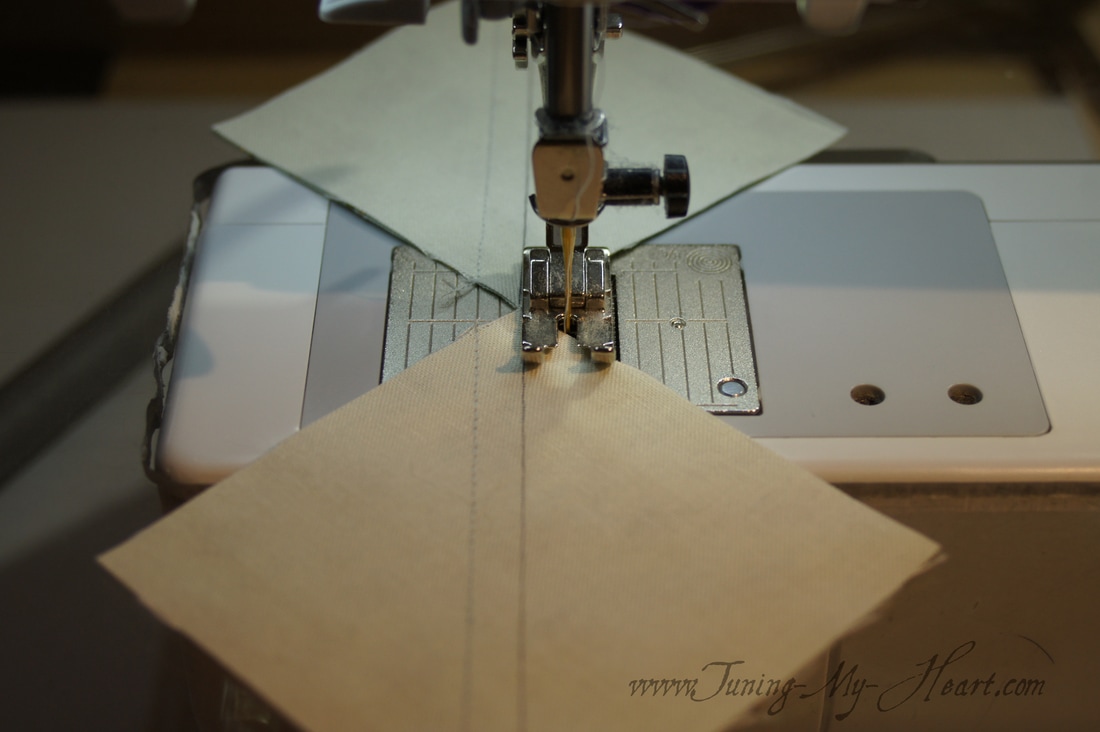 Using a ruler and rotary cutter I cut right on the diagonal line that I drew. After pressing I line up the diagonal line on my ruler and trim off those points and square up the block if needed. This one looks good and is the right size at 2 1/2 inches.
Now I repeat that process with my C and D squares. 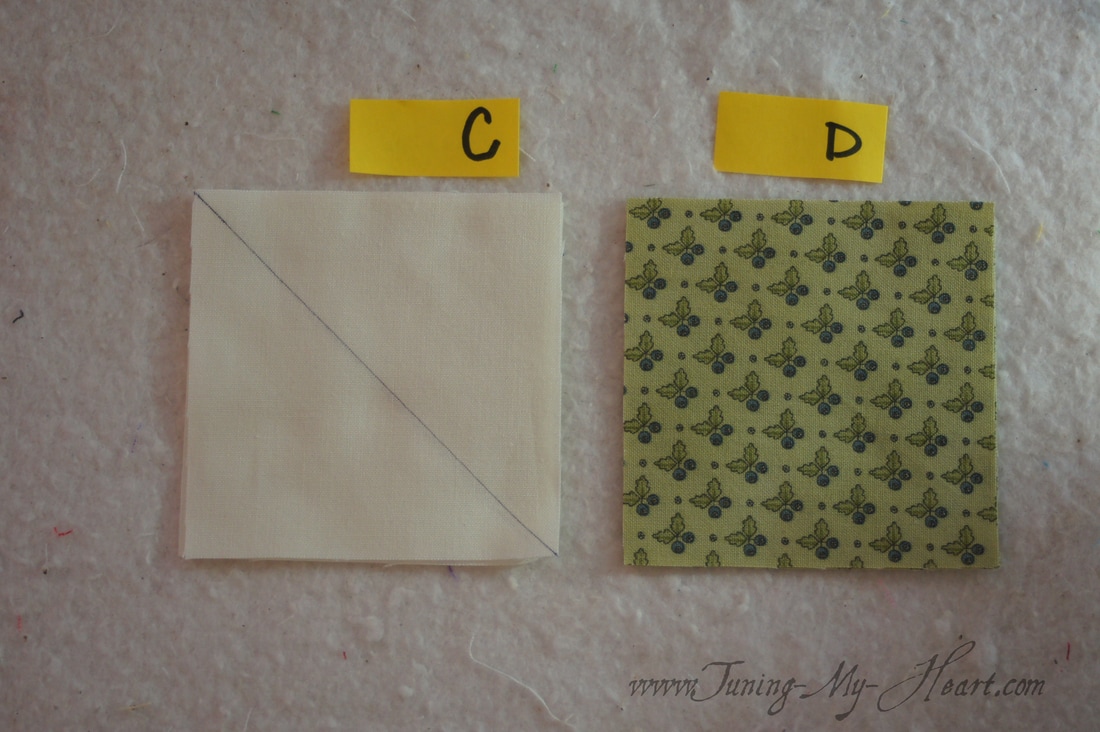 These Half Square Triangles should measure 2 7/8" when done. 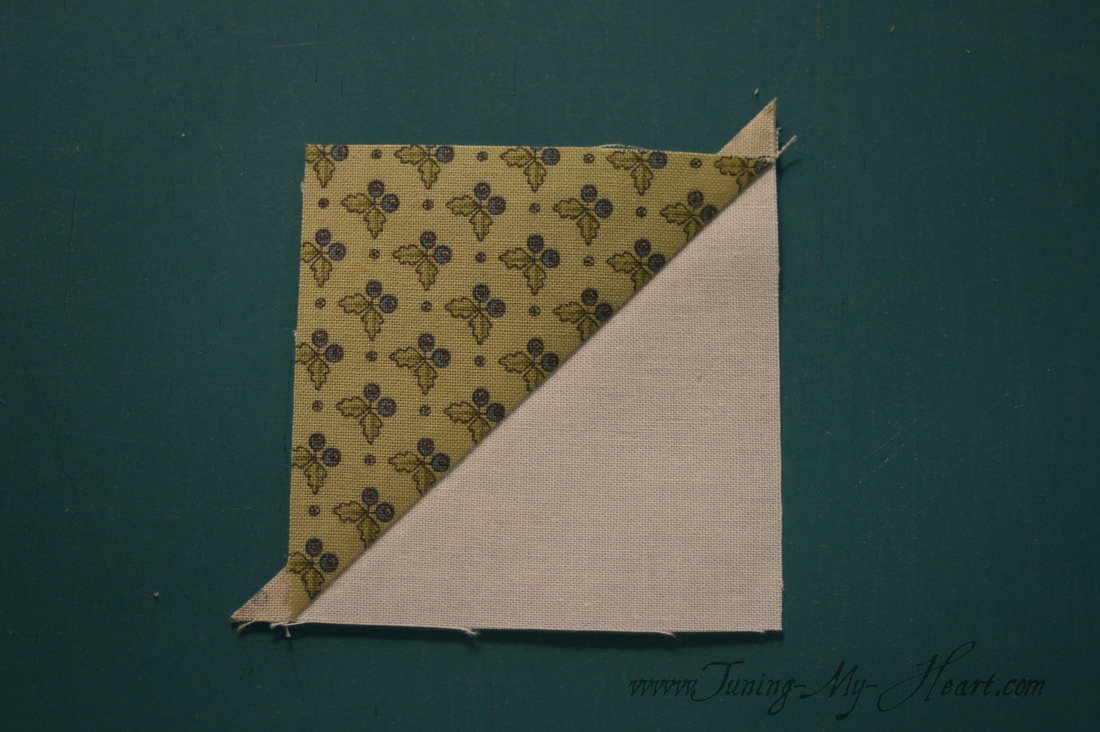 Next I draw a line no the back of these units. 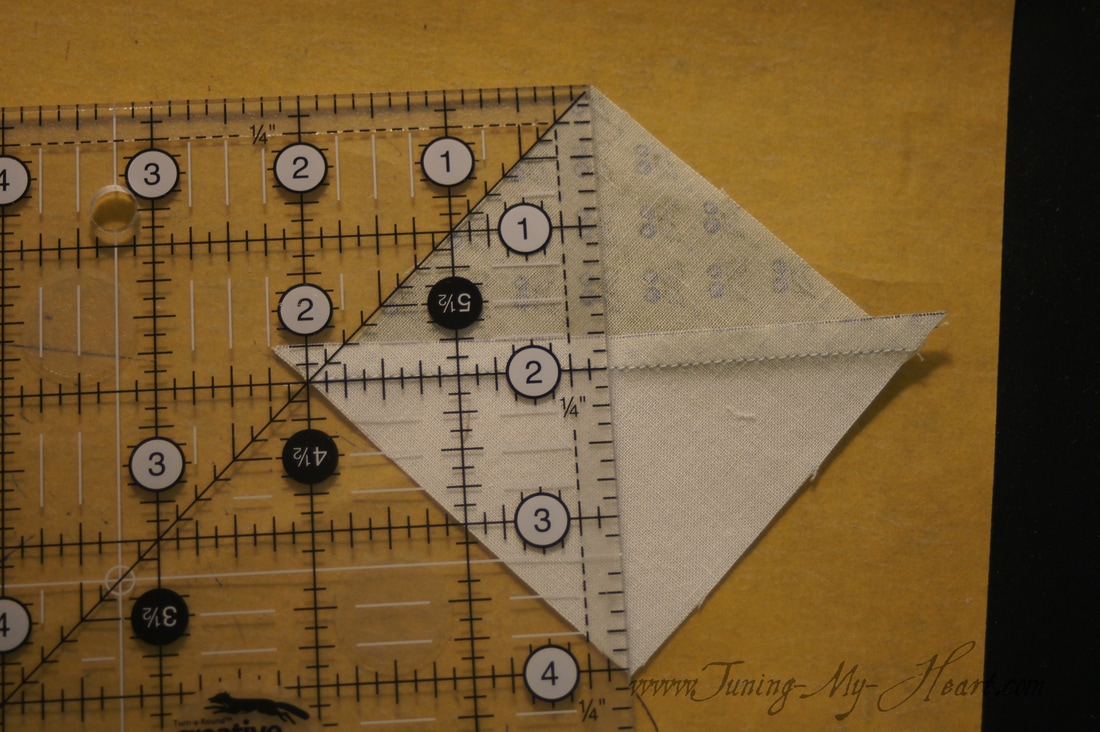 Now I put two of these units together, right sides facing. The seams will "lock" into place nicely. 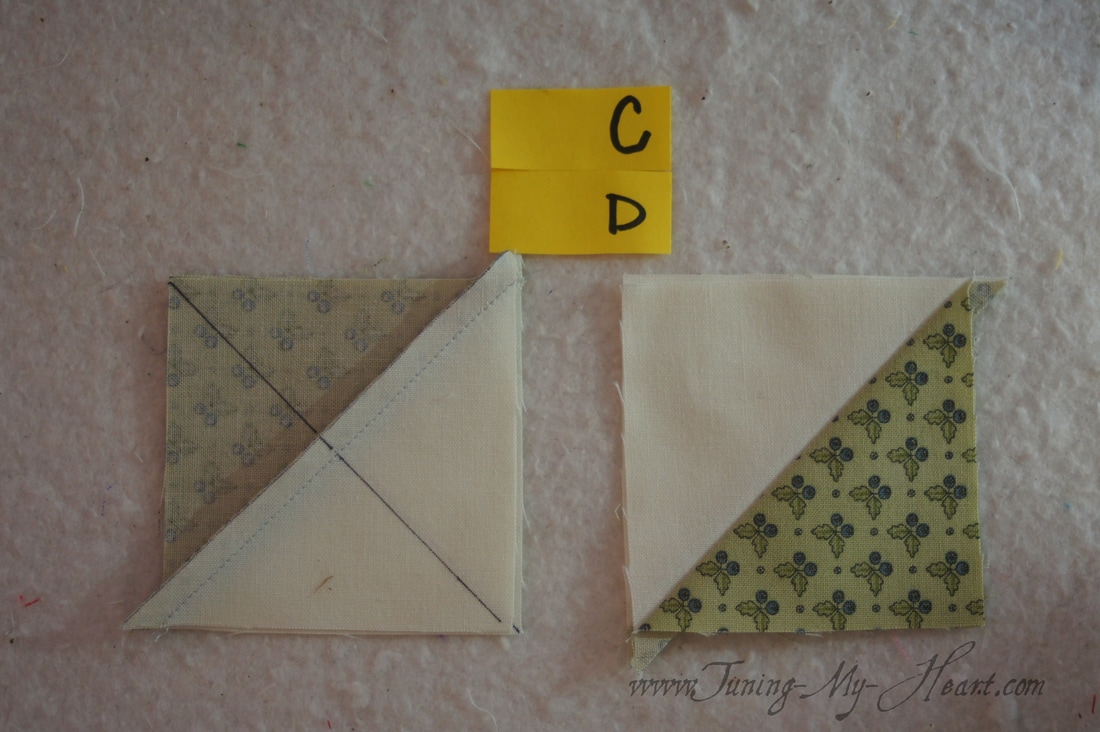 Just like before, I am sewing a scant quarter inch on each side of my drawn line. 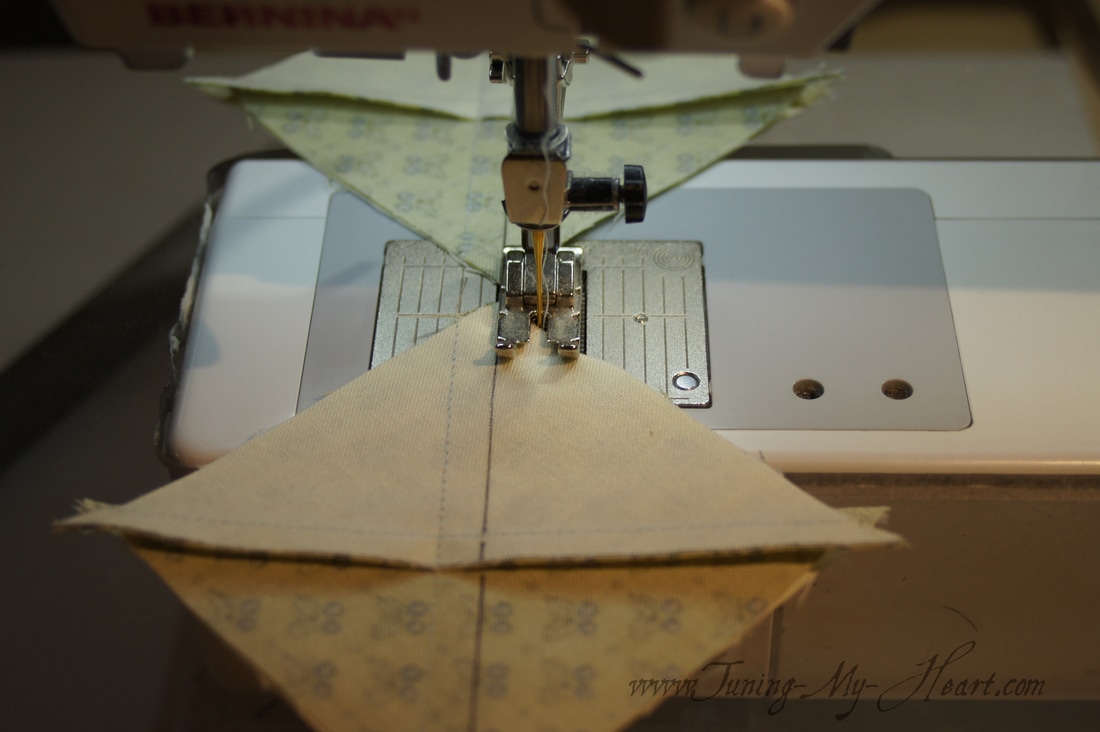 Cut the units apart on my drawn line and I have my first two "X's"
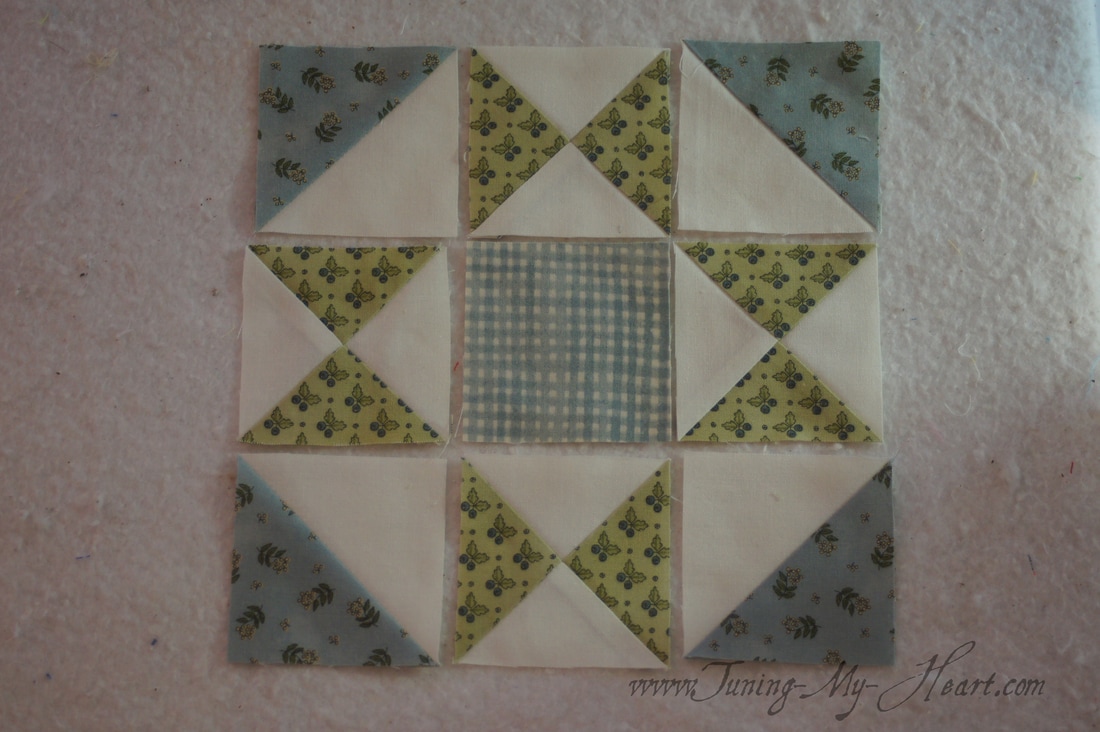
Time to put all of my lovely little bits together and assemble the rows. When pressing these I want the seams in the rows to face opposite directions. I pressed the top and bottom rows to the outside and the middle row towards the center square.
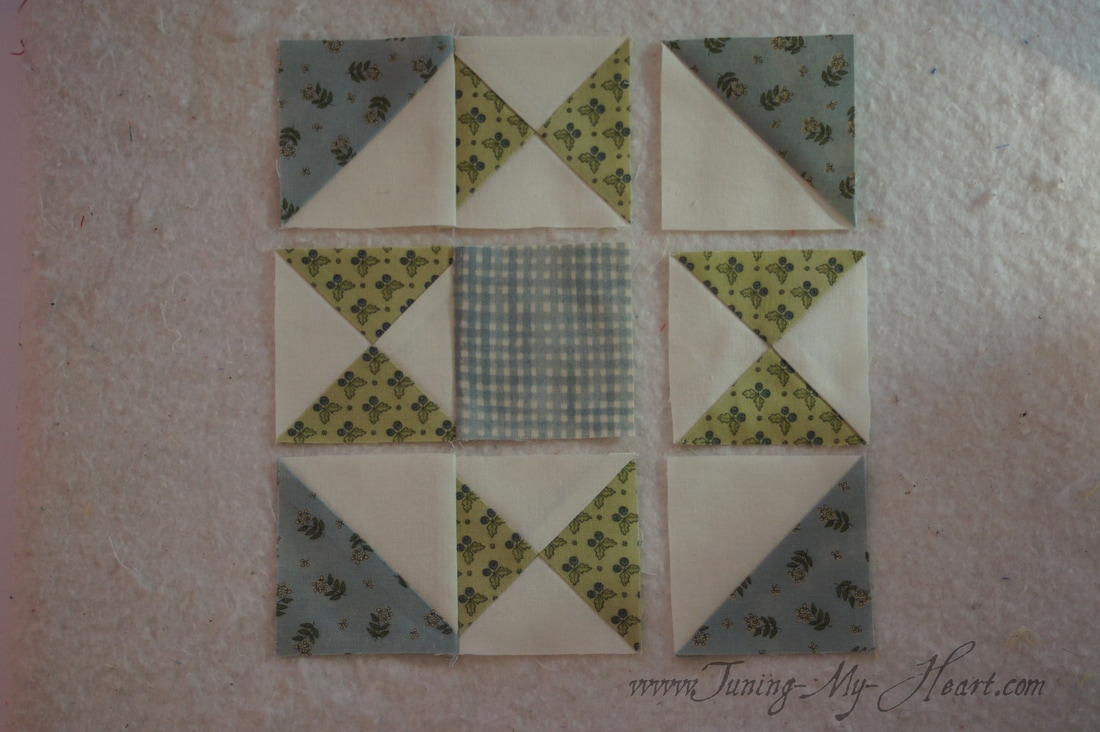
The rows are complete and need to be joined to make the block. 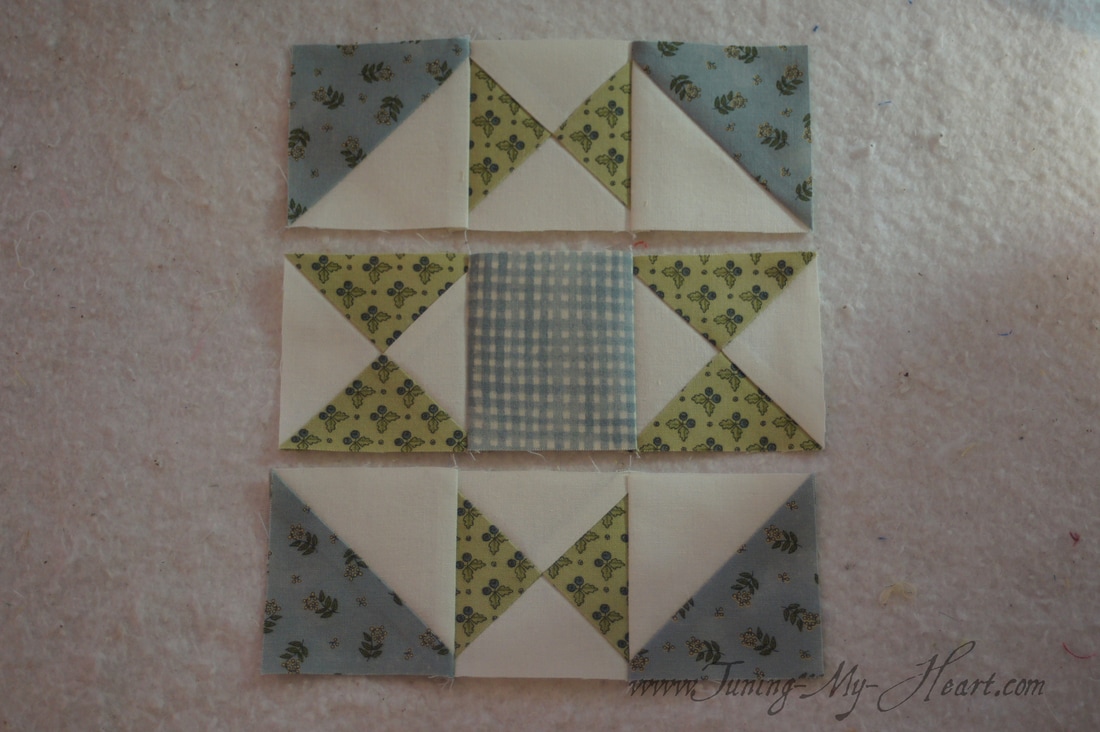 This is where pinning becomes my friend. I place a pin where any seams join. 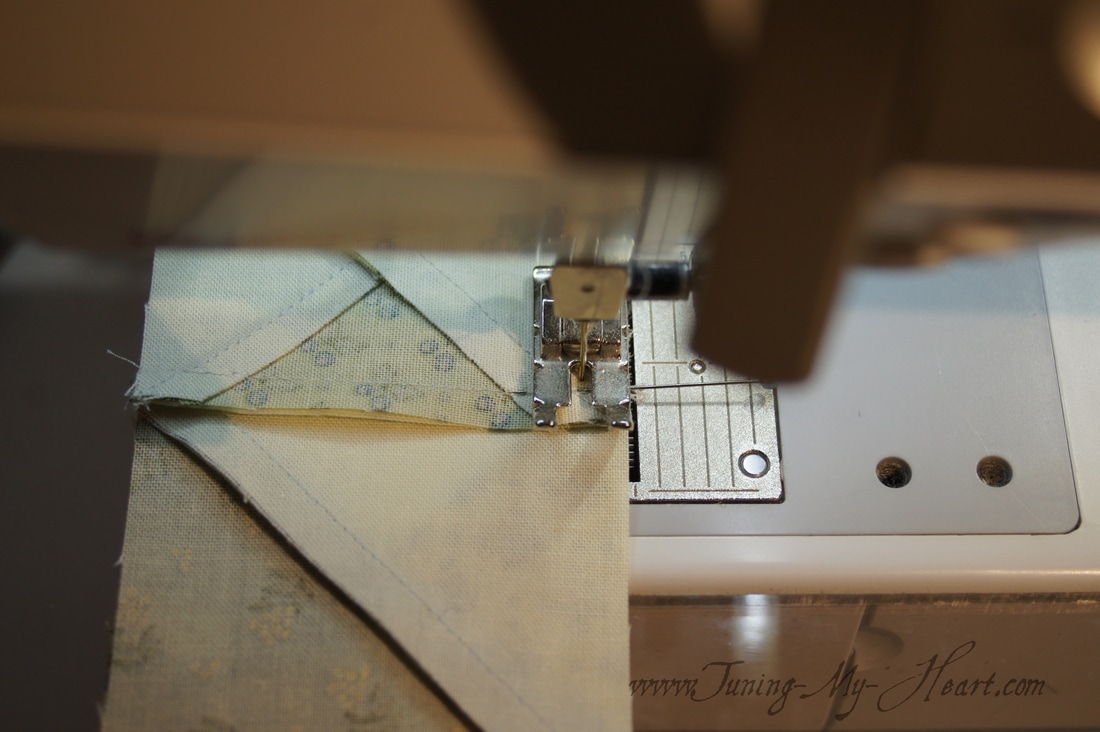 There was some bulk in the middle so I fanned my seams for a flatter block. 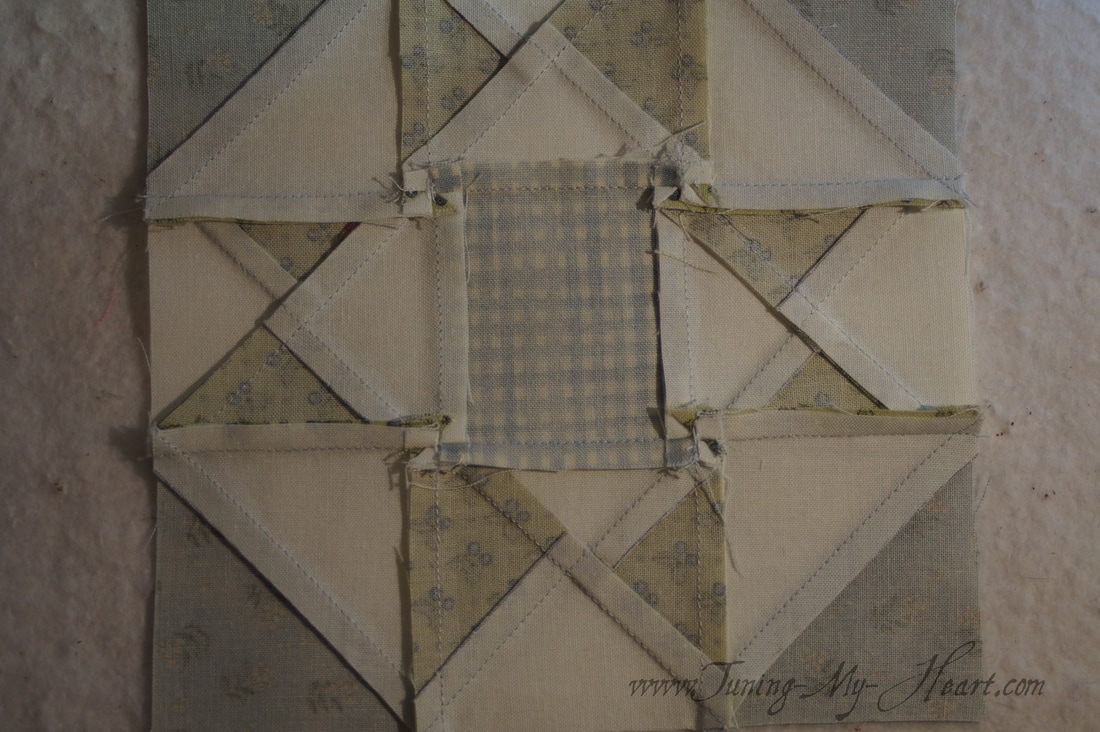 TaDa! Four X is complete and looking marvelous. 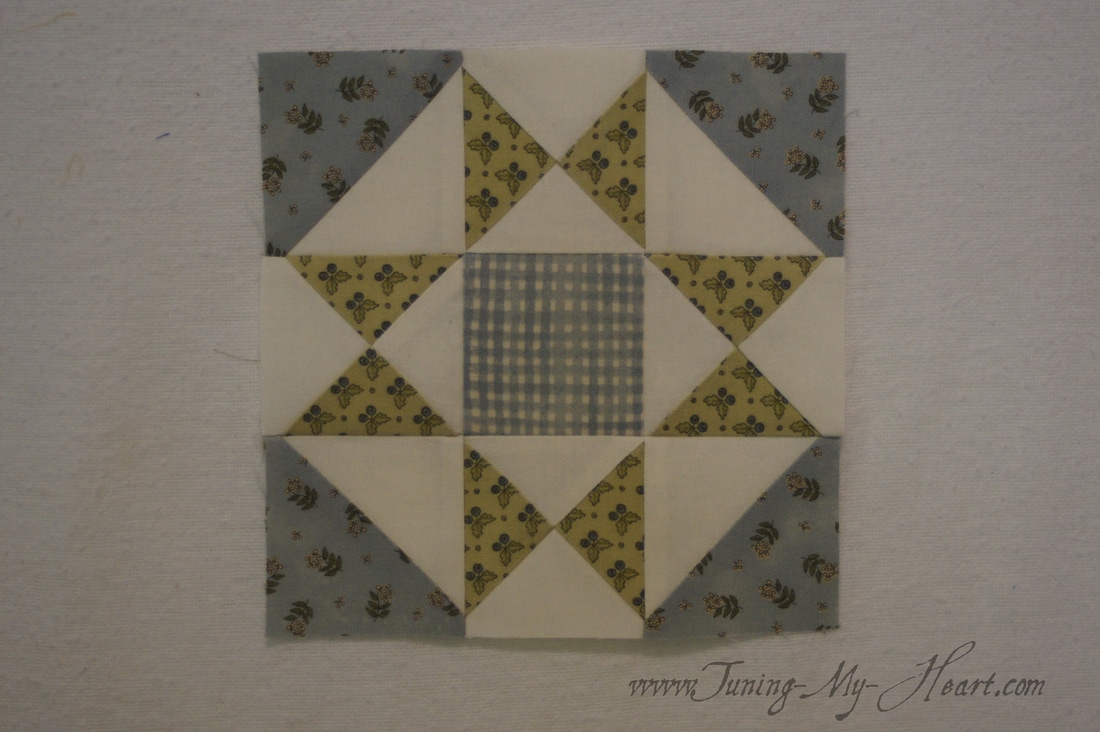 How are you coming along with your Moda Blockhead blocks? I hope you are having as much fun as I am. Until next time... Happy Quilting!!  |

Welcome to the site of Debra Davis-a woman who loves the Lord and loves to quilt.
My other blog where I share about my walk of faith:
Sitting at His Feet 
|


 RSS Feed